Documentation
Nastya Premium PrestaShop Theme
“ Thank you for purchasing our theme. If you have any questions that are beyond the scope of this help file. Thanks so much! ”
1. Installation theme
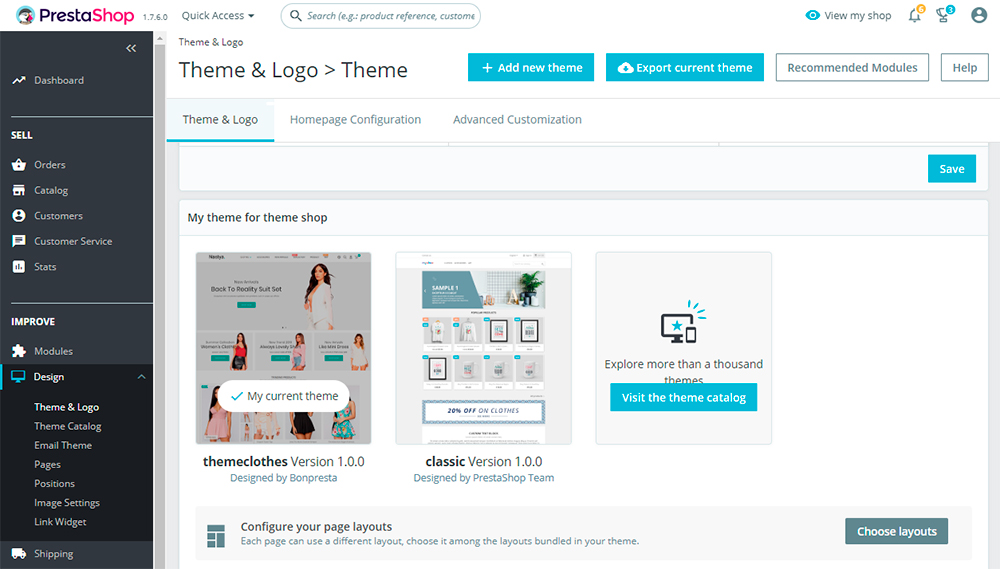
Go to your your Back-Office and open theme section.
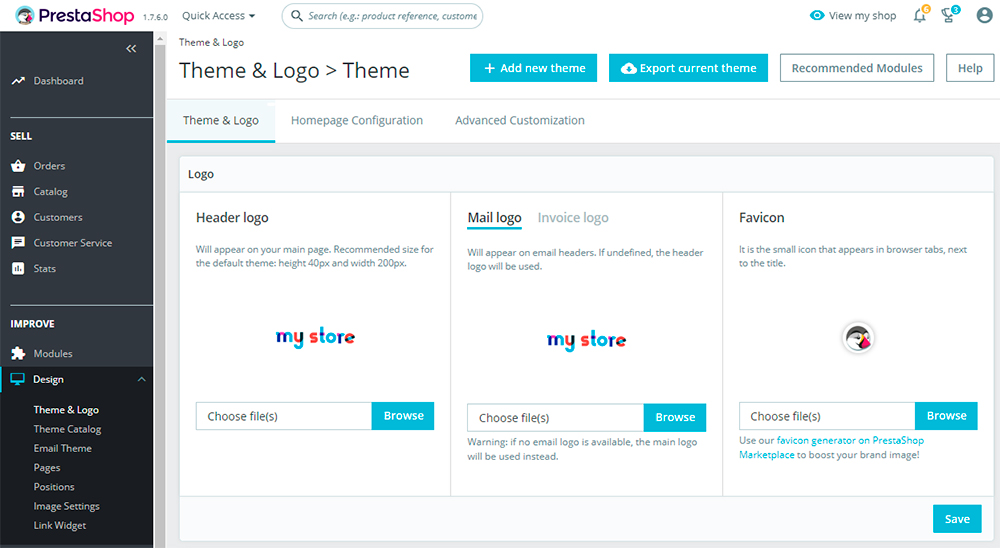
Then click on the button “Add new theme”
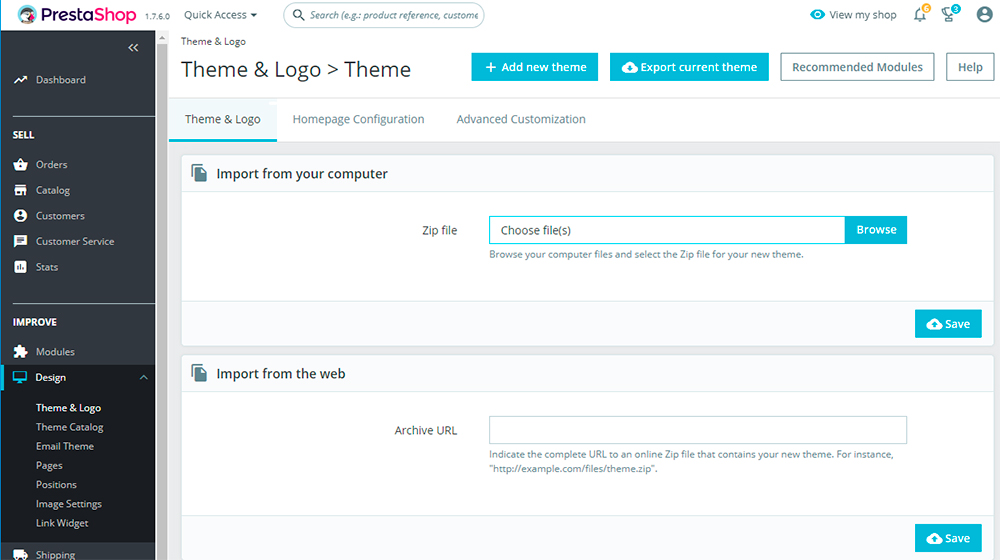
Choose the file on your computer themeinstaller.zip and upload the theme to your shop.
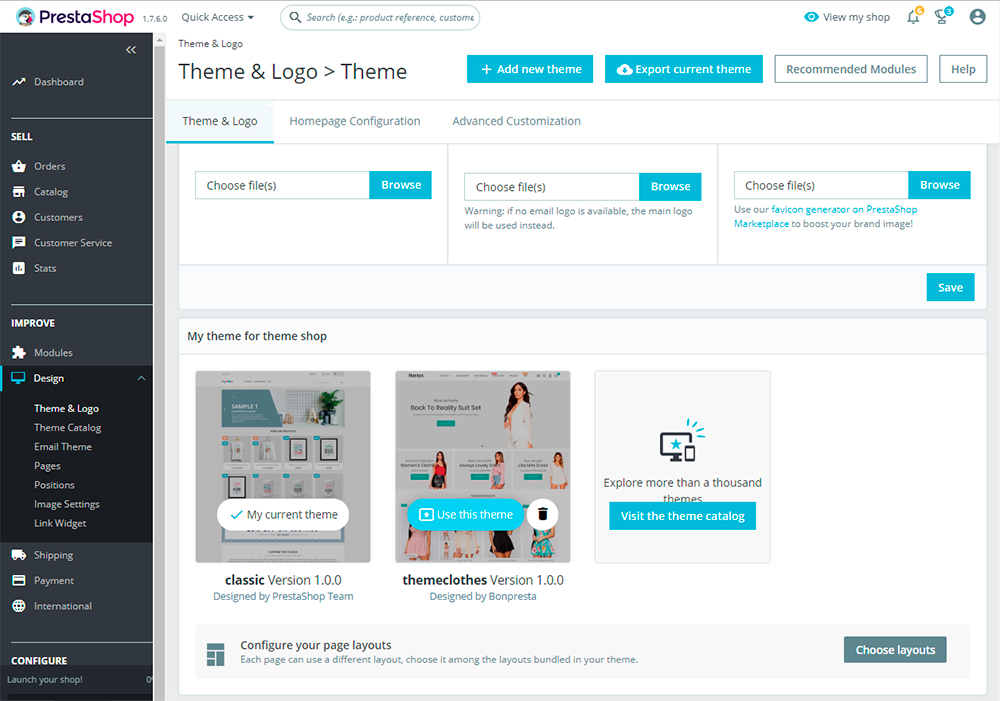
Then click on the button “Use this theme”
2. General Setting
2.1 Image sizes
To resize images go to Backoffice -> Design -> Images settings.
Here are the default sizes of images of Nastya themes
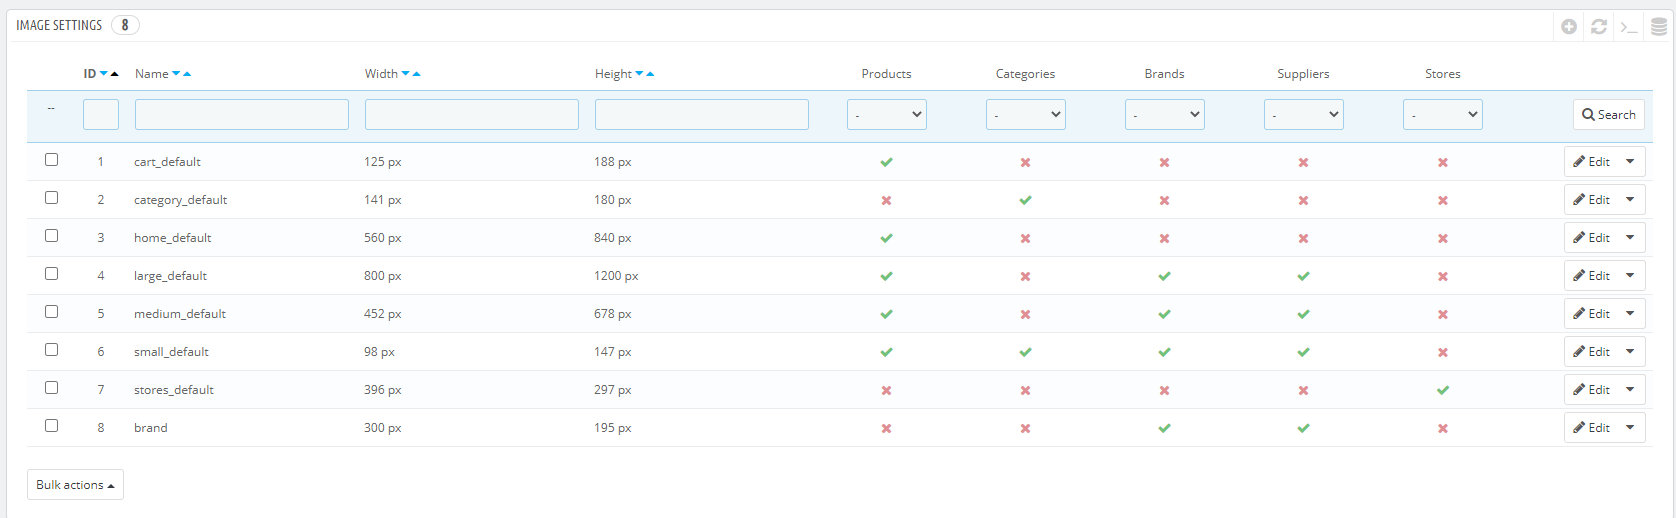
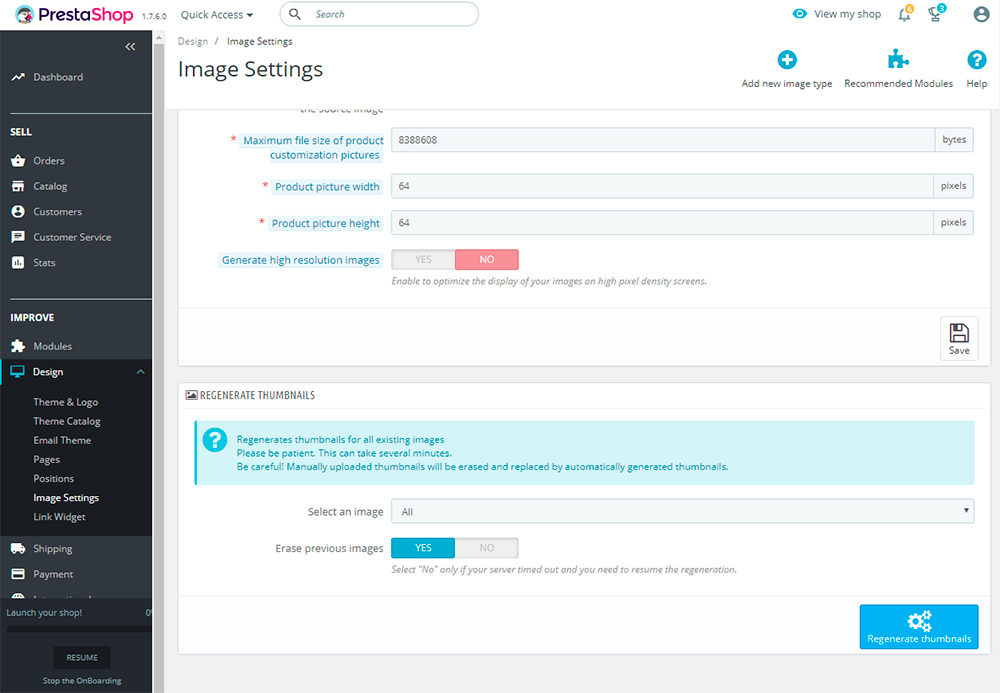
Each image resizing requires regeneration! Go to your your Back-Office and open Images Settings. After installation need regeneration images. Then click on the button “Regenerate thumbnails”
2.2 Translation Theme
An important clarification: translations that are in two "%" signs must be left unchanged, since these are global variables and values are automatically substituted there from the database. For instance:

- Translation Front Office
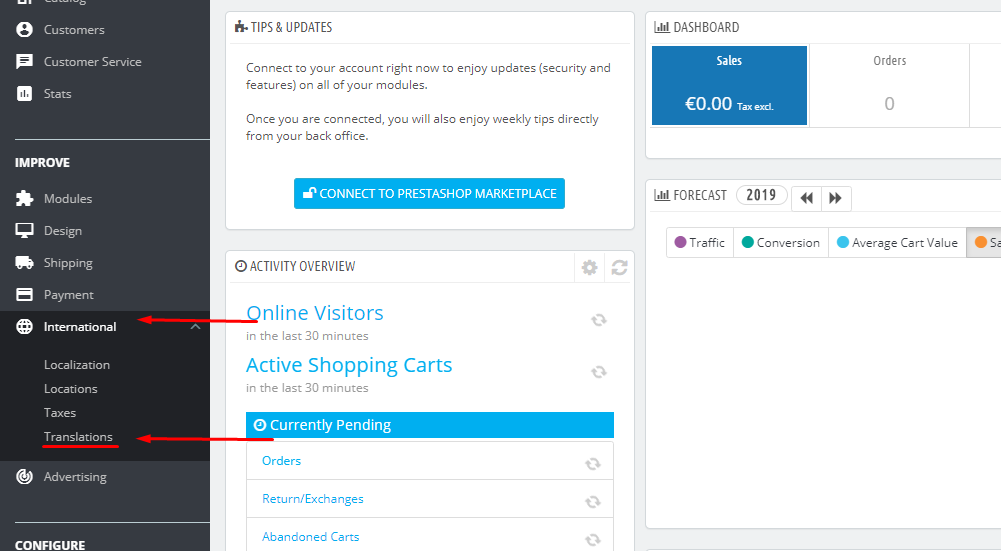
In the admin panel, go to the International section and then to Translations
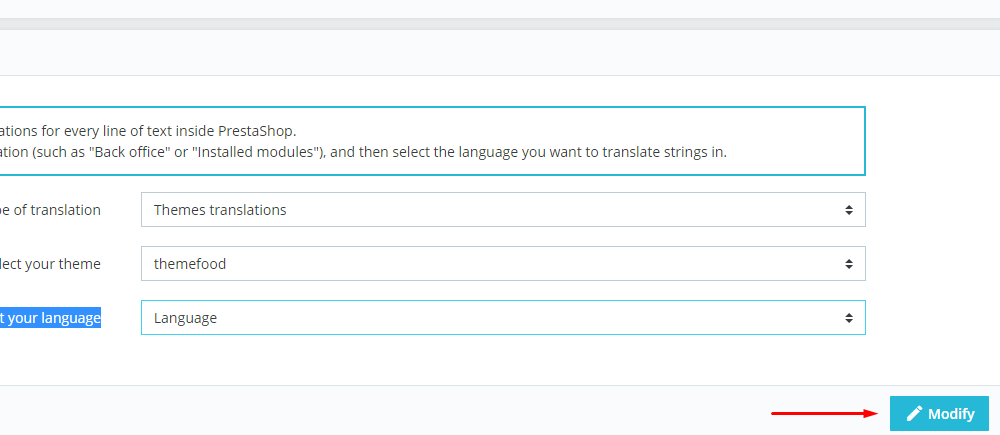
in a new window that opens, in the fields for selecting Type of translation you need to select the option to translate Themes translations
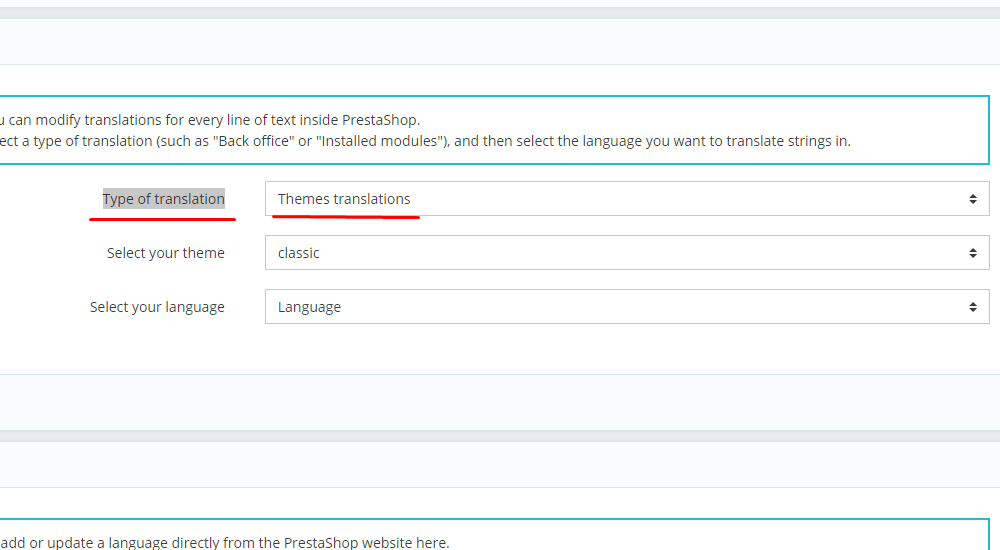
in the field for selecting Select your theme select the name of your theme in the field for selecting Select your language select the language in which you need a translation
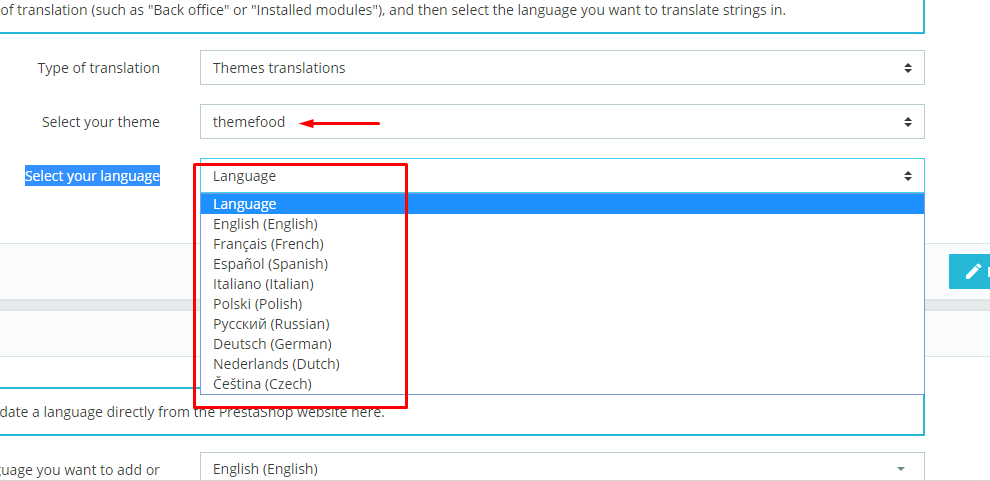
After the above actions, click on the edit button.
in a new window that opens, in the search translations input field, write the word which you are looking for, after we click search! Now you need to write a translation for your site and click save
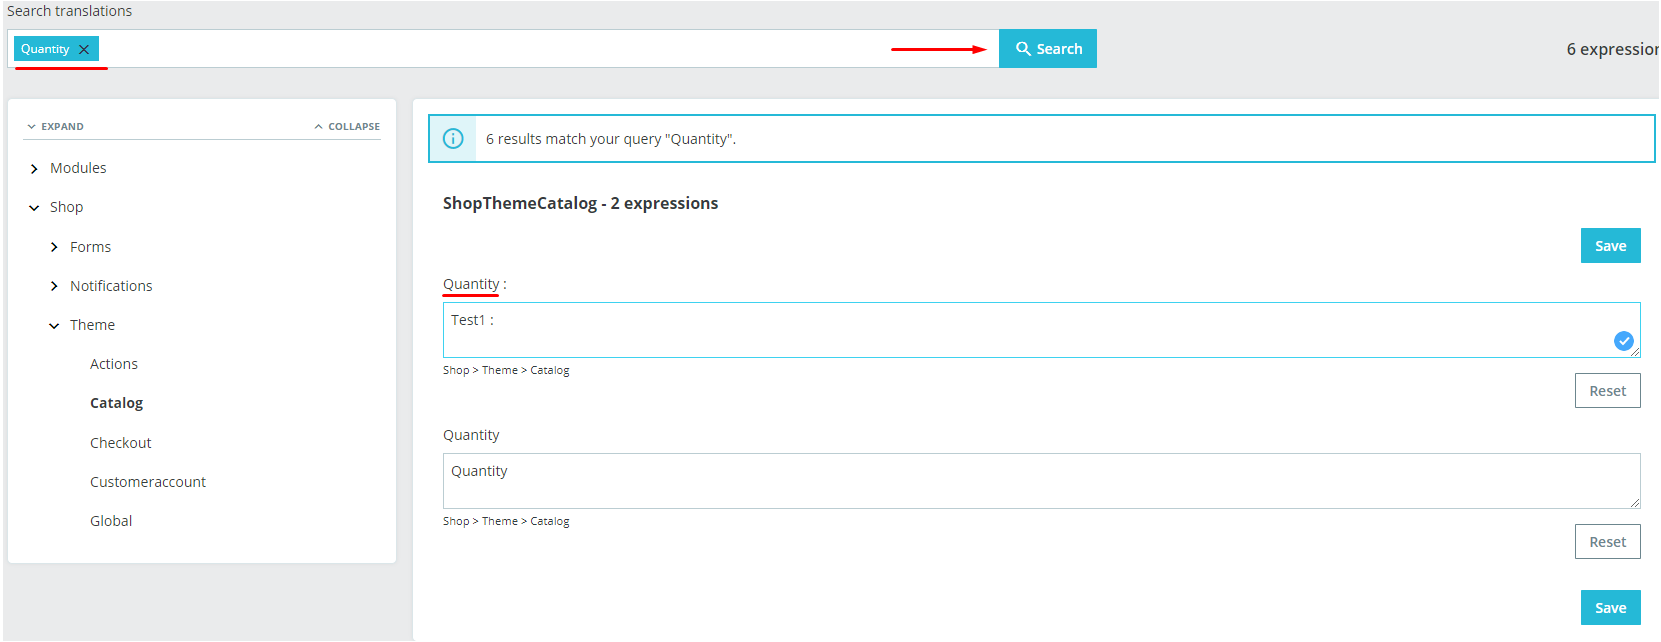
Then go to your website and refresh the page and translation changes are made
You can also read the official Prestashop translation documentation Prestashop translation guide
Here is information for all your needs PrestaShop Translations
2.3 Translation Back Office
In the admin panel, go to the International section and then to Translations
in a new window that opens, in the fields for selecting Type of translation you need to select the option to translate Back office translations
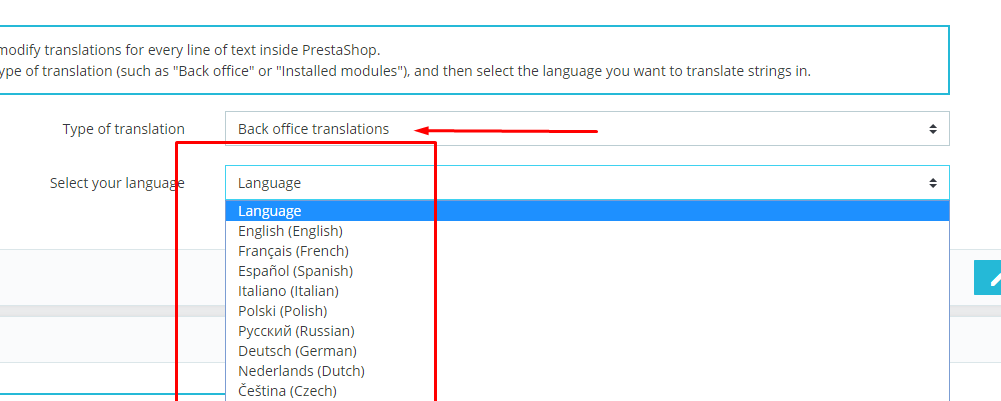
After the above actions, click on the edit button.
in a new window that opens, in the search translations input field, write the word which you are looking for, after we click search!
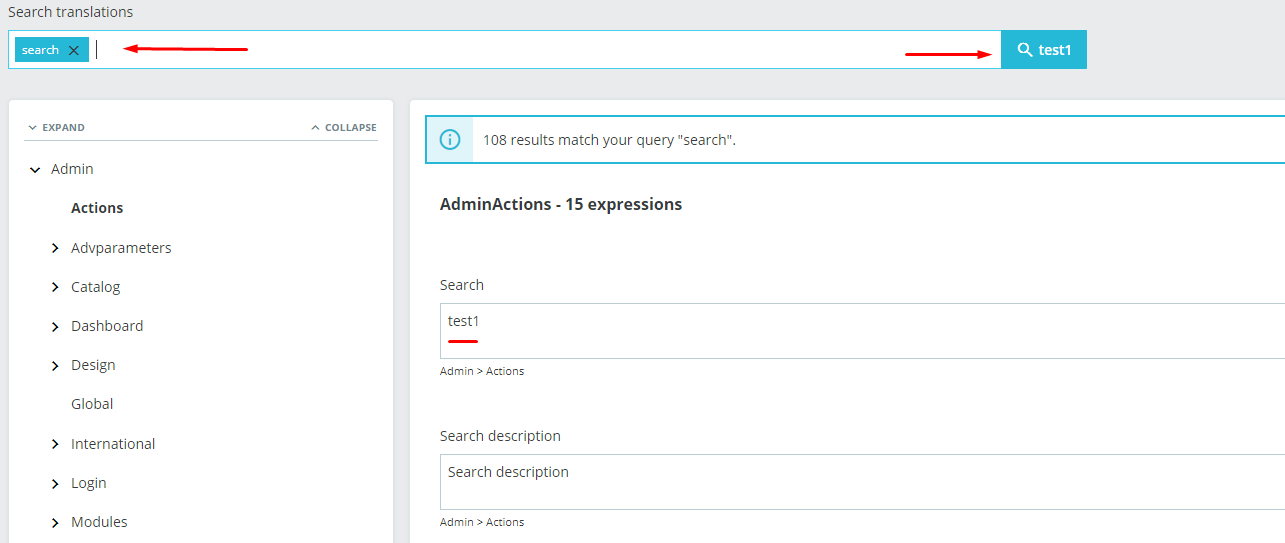
in the text area write your translation! and click save
After refresh the page and change the translation are involved
2.4 Translation Modules
In the admin panel, go to the International section and then to Translations
in a new window that opens, in the fields for selecting Type of translation you need to select the option for translation Installed modules translations
then in the input field Select your module select the module you want to translate
In the input field Select your language, select the language to which you need to transfer the module!
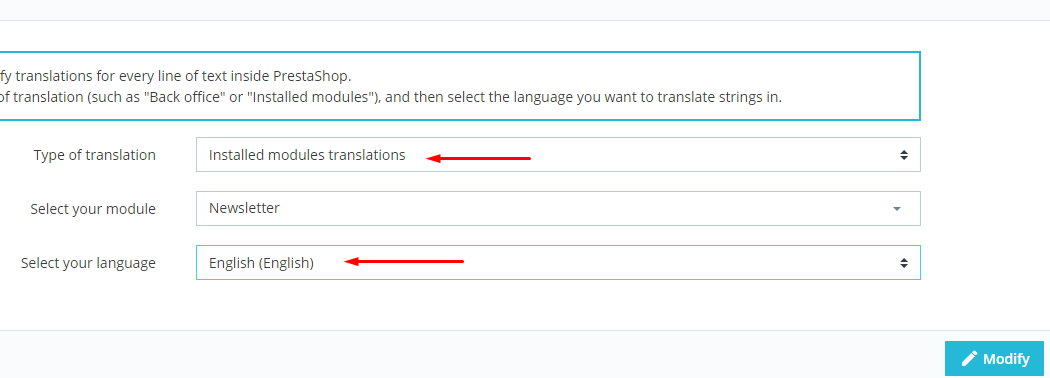
After the above actions, click on the edit button.
For example, take the Newsletter module
In the new window that opens, you see a list of words and phrases that is present in the module
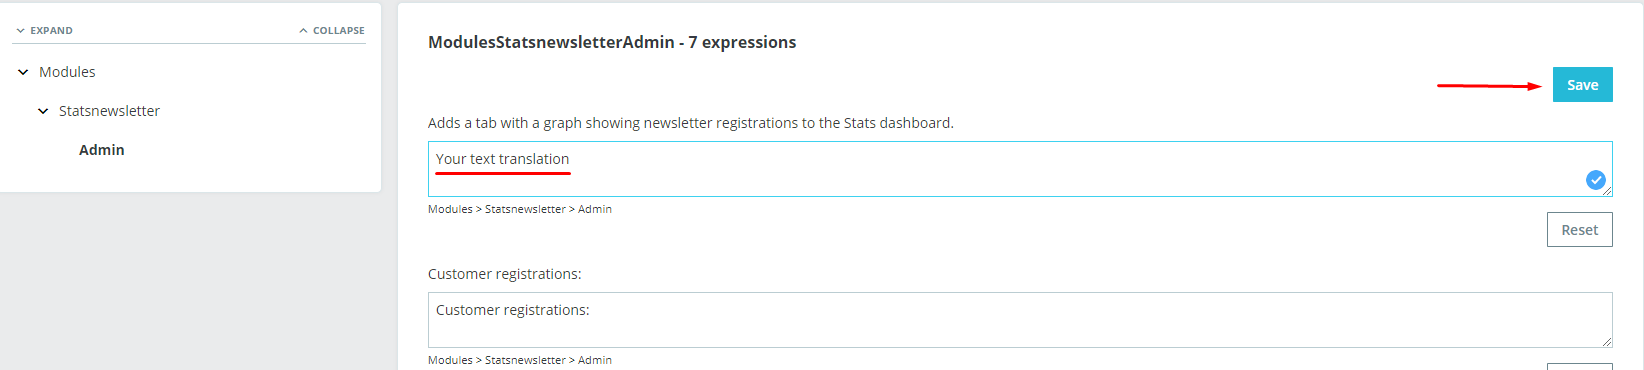
You need to translate into your language and click save
Then go to your website and refresh the page and translation changes are involved
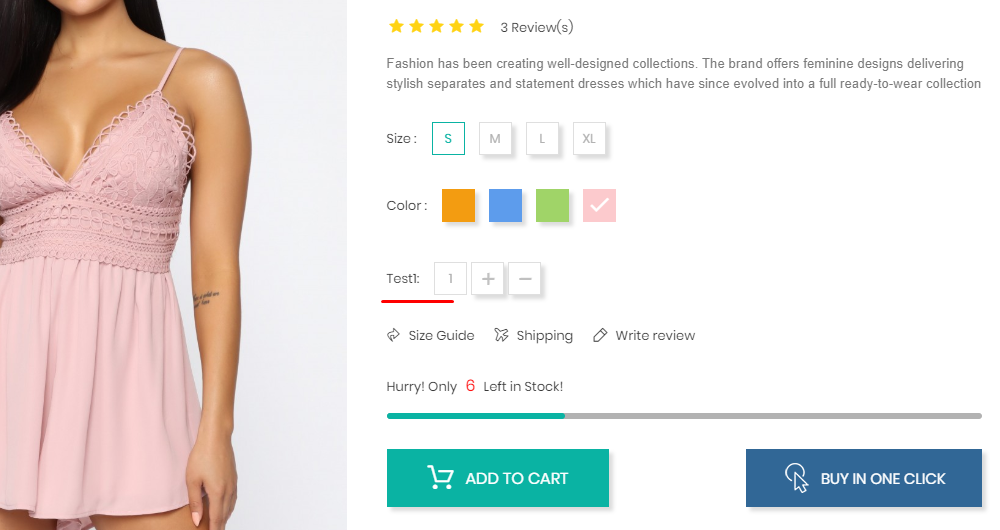
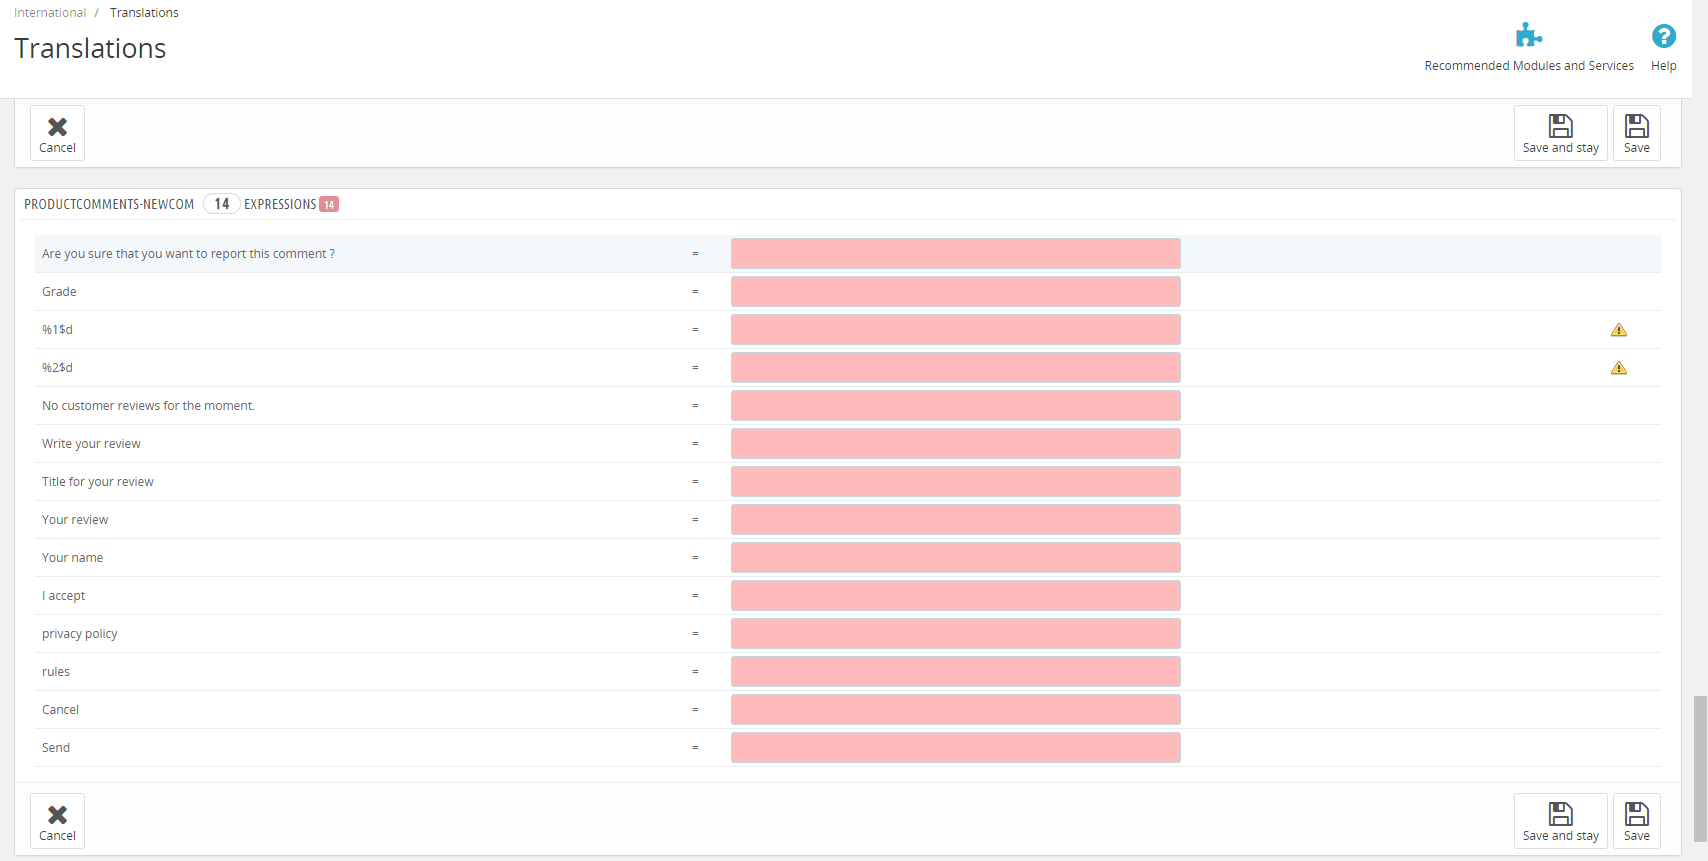
2.4.1 Translation of the "Product Comments" module
The translation process for the "Product Comments" module is slightly different from the translations of other modules.
First, open the "Modules" tab then "Module Manager".
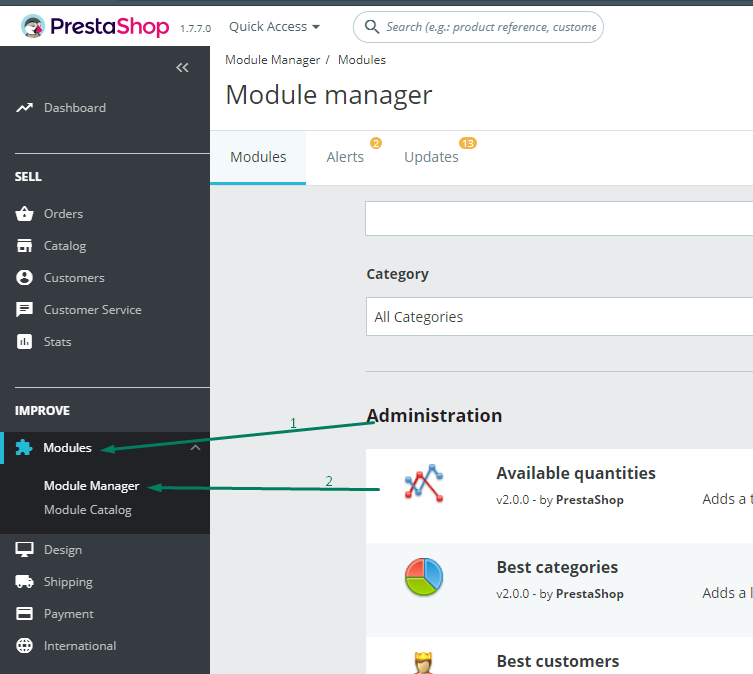
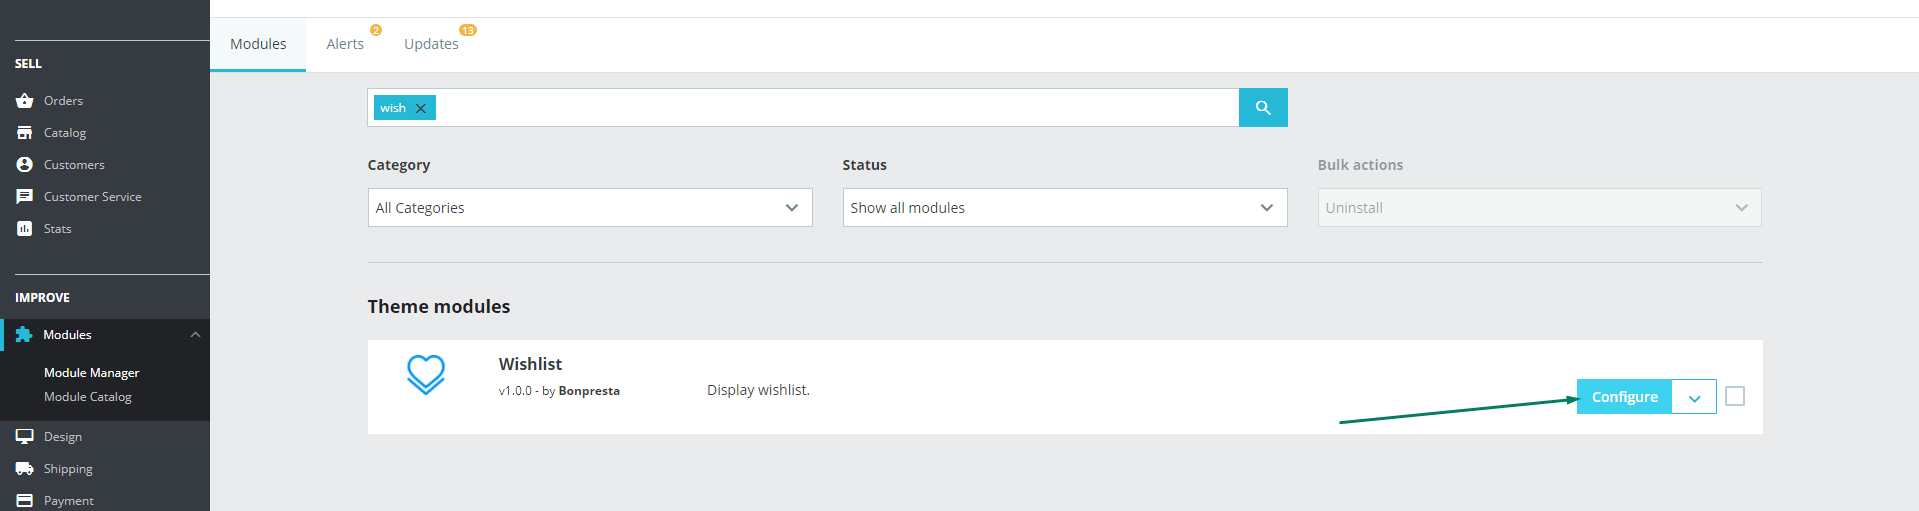
Next, go to the settings of any installed module, in our example this is the "Wishlist" module.
In the module configuration window that opens, click Translate and then select the desired language.
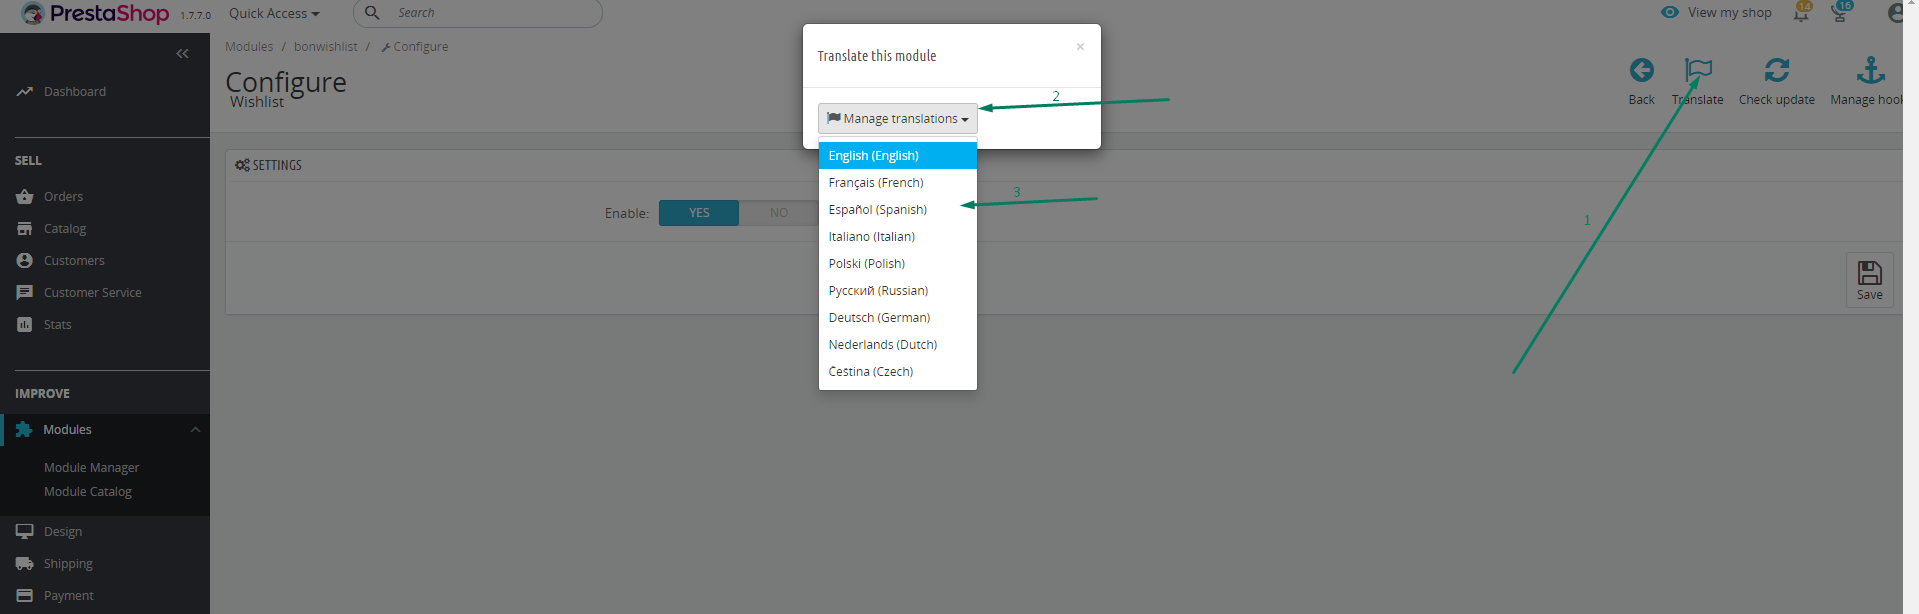
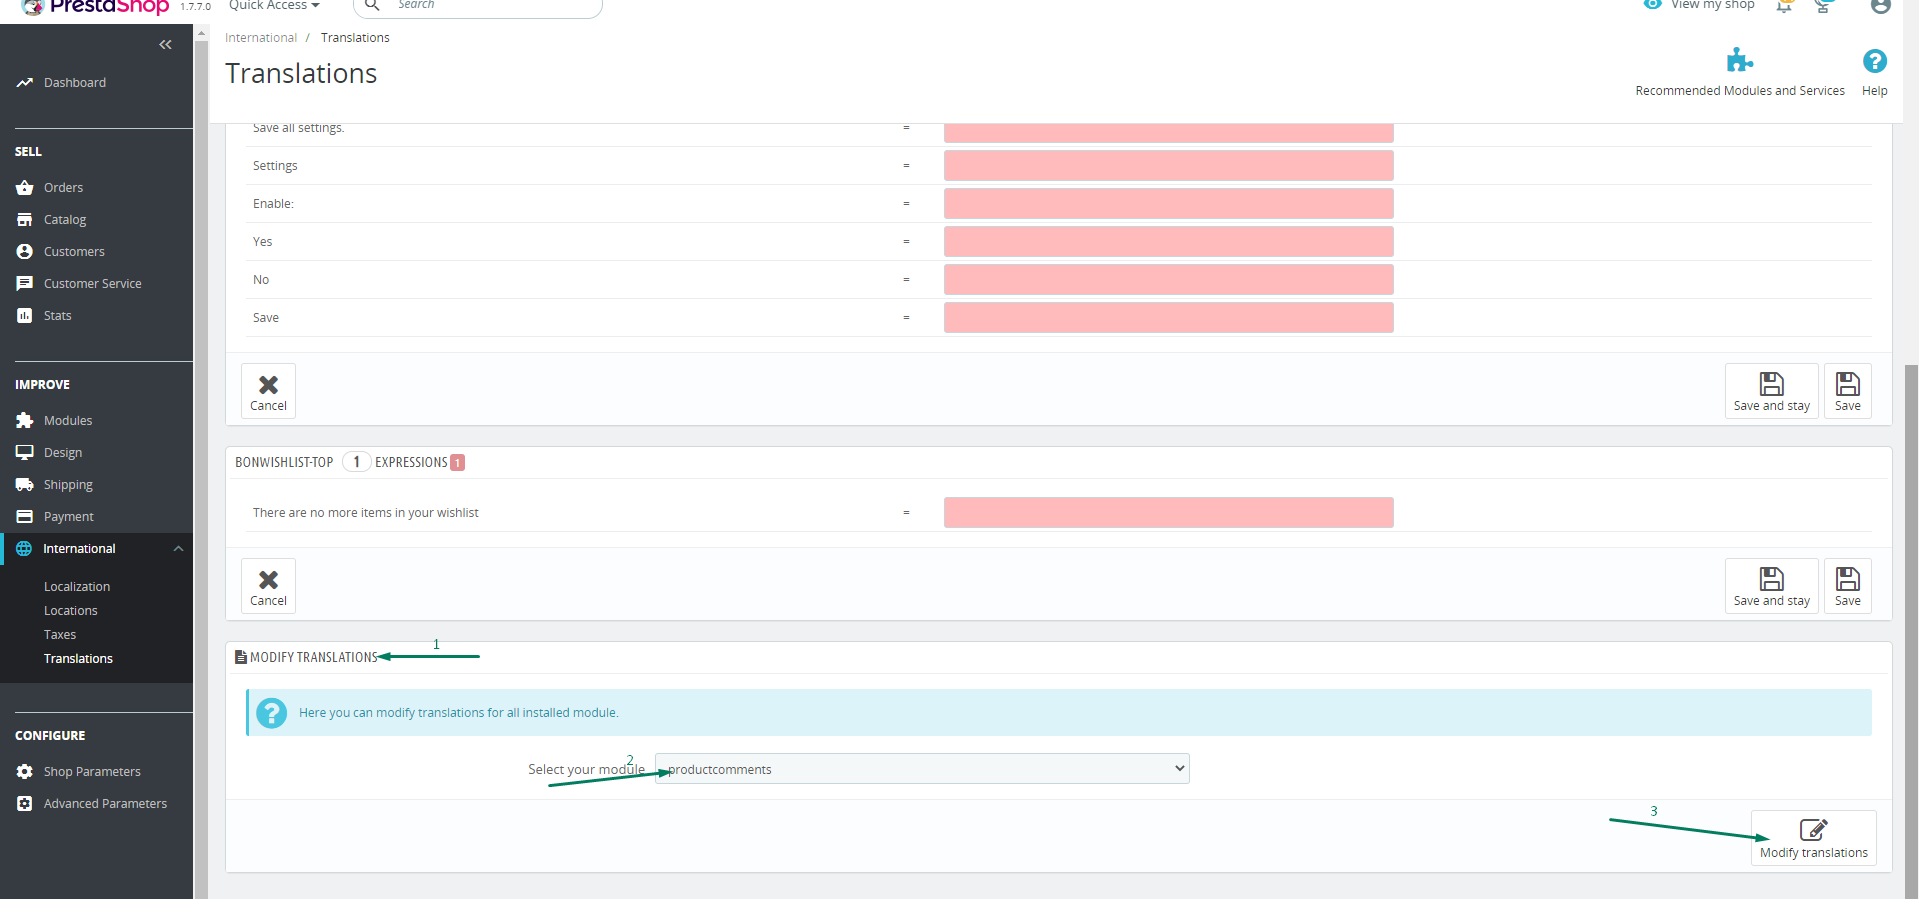
In the appeared translation settings window you need to go down to the very bottom of the page and in the window called "MODIFY TRANSLATIONS" in the "Select your module" field select the module called "productcomments". After that press the button "Modify translations".
If you did everything correctly, you will see the module translation fields.
3. Modules Setting
3.1 Module "Theme Settings"

Go to your your Back-Office and open Theme Settings. Click button "Configure". after that you will see the settings window.
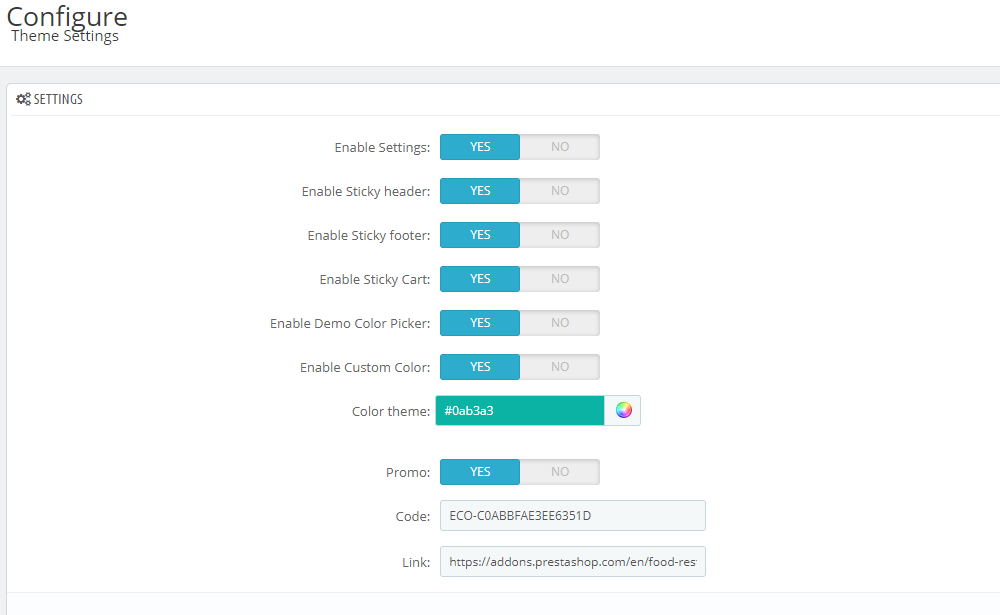
After that you can change the settings by pressing the appropriate buttons
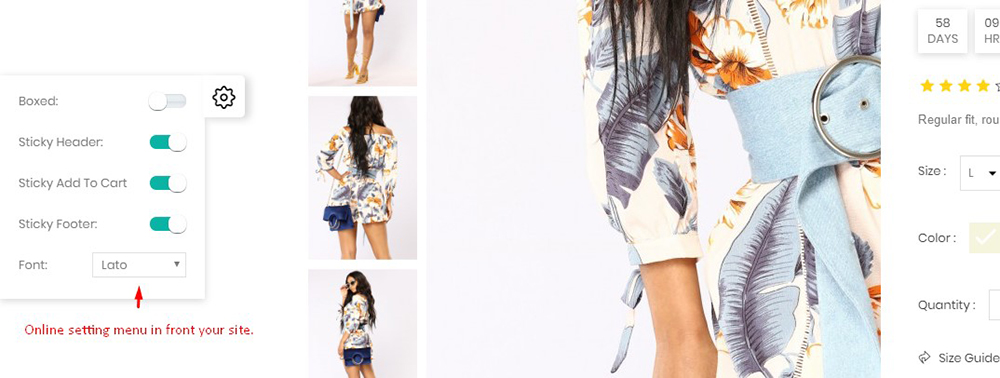
You can change any settings as you need. Like a screenshots. The same menu is on the front of your site if you click the settings button and drag the buttons. In front-settings you can change main font your site.
3.2 Module "Awesome Image Slider"

Go to your your Back-Office and open Awesome Image Slider. Click button "Configure". after that you will see the settings window.
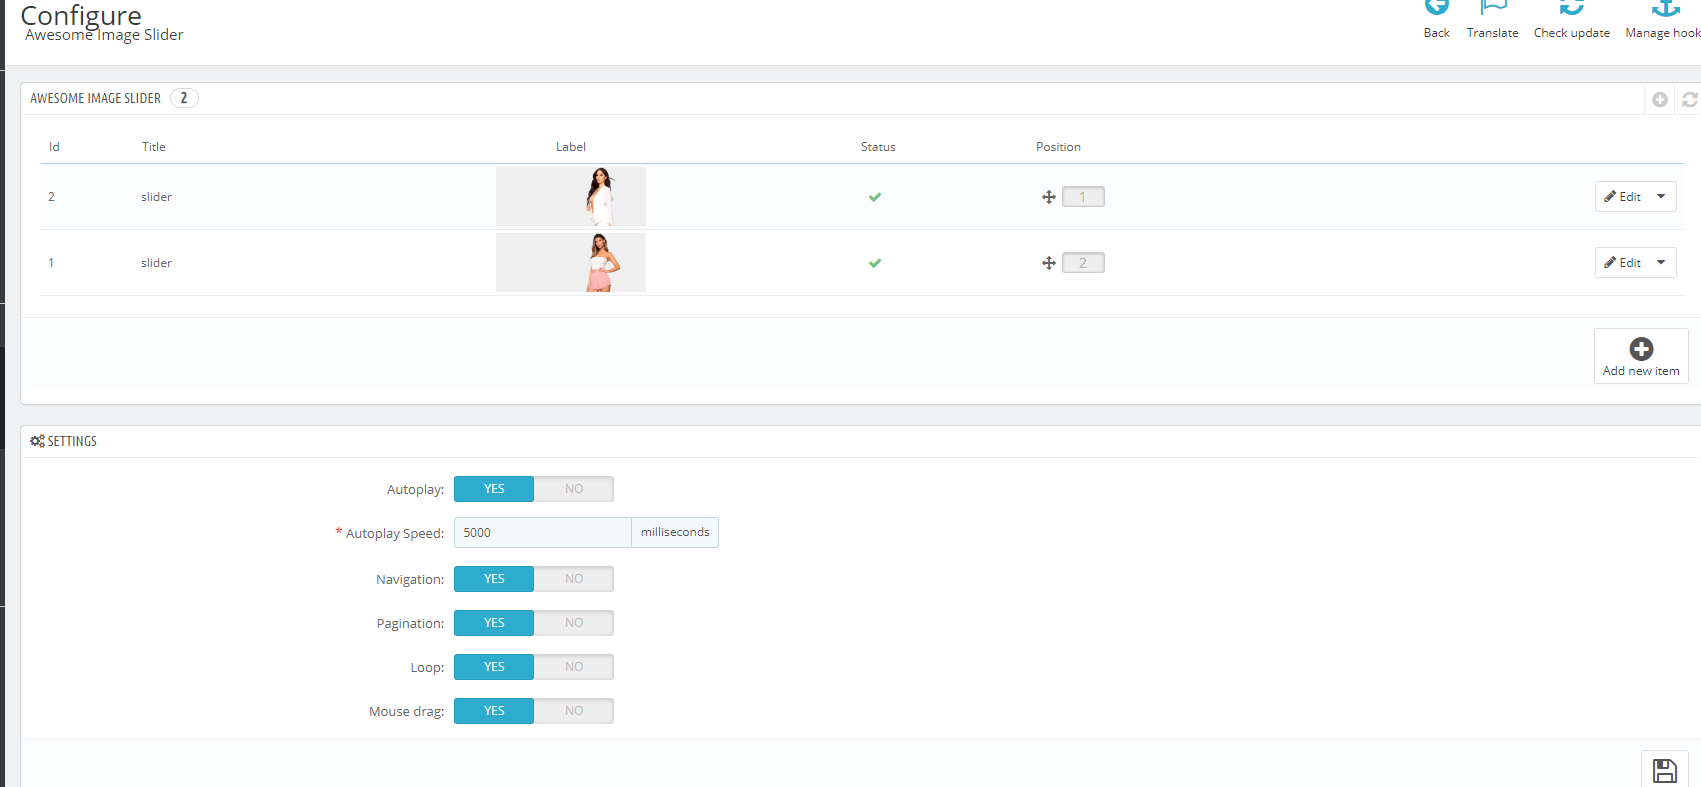
After that you can change the settings by pressing the appropriate buttons. In the lower menu there are general settings for the slider. There you can change the repetition, interval of the slide show, navigation and pagination
In the top menu you can add a new slide by clicking on the button "New Item". Than you see that menu.

In this menu you need to specify the name of the slide, upload your image, and specify a link for clicking on the slide. Text and image must be inserted separately for each language that you have connected, languages are selected in the selection in the upper right field
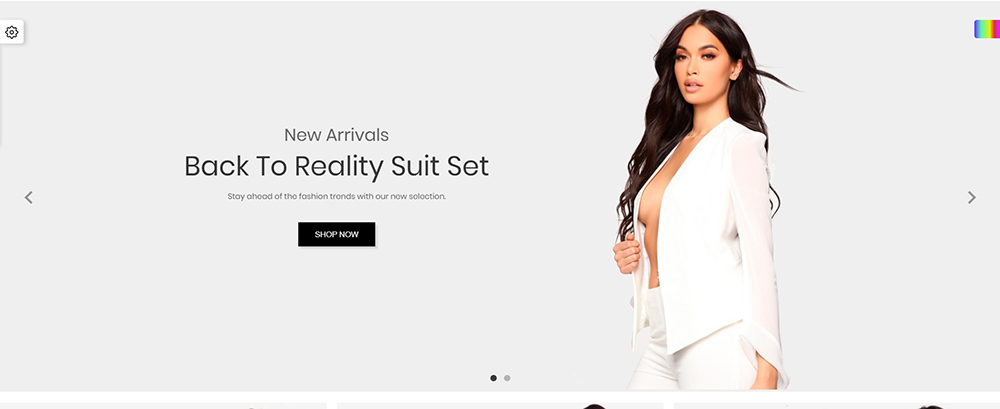
To add text on top of your slide you need to go to menu "Content" and fill with your text as an example. Than click "Save".
After setting, you will get a slider on the main page of your store
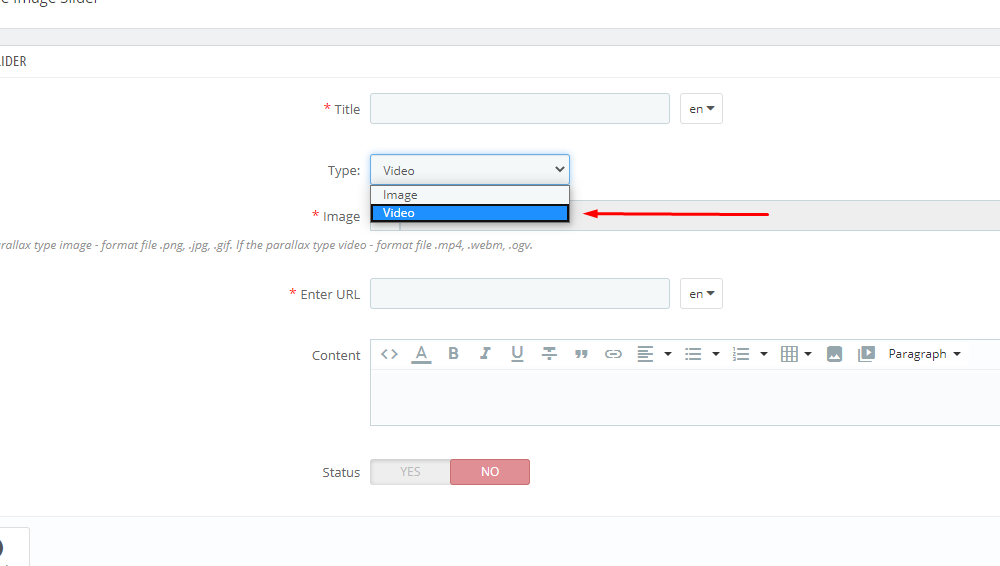
You also have the option to upload a video
To do this, in the field for selecting Type, specify video
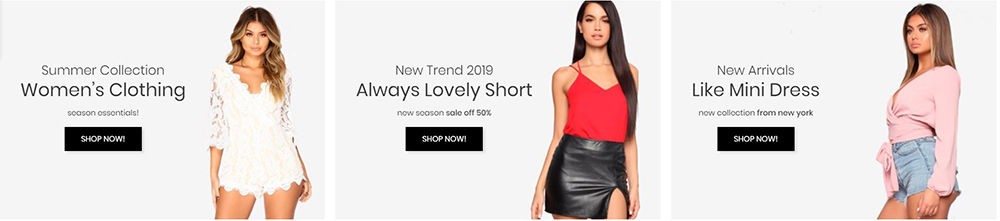
3.3 Module "Responsive banners"

Go to your your Back-Office and open Responsive banners. Click button "Configure". after that you will see the settings window.

In this menu you can either change your slides by clicking the button "Edit" or add a new one by clicking the button "Add Item" in the settings window.
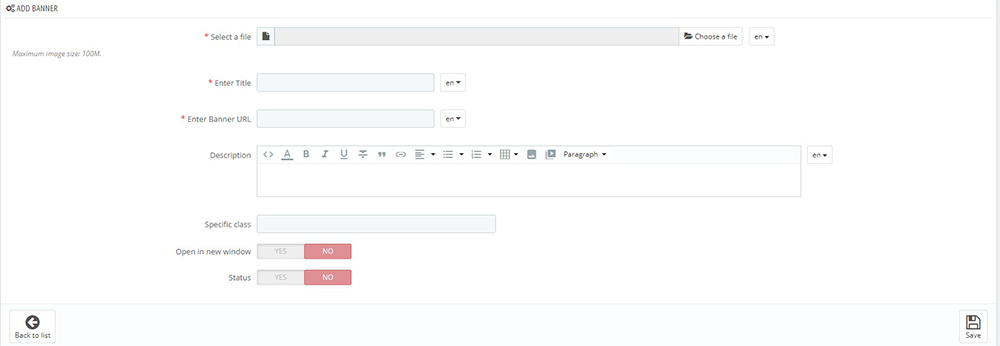
In the menu for adding a slide you need to fill in all the fields in all languages available in your store, also select the options for displaying the slide and click the save.
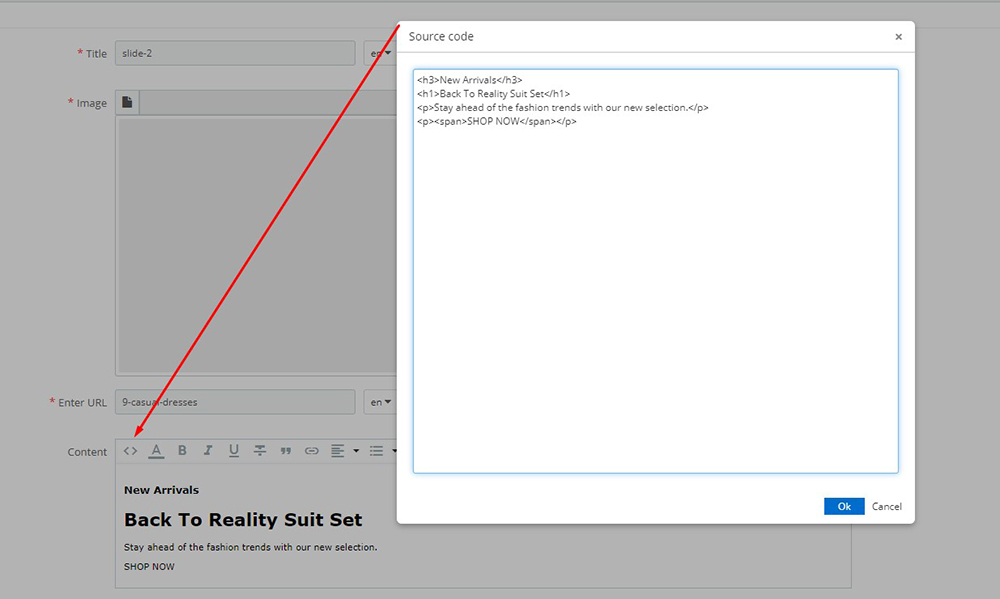
To change the text on top of the banner you need to go to the menu "Description", click "Source Code" and fill as in the example and save.
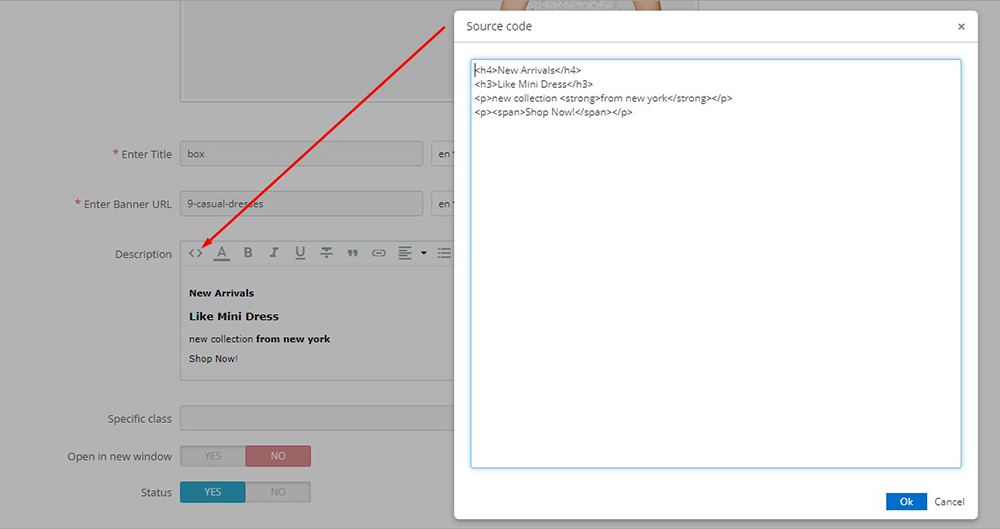
After setting, you will get a banners on the main page of your store
3.4 Module "Free Shipping Notice"

Go to your your Back-Office and open Free Shipping Notice. Click button "Configure". after that you will see the settings window.
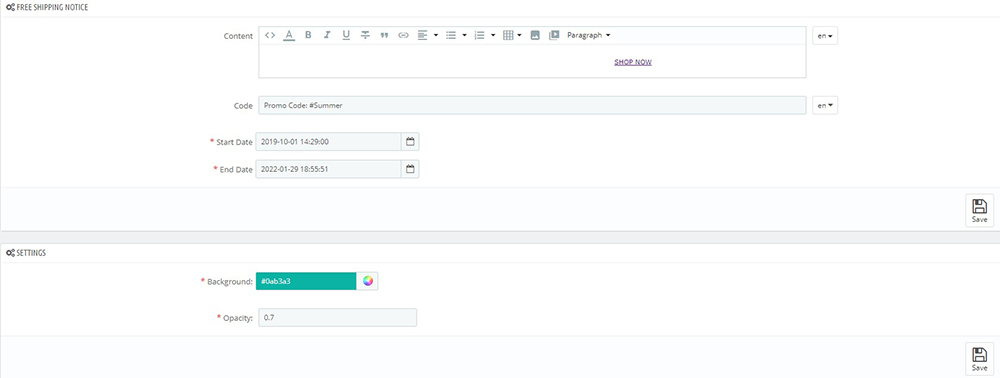
In this menu you can choose the background color, transparency, also set the start date and end date
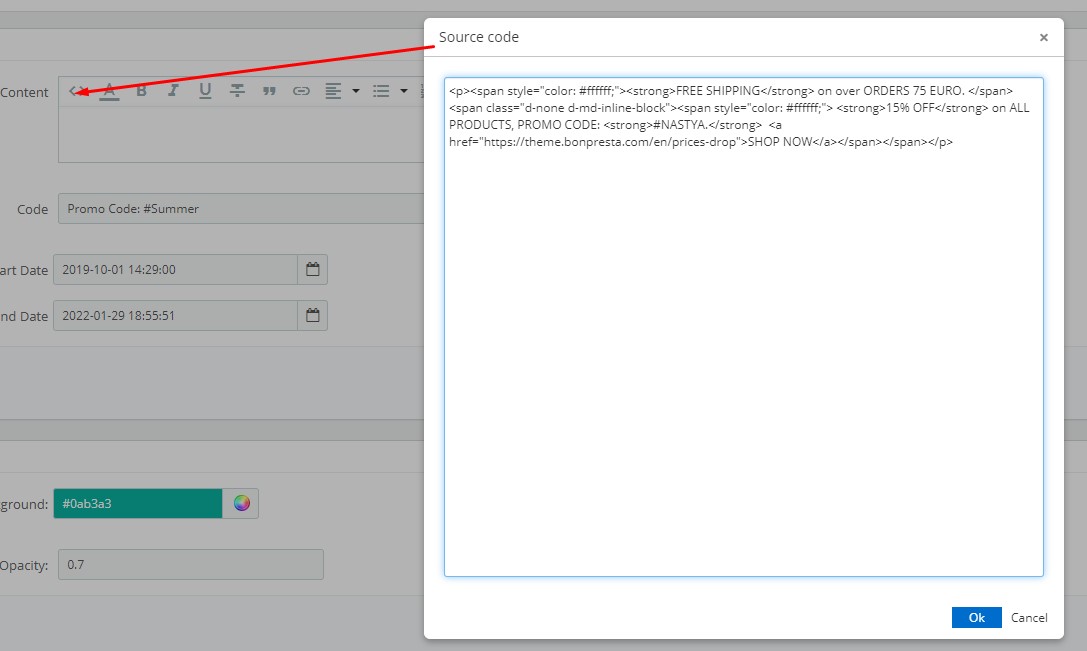
You can also change the text styles and the text itself by clicking on the button "Source code"
After setting, you will get a top banner on the main page of your store

3.5 Module "GDPR EU Cookie Law Banner"

Go to your your Back-Office and open GDPR. Click button "Configure". after that you will see the settings window.
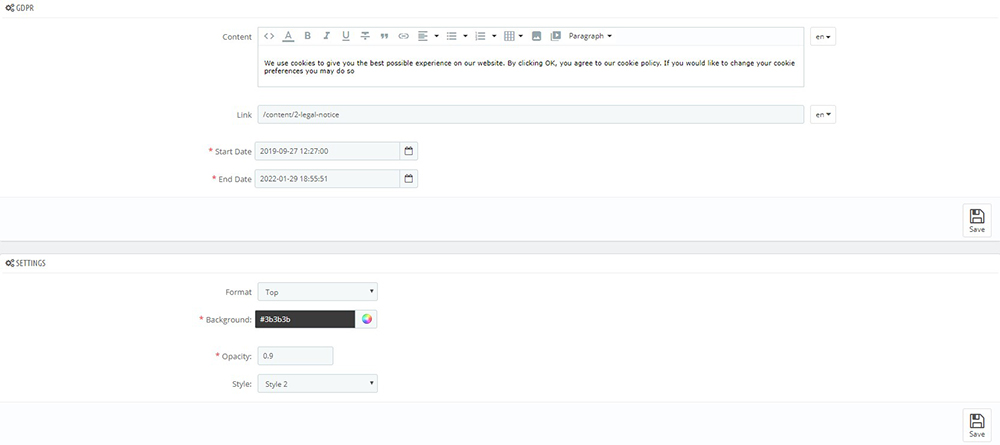
In this menu you can choose the background color, position, transparency, also set the start date and end date
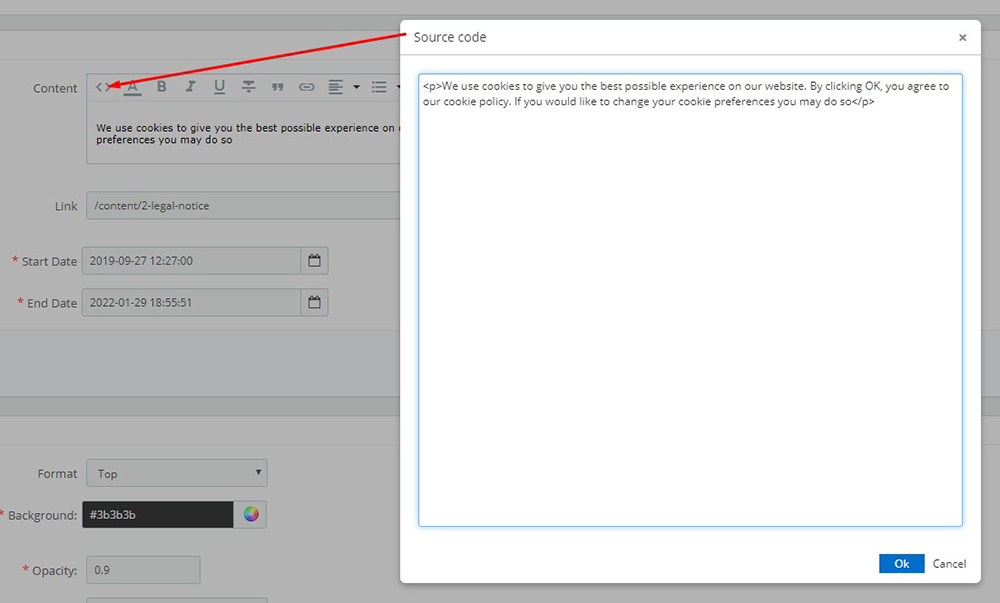
You can also change the text styles and the text itself by clicking on the button "Source code"
After setting, you will get a GDPR banner on the main page of your store

3.6 Module "HTML Content"

Go to your your Back-Office and open Responsive banners. Click button "Configure". after that you will see the settings window.

In the general menu below you can change item lines and change settings. To add a block with information click "Add item", and than you see that menu.
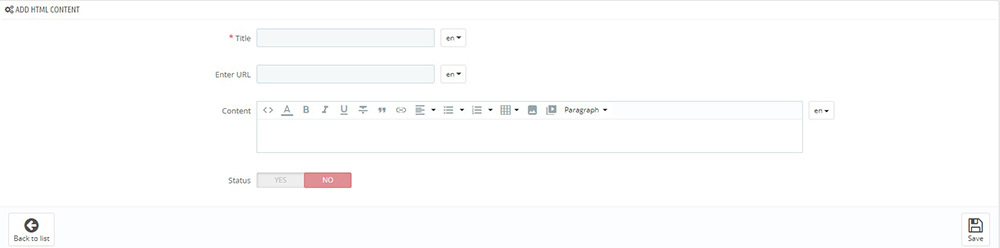
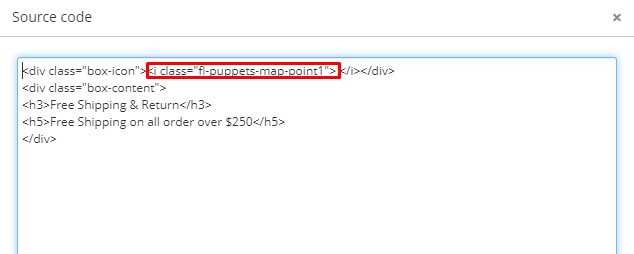
In this menu you need to fill in all the necessary fields in all languages available on your site. In order to add a description you need to go to the menu "Content" and click "Source Code"
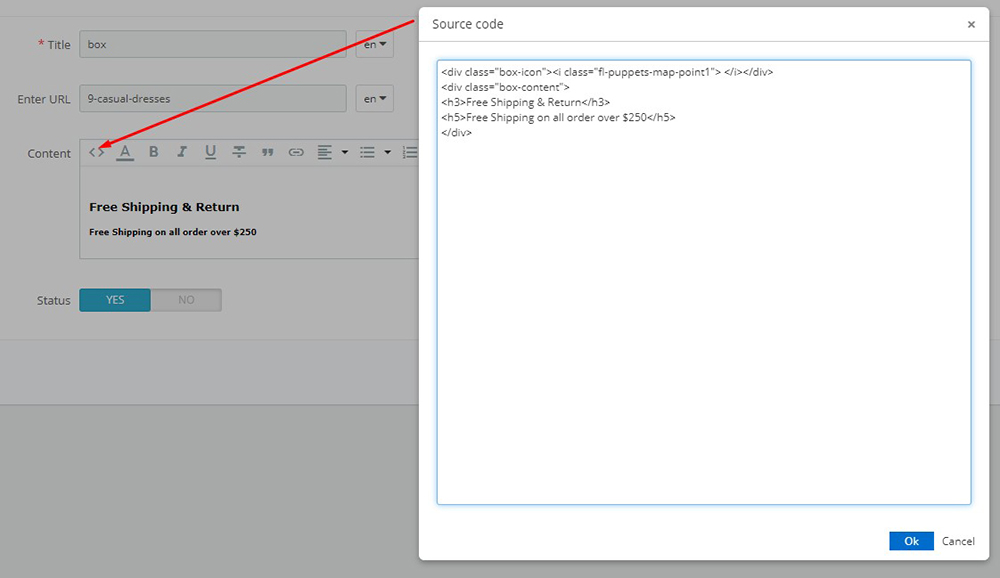
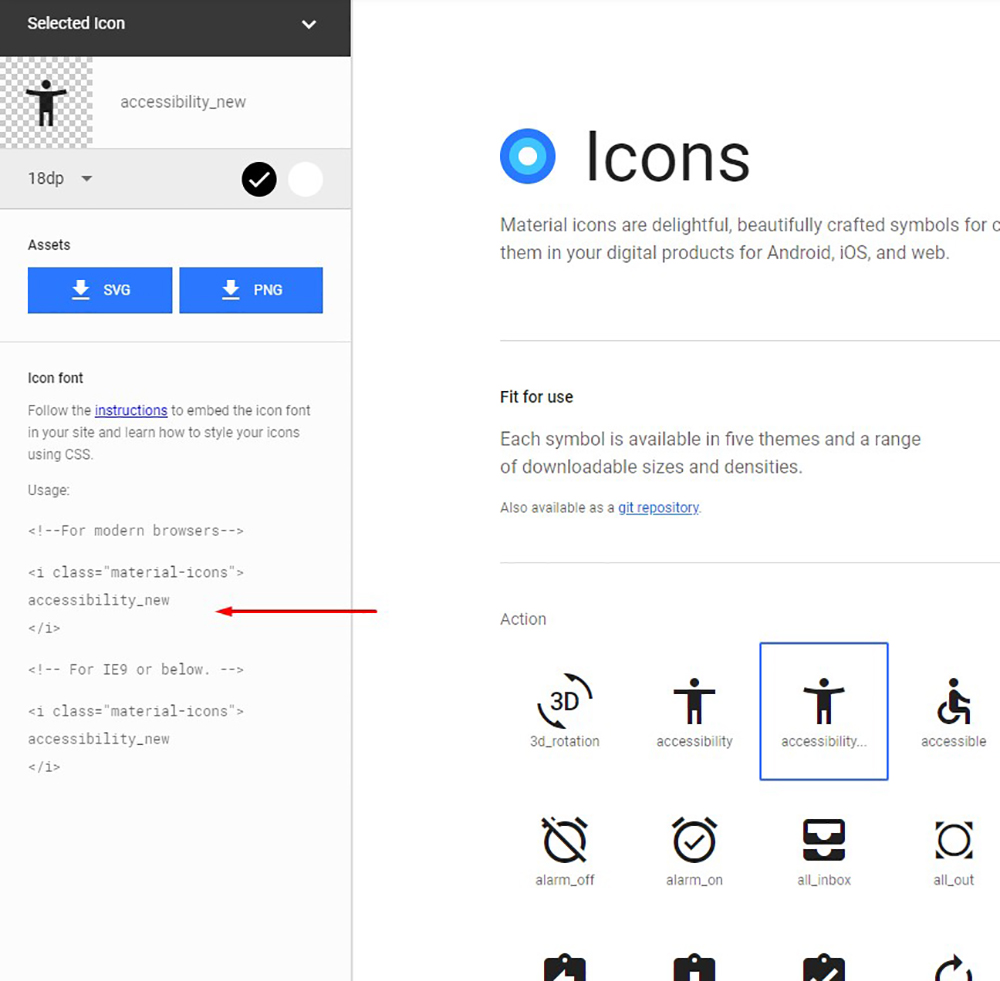
In order to change the icon you need to go to the site Material Design Icons. There you can select any icon. Clicking on it will open the settings menu. you need to copy the <i> tag and paste to place at seconr screen.
In result you have same block information on front of your site.

3.7 Module "Promotion Discount Countdown Banner & Slider"

Go to your your Back-Office and open Promotion Discount Countdown Banner. Click button "Configure". after that you will see the settings window.

In the bottom menu, you can select the number of items to display. To add a new slide, click "Add item", than you see that menu.
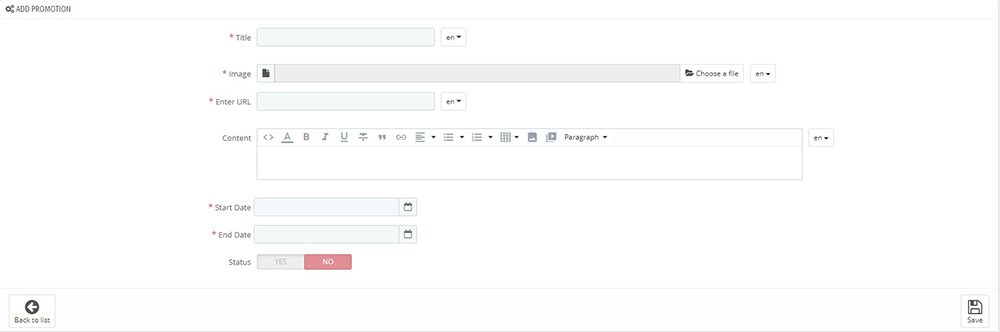
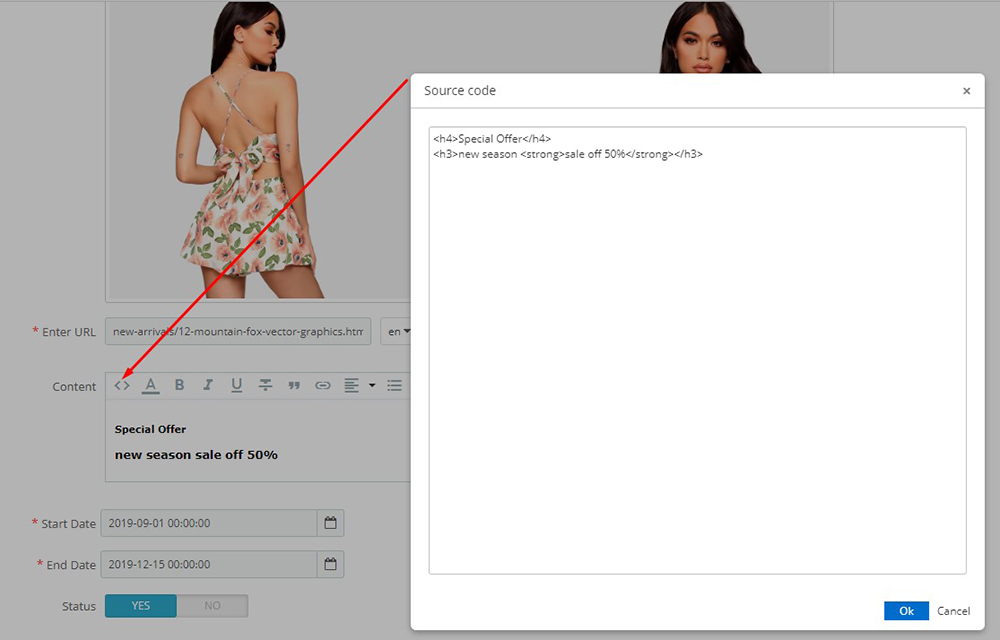
In this menu you need to fill in all the fields in all languages available in your store, also select the start date of the countdown and the end date and status. To insert text and buttons on the slider you need to go to the menu "Content" and click "Source code" and fill like screen.
In result you have parallax banner with countdown in front of your website.

3.8 Module "Instagram Carousel Social Feed Photos"

Go to your your Back-Office and open Instagram Carousel Social Feed Photos. Click button "Configure". after that you will see the settings window.
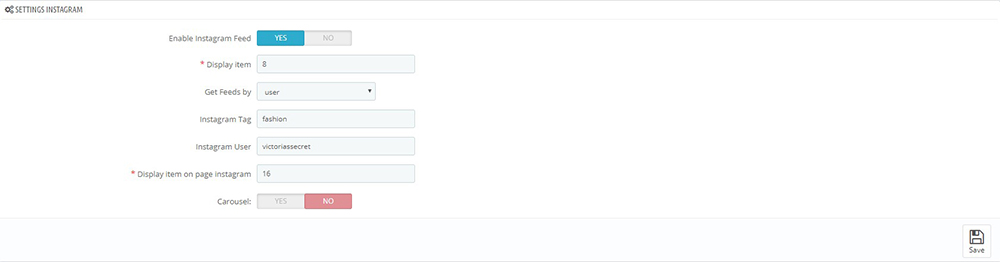
In this menu, you can configure your block, set the number of photos to display, specify where to get pictures by name in the instagram, and also enable or disable the carouse
In result you have instagram photos block in front of your website.

3.9 Module "Brand Manager"

Go to your your Back-Office and open Brand Manager. Click button "Configure". after that you will see the settings window.
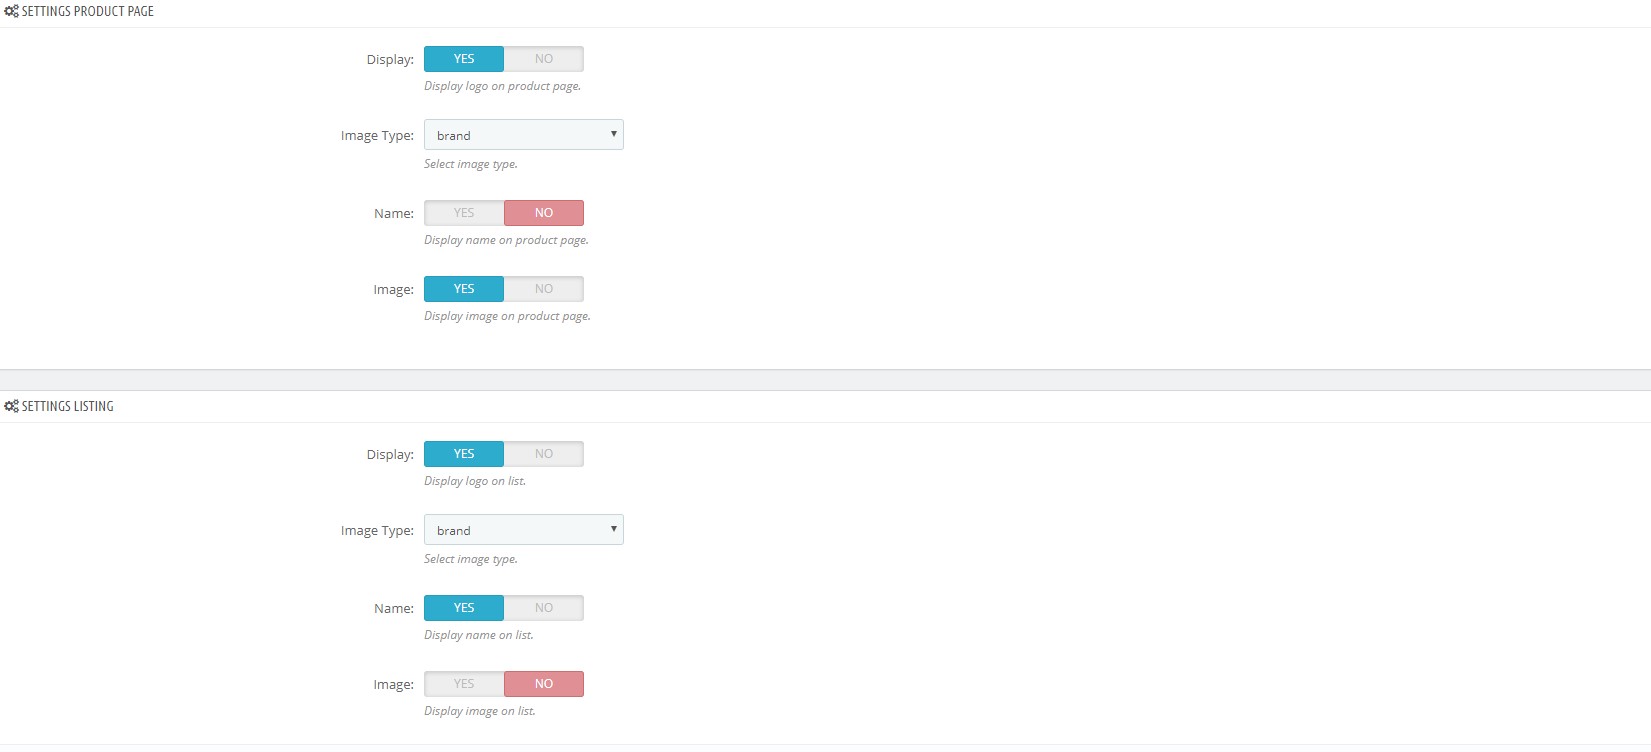
In this menu, you can configure your brand-view. You can also customize brands on various pages. Also choose whether to show a picture or not or a name.
In result you have brands block in front of your website.
3.10 Module "Product Discounts with Countdown"

Go to your your Back-Office and open Product Discounts. Click button "Configure". after that you will see the settings window.

In this menu you can change the discount data that you have or add a discount to another product by clicking the button "Add Item".
Here you need to select your product in the search and indicate the start and end dates of the discount, the discount size and set the active status.
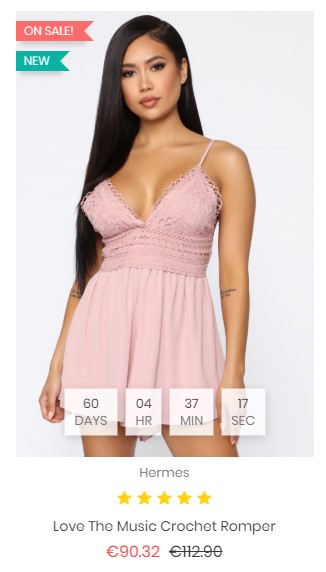
In result you have discount counter in front of your product list.
3.11 Module "Product Images Zoom"

Go to your your Back-Office and open Product Images Zoom. Click button "Configure". after that you will see the settings window.
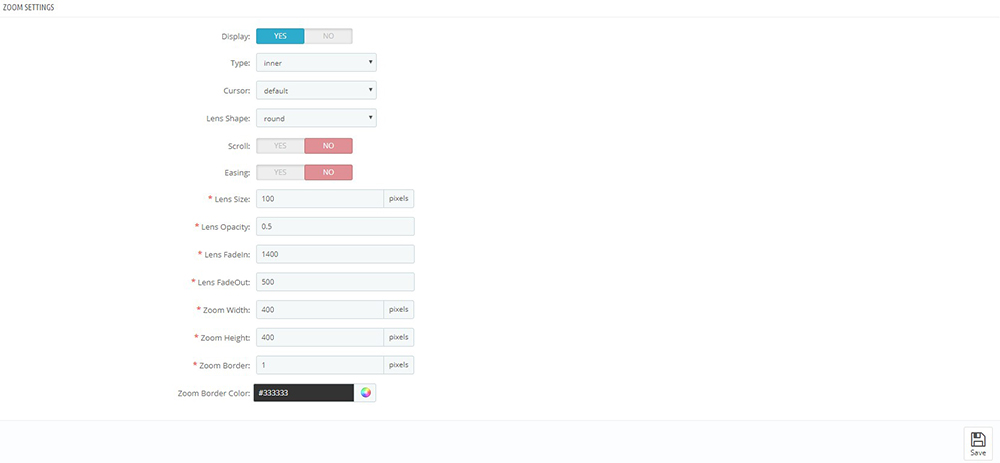
In this menu you can configure the type of zoom, as well as the size of the zoom window or the animation of its display.
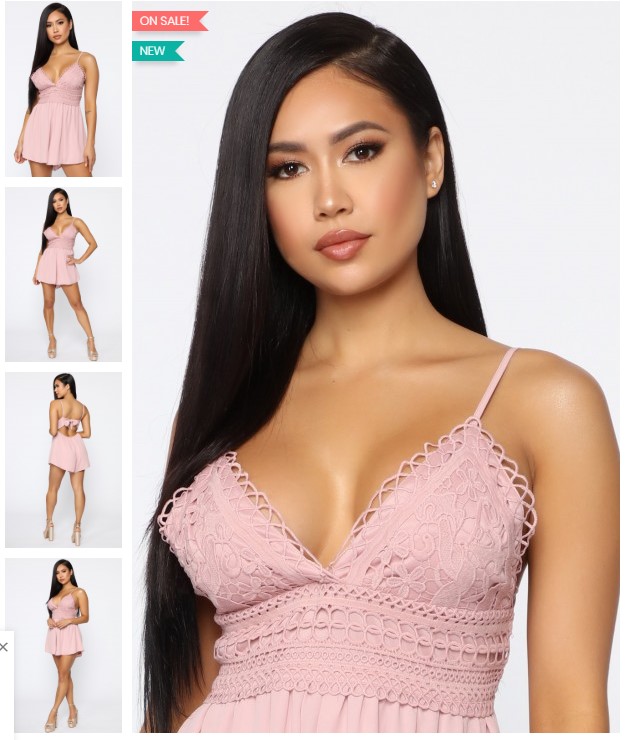
In result you have zoom window in front of your product.
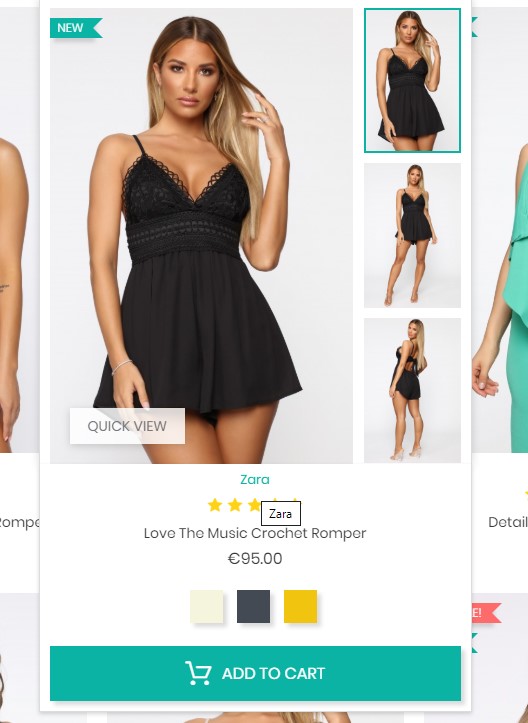
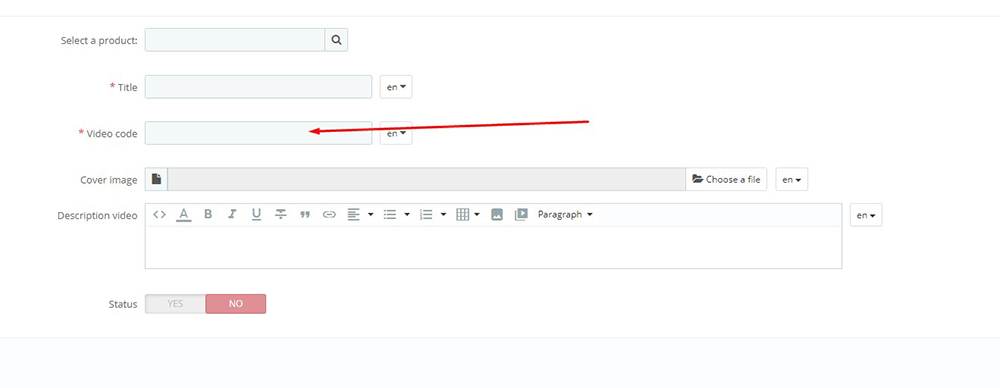
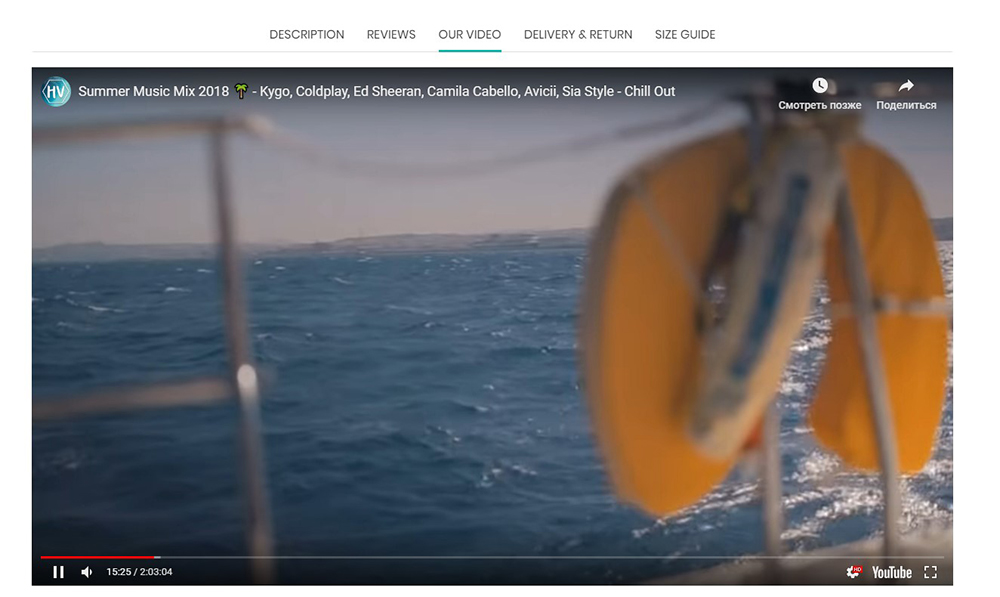
3.12 Module "Product Video Youtube"

Go to your your Back-Office and open Product Video Youtube. Click button "Configure". after that you will see the settings window.
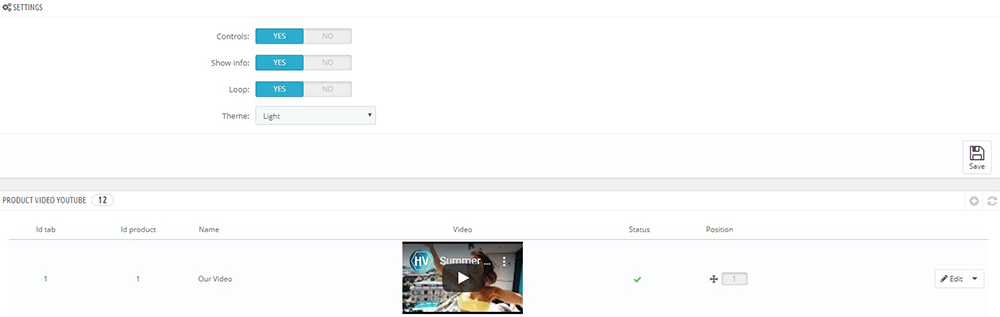
Here you can change the video settings as well as add video to new products by clicking the button "Add Item", then you see same menu.
Here you need to find your product and provide a link to the video from YouTube. The link should look like:

You need to fill in all the fields in all available languages, as a result you will have a video on the product page as in the picture.
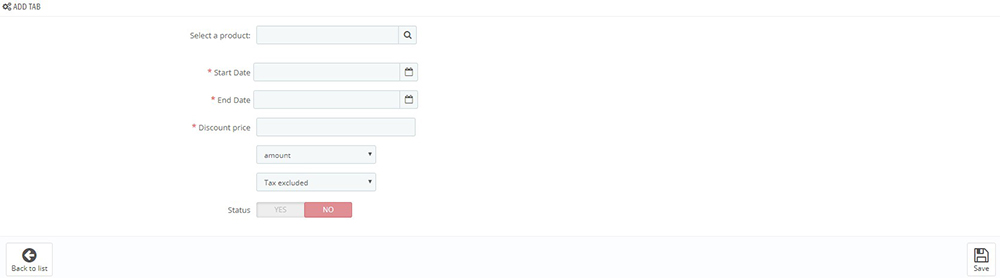
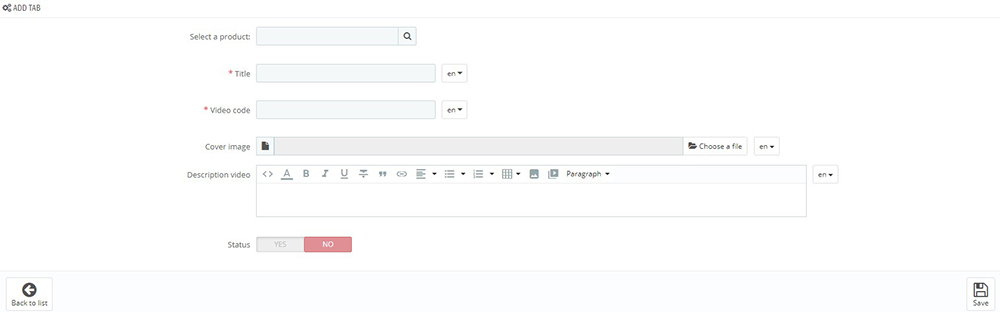
3.13 Module "Product Custom Tab"

Go to your your Back-Office and open Product Custom Tab. Click button "Configure". After that you must click "Add Item" and you will see that window.
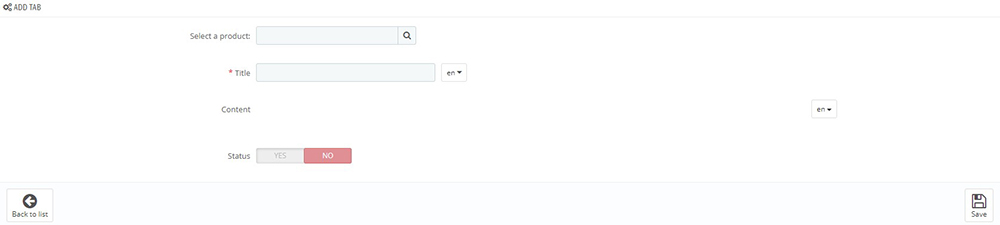
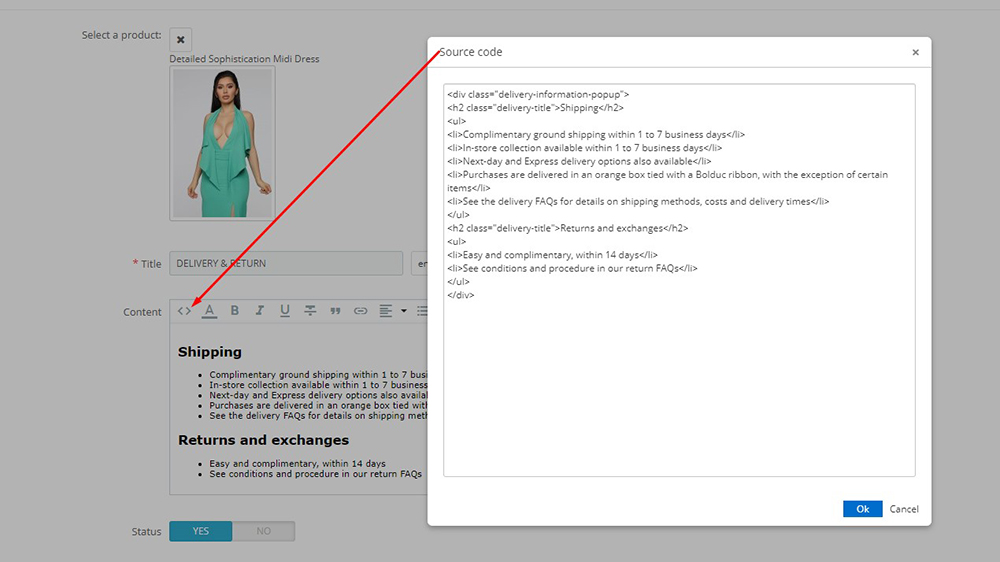
In this menu you need to select your product and enter the name of the tab in all available languages. the contents of the tab can be added by clicking the button "Source code", like example.
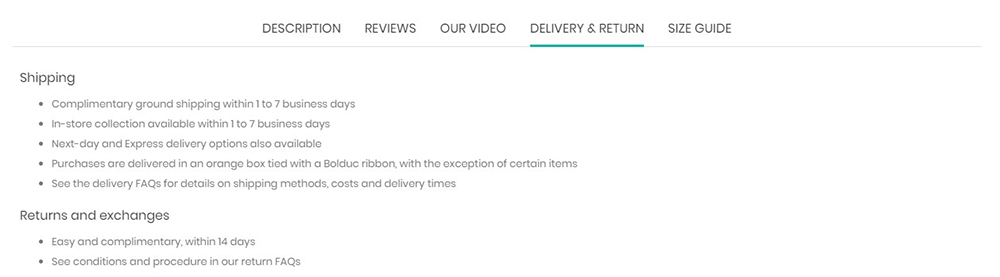
In result you will have custom tab in your product page.
3.14 Module "Product Comments"

Go to your your Back-Office and open Product Comments. Click button "Configure" and you will see that window.
In this menu you can configure the display of comments, delete comments or confirm them, enable and disable the addition of comments. After saving the settings, comments are displayed on your product page.
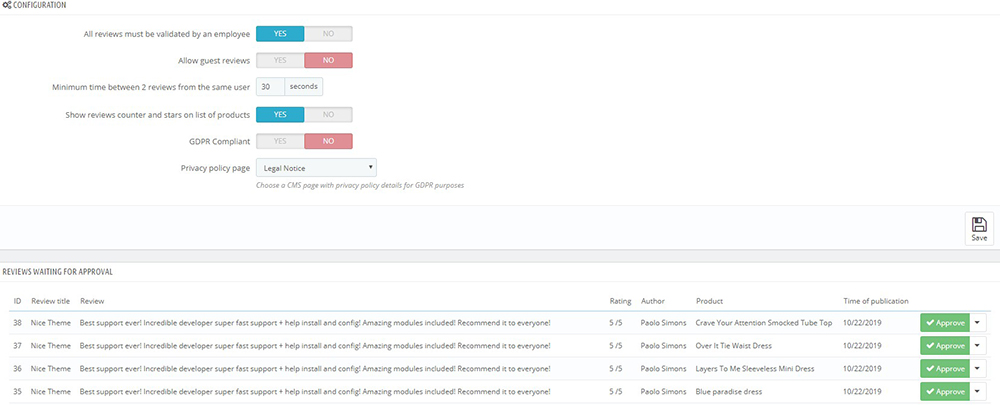
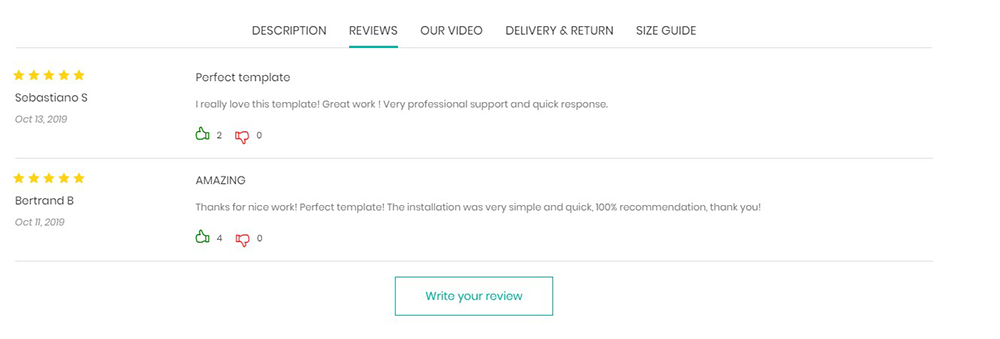
After save settings you will have comment in your product page.
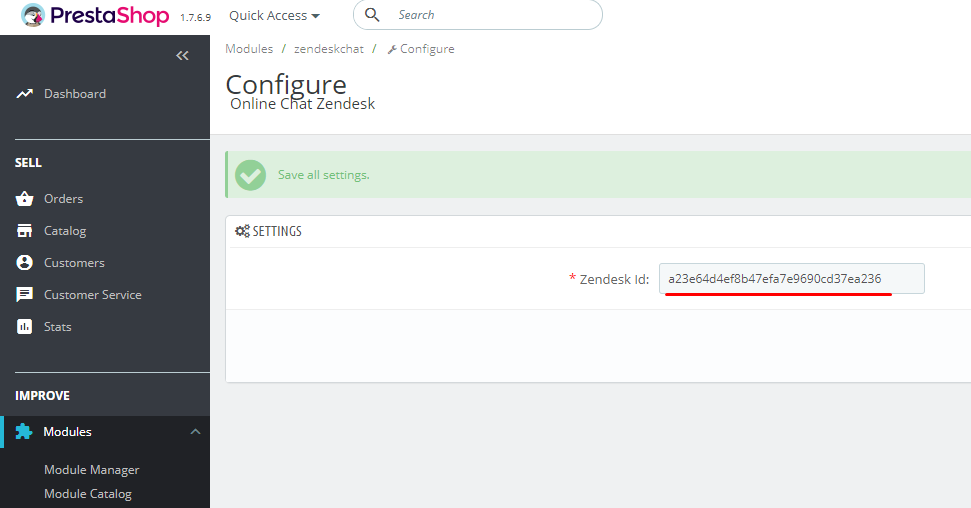
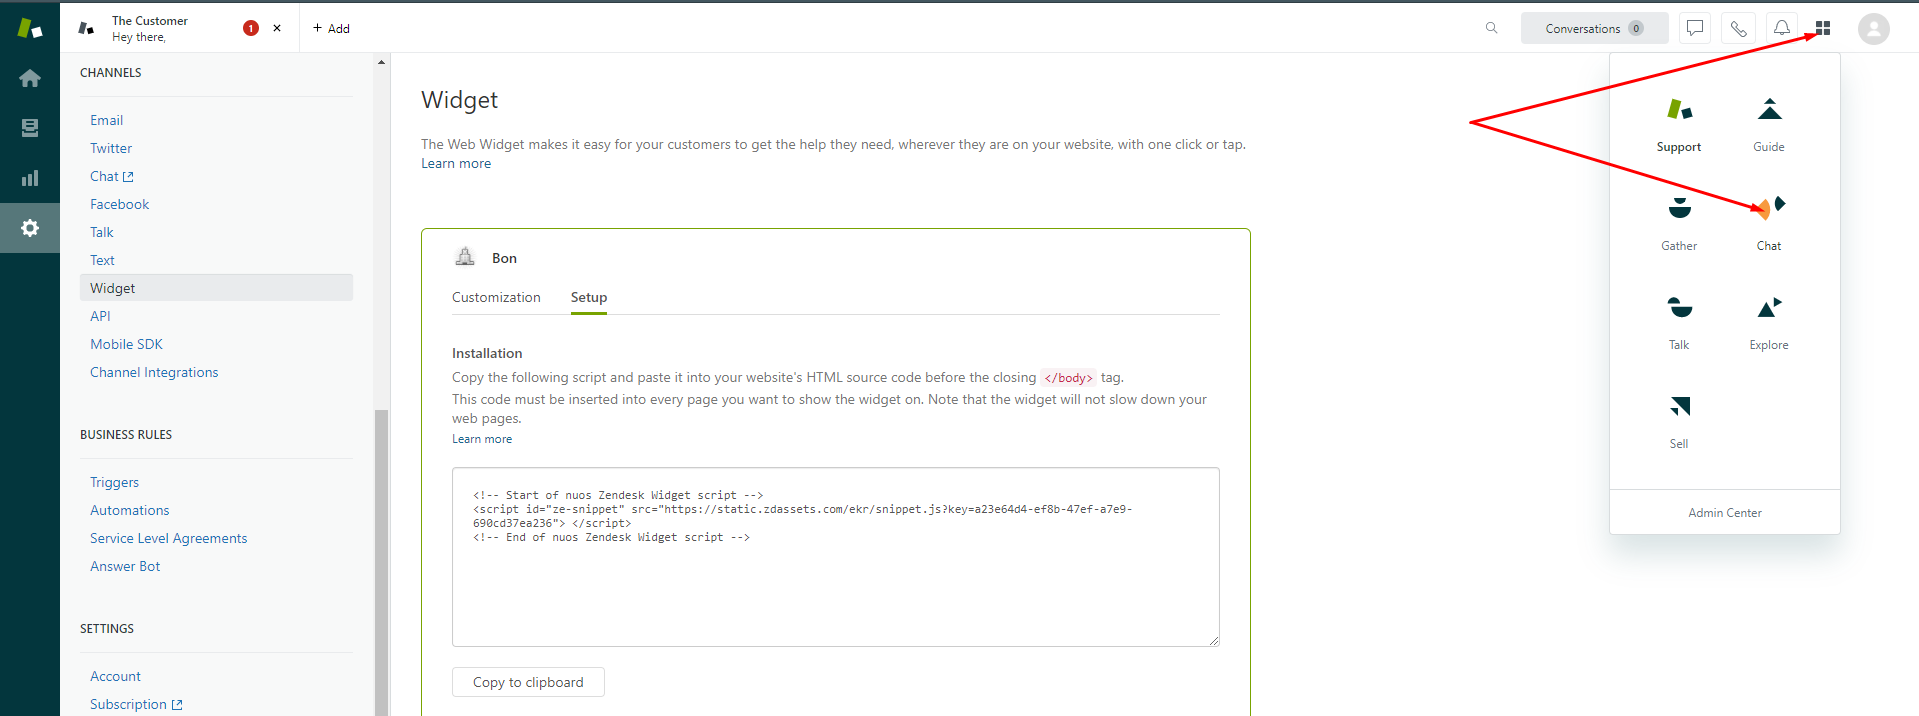
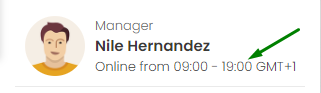
3.15 Module "Online Chat"

Before your visitors can start chatting with you, you must have Zendesk account at https://www.zendesk.com/

After that, you must confirm your email
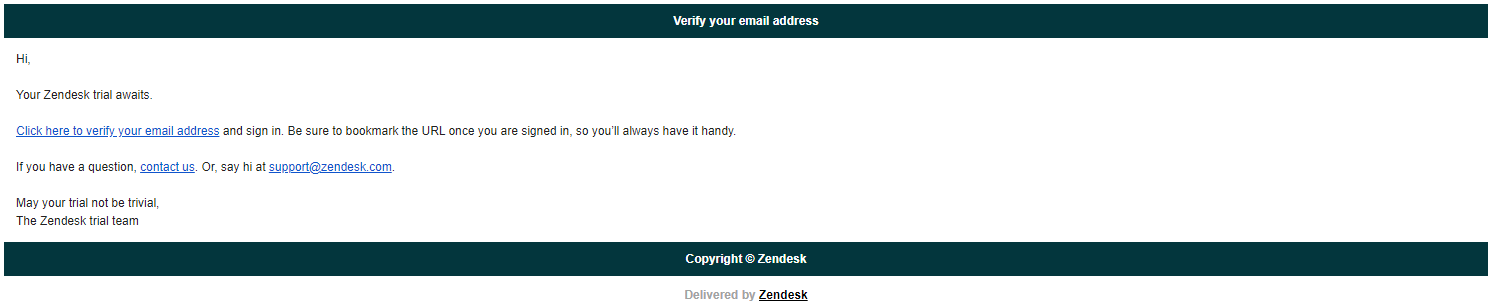
Next copy your Zendesk key
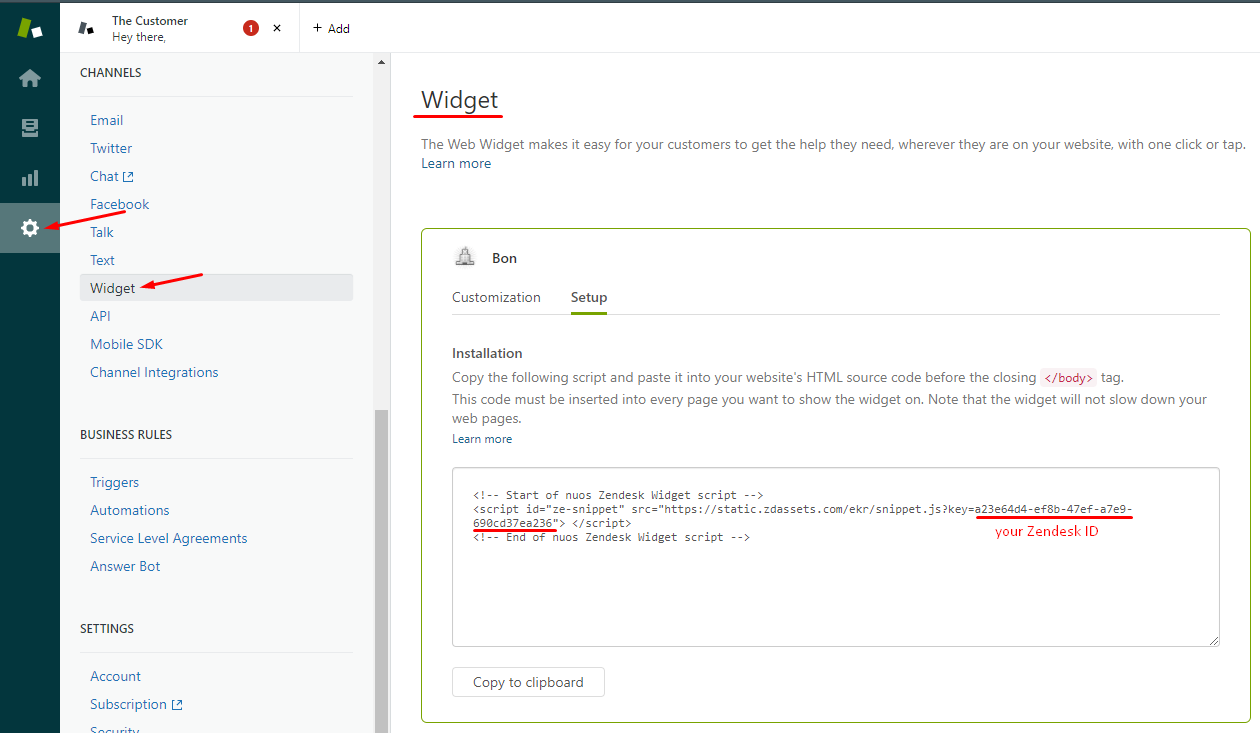
Go to your Back-Office and open Online Chat. Click button "Configure" and you will see that window. In this field you put your Zendesk key and save. After that you have online chat in your front-office
There is Dashboard where you can configure your chat
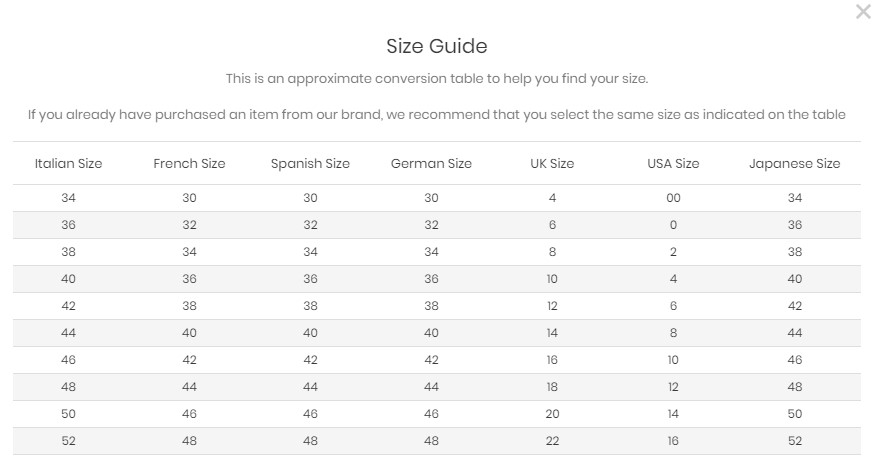
3.16 Module "Product Size Guide and Shipping"

Go to your your Back-Office and open Product Size Guide and Shipping. Click button "Configure" and you will see that window.

Here we can add a popup or edit an existing one. And you can change default setting click "Edit".
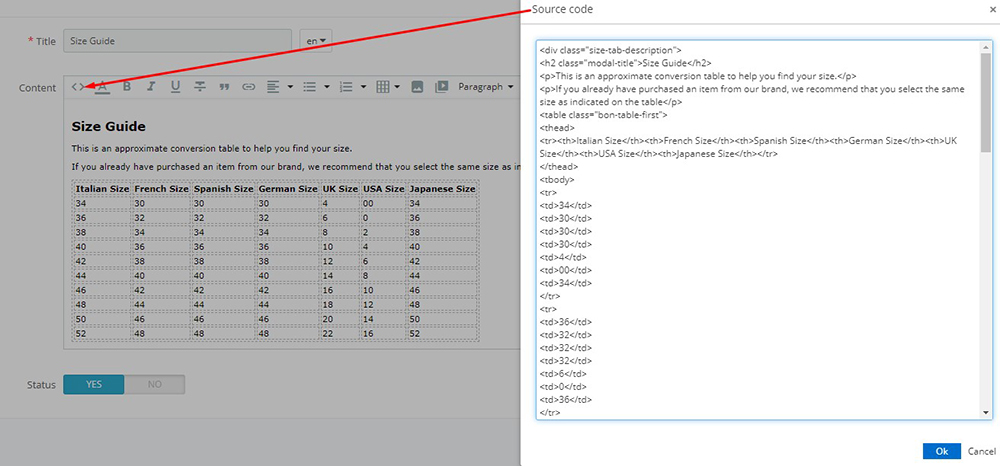
After save settings you will have popup in your product page.

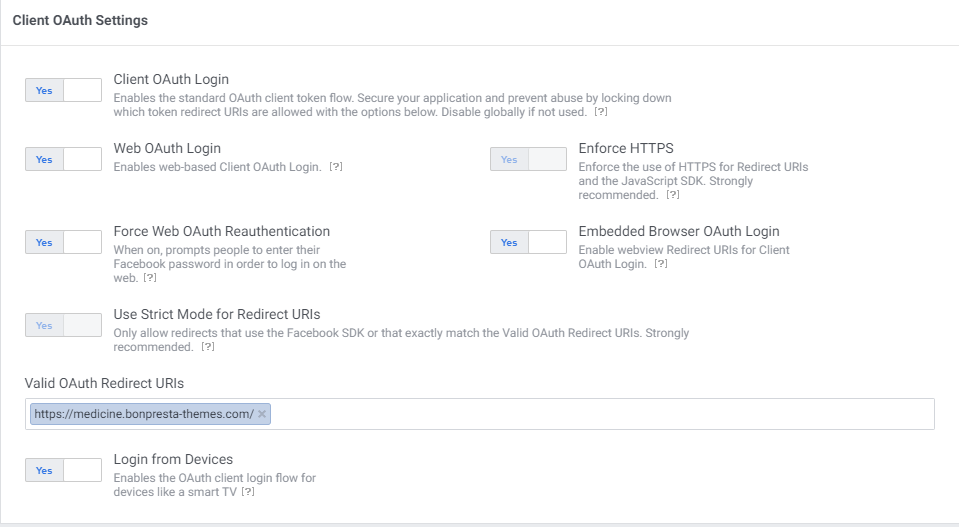
3.17 Module "Facebook logins"
Back office view

Front office view
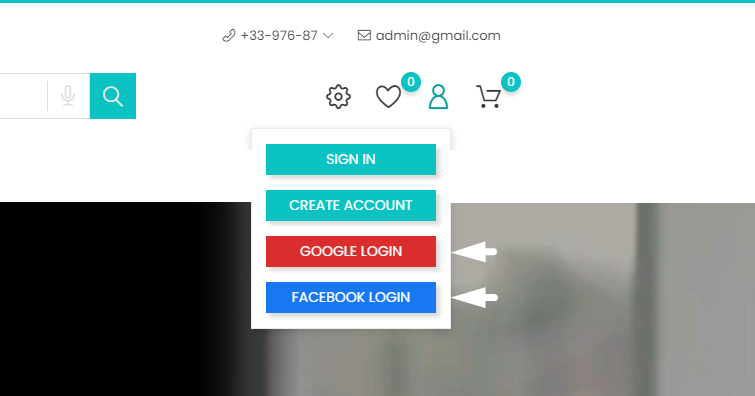
Go to your your Back-Office and open module "Facebook logins". Click button "Configure" and you will see that window.
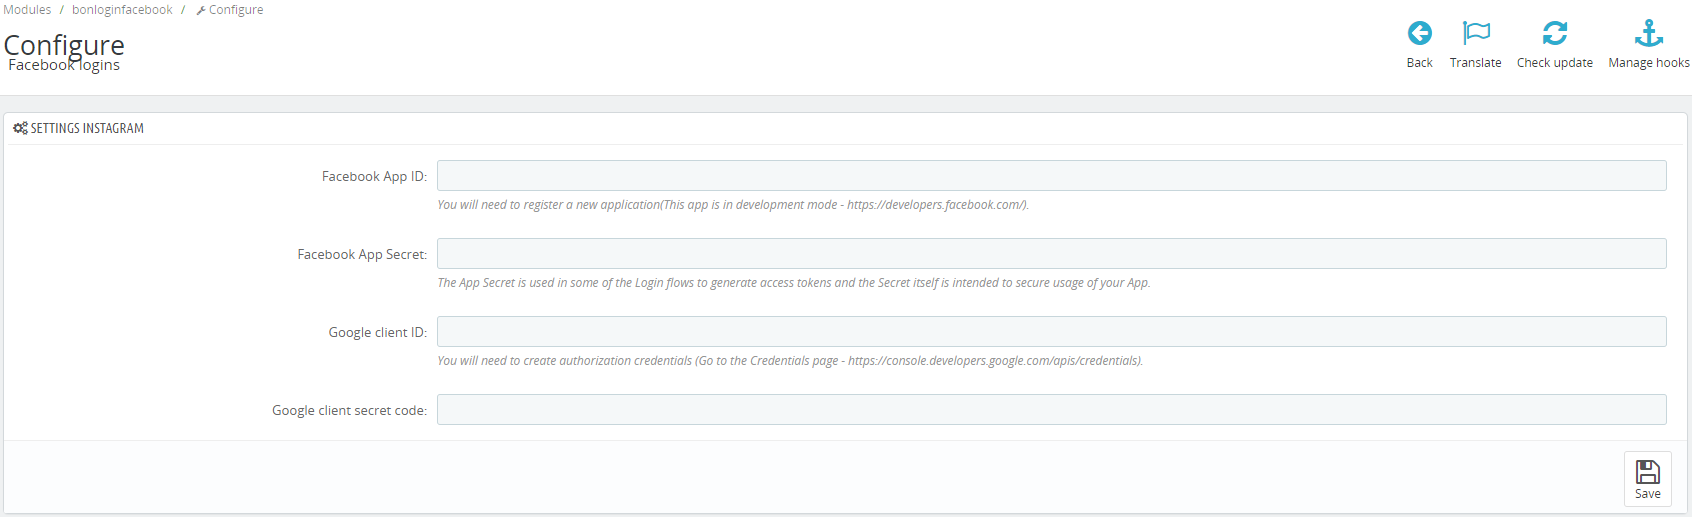
To log through Facebook, we need the "Facebook app ID".
3.17.1 Setting up module hooks
If the module is not displayed in the front office you need to check for the presence of the following hooks:
a) Hook in the file "personal-information.tpl" at "..\themes\theme name\templates\checkout\_partials\steps\"

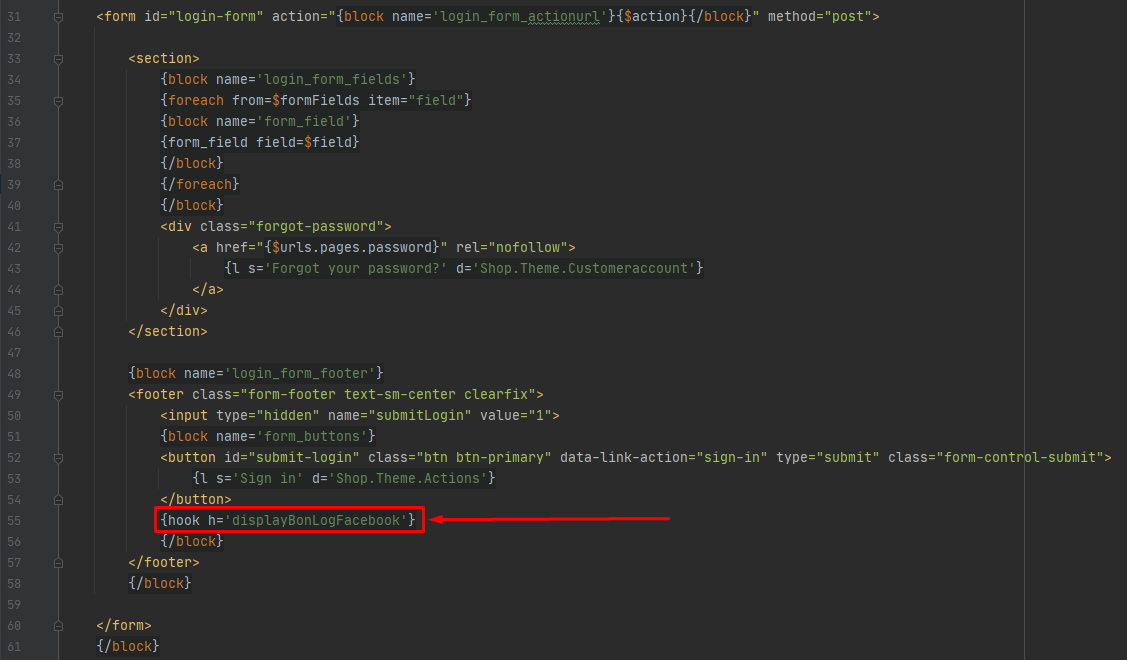
b) Hook in the file "login-form.tpl" at "..\themes\theme name\templates\customer\_partials\"
c) Hook in the file "ps_customersignin.tpl" at "..\themes\theme name\modules\ps_customersignin\"
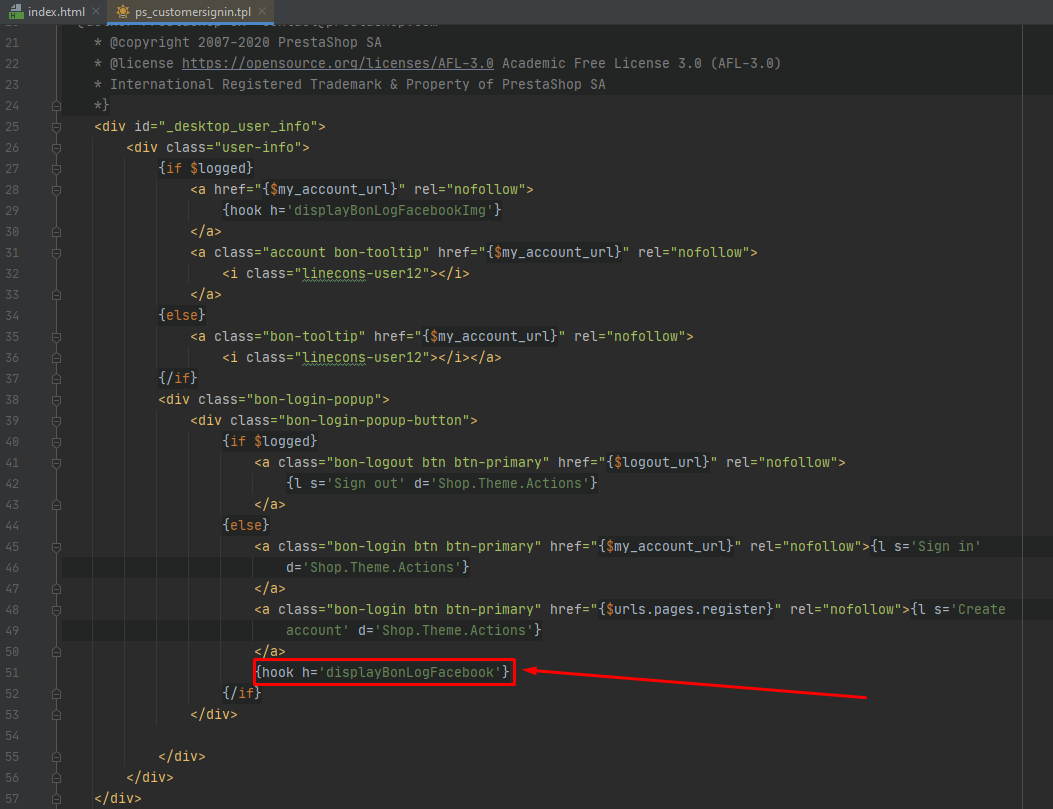
If there are no hooks, they must be added
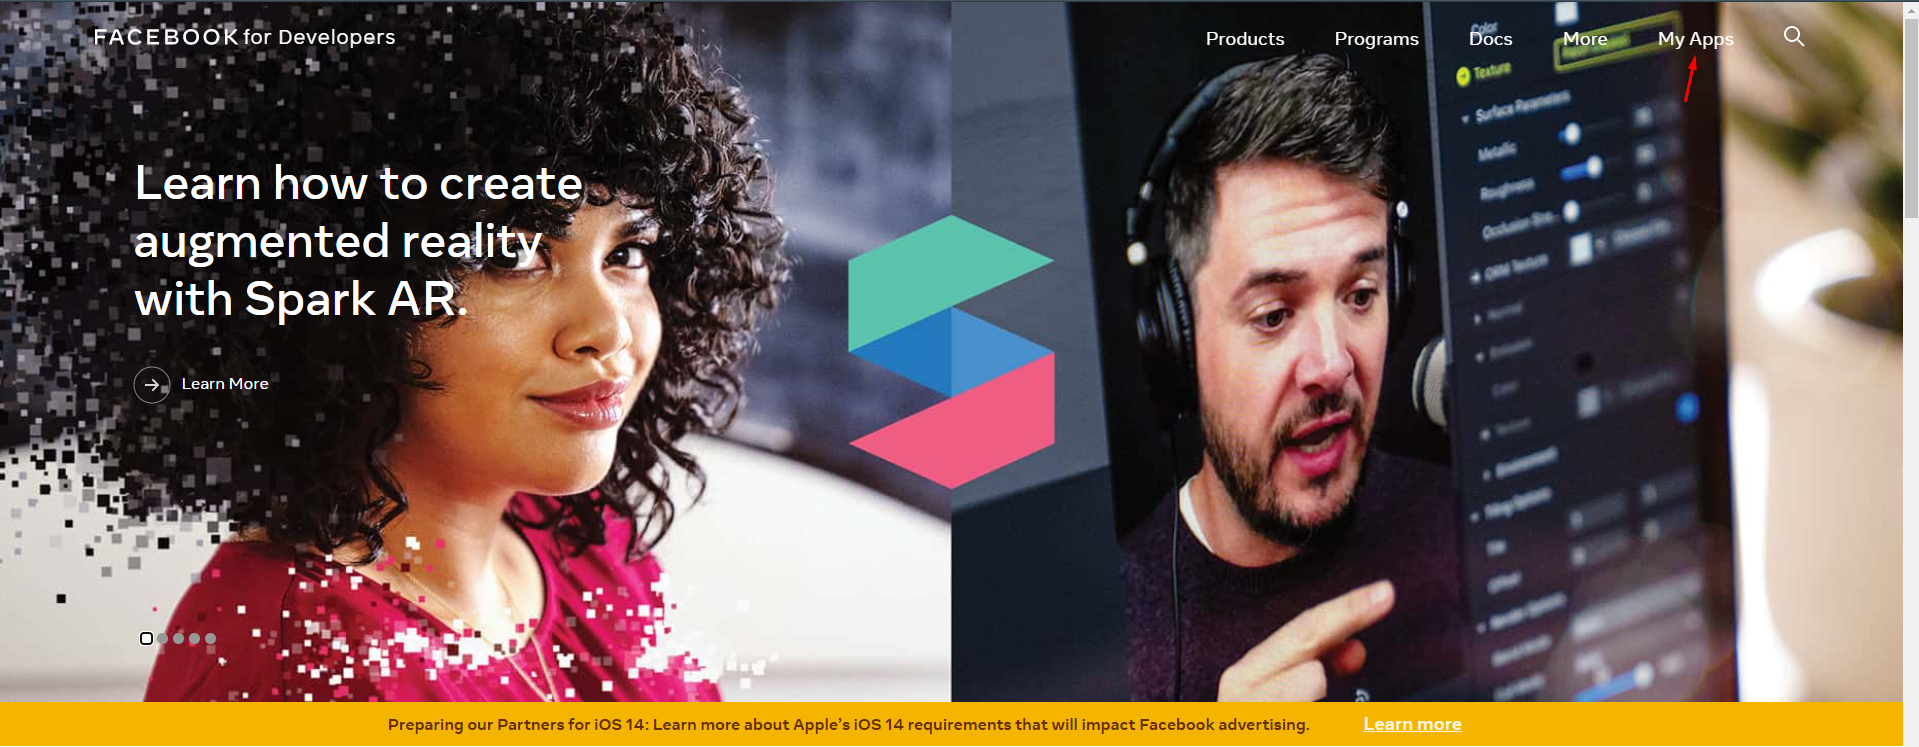
3.17.2 How To Get An App ID and Secret Key From Facebook
To start with, navigate your browser to the Facebook Developers page (developers.facebook.com). You’ll need to login to your Facebook account. Once logged in, you’ll see a screen similar to this:

To begin, click the "My Apps" link in the top right menu.
Then click "Create App"
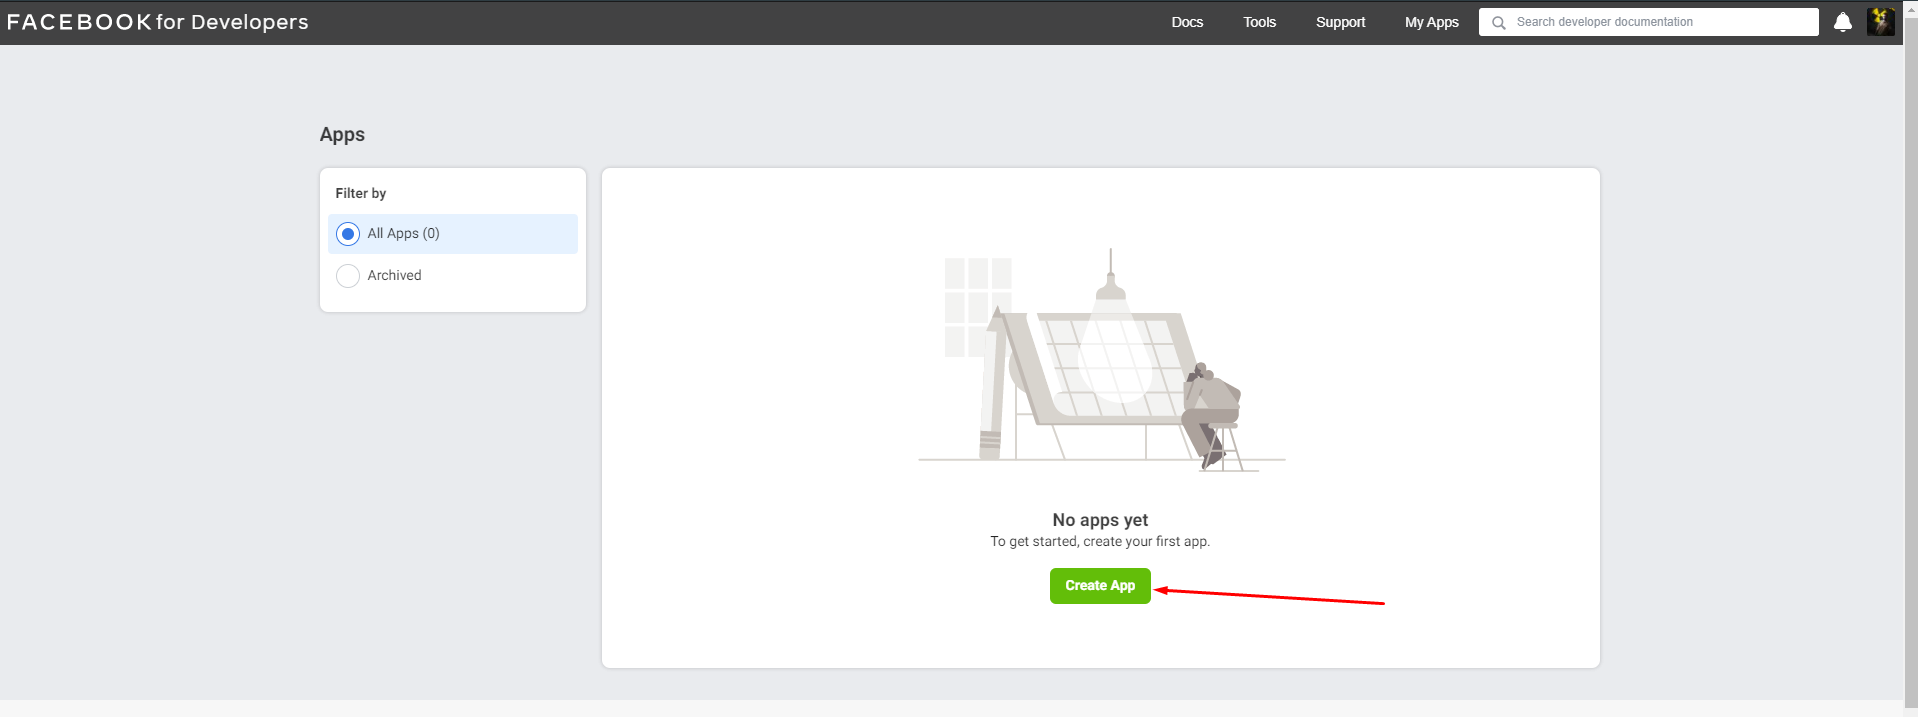
In the pop-up window you need to select "What do you need your app to do?"
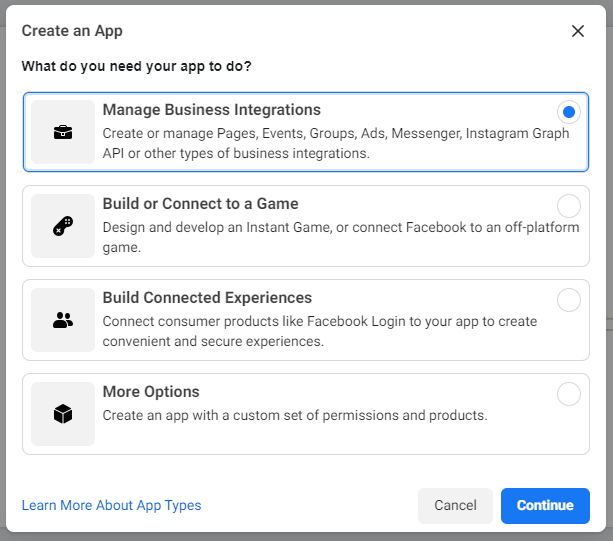
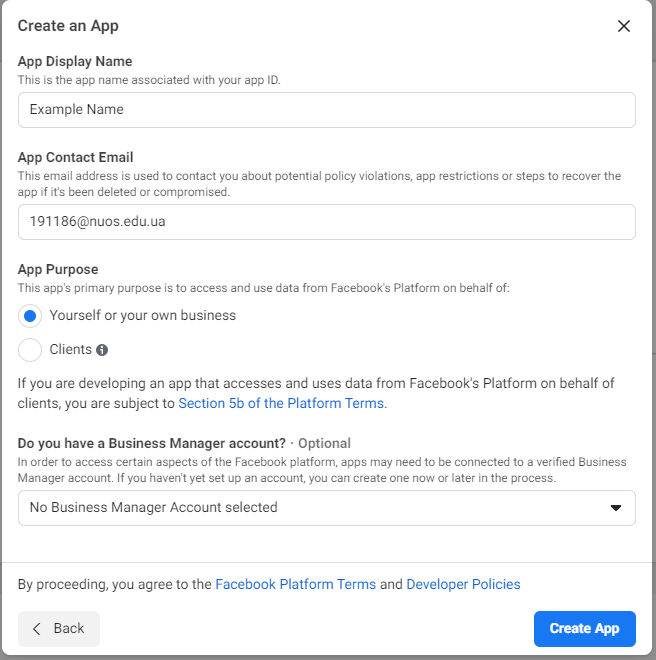
After that, a window will appear asking for the display name of the new application, contact email address, purpose, and a question about the business account. Since this app will not be published, just choose a name that is easy for you to remember.
After you’ve filled out the required fields and clicked Create a New App ID, you’ll be taken to your new App’s dashboard. From here, you’ll need to click on the "Settings -> Basic" link to view your App ID and Secret Key.
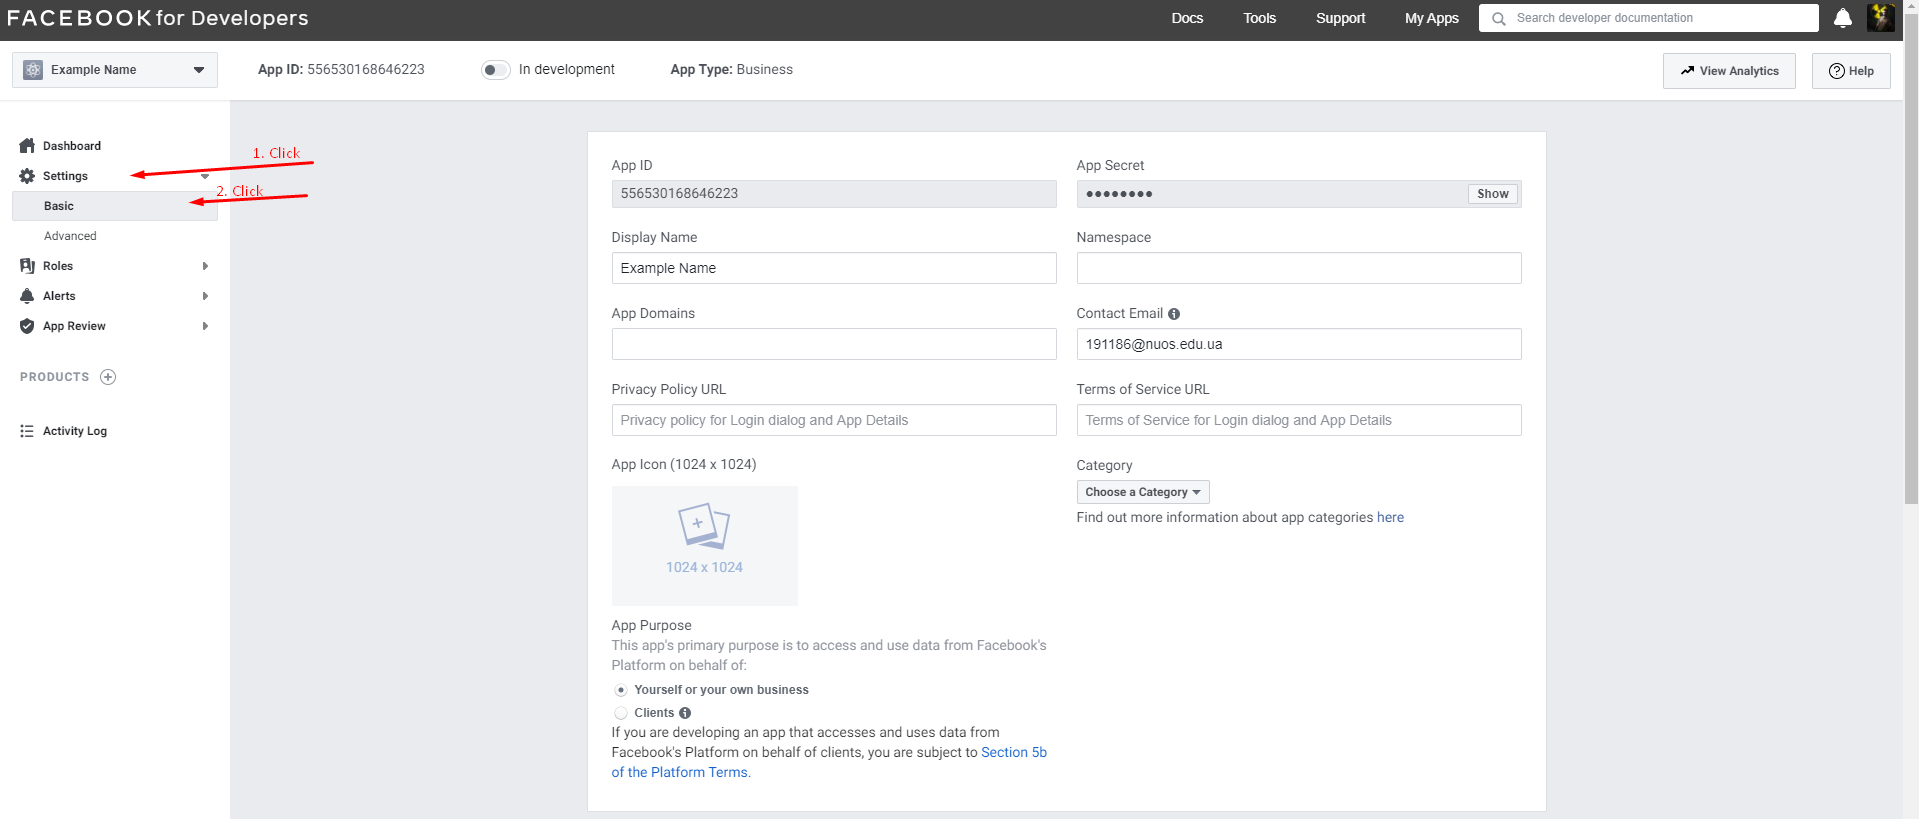
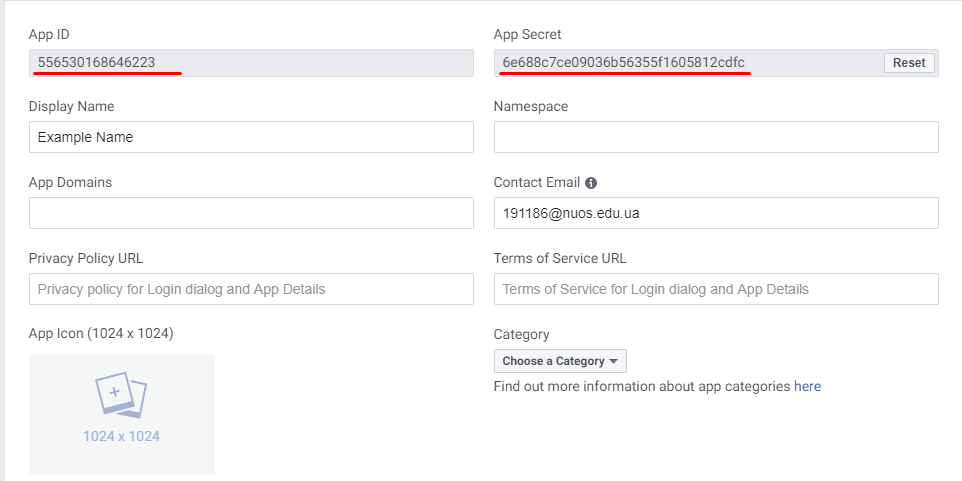
Your Secret Key will be hidden from view until you click the Show button.
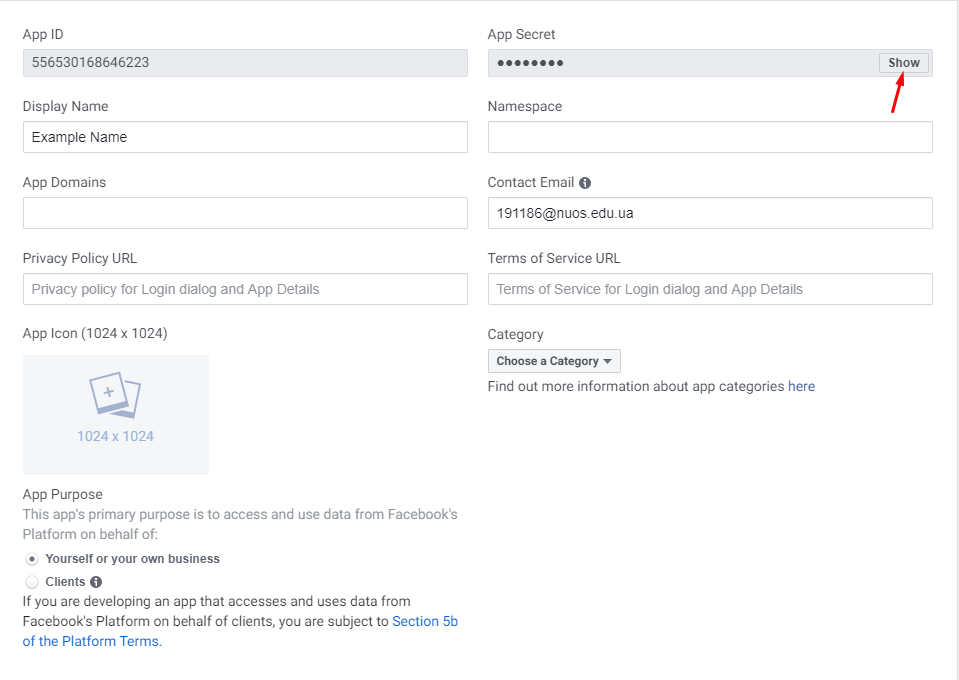
Once you’ve done this, we recommend copying both fields to a text file for easy access later.
Then enter "Privacy Policy URL" and enable live mode.
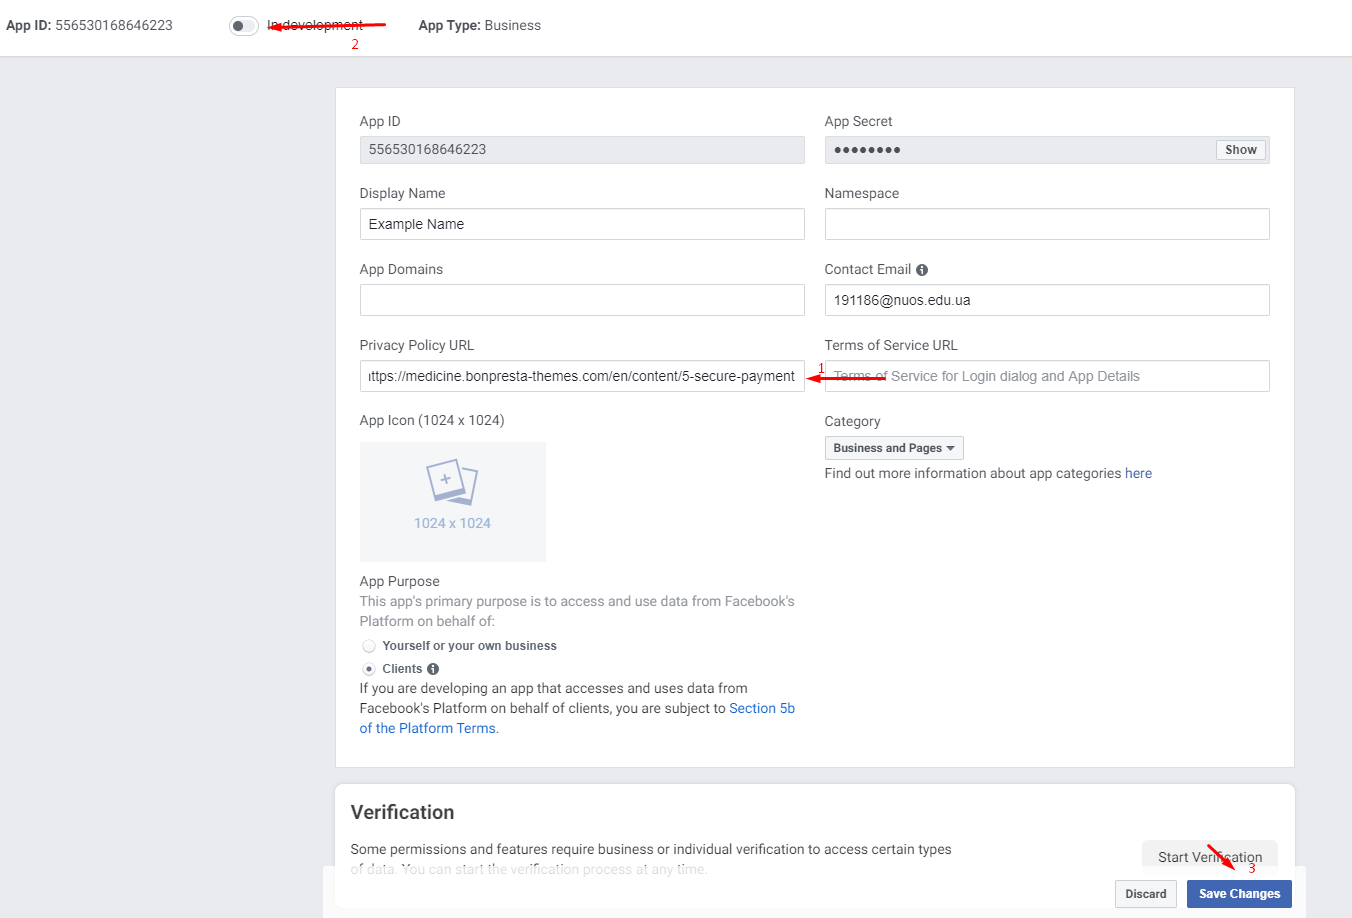
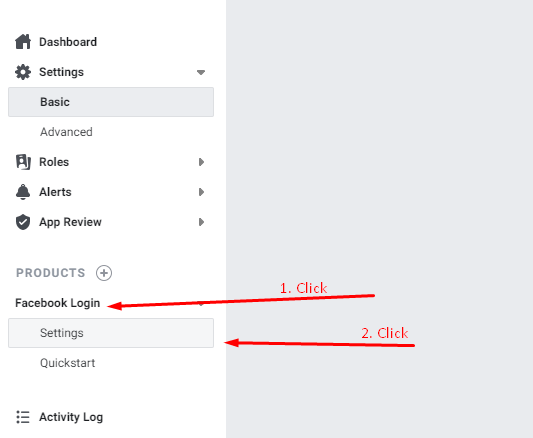
After saving the settings, you need to go to the "Facebook Login -> Settings" tab.
Select the following settings and enter your website url and save the settings.
Enter the received keys into the module fields.

You’re finished! That’s all there is to generating an App ID and Secret Key from Facebook. You can ignore the other settings.
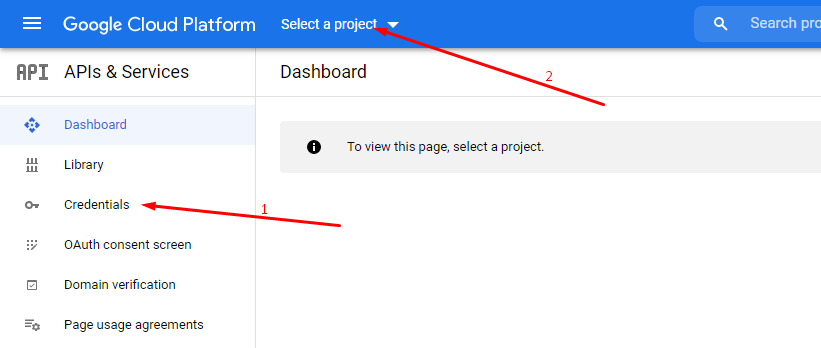
3.17.3 How To Get An App ID and Secret Key From Google
Go to the Google Developers Console.
Navigate to the tab "Credentials".
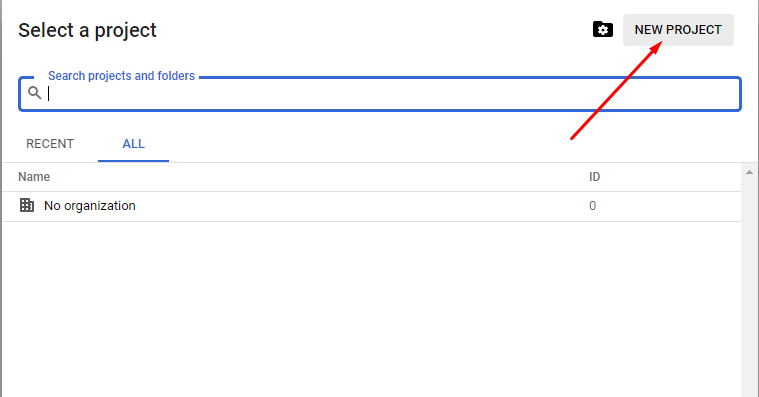
Click "Select a project -> New Project" .
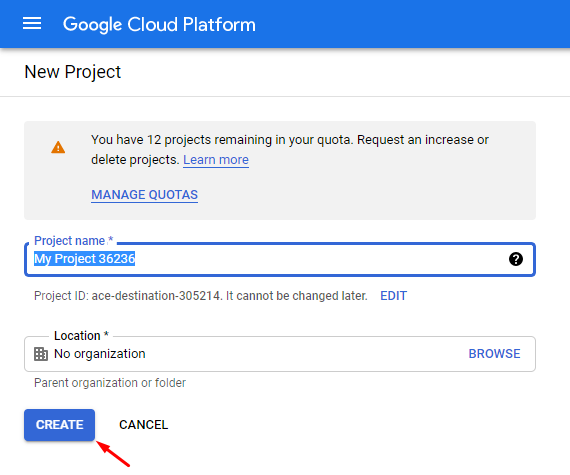
And then click the button “Create”.
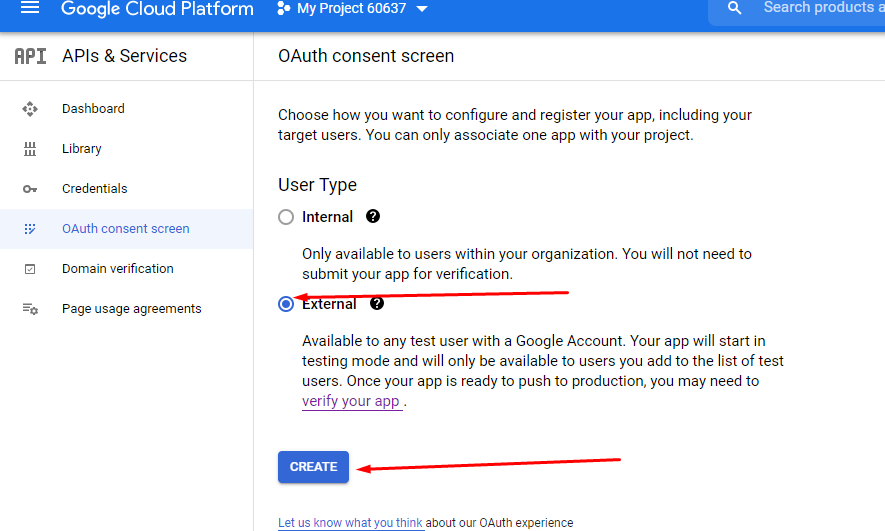
Next, in the "Credentials" tab, click the "Configure consent screen" button.

Select "External" and click "Create".
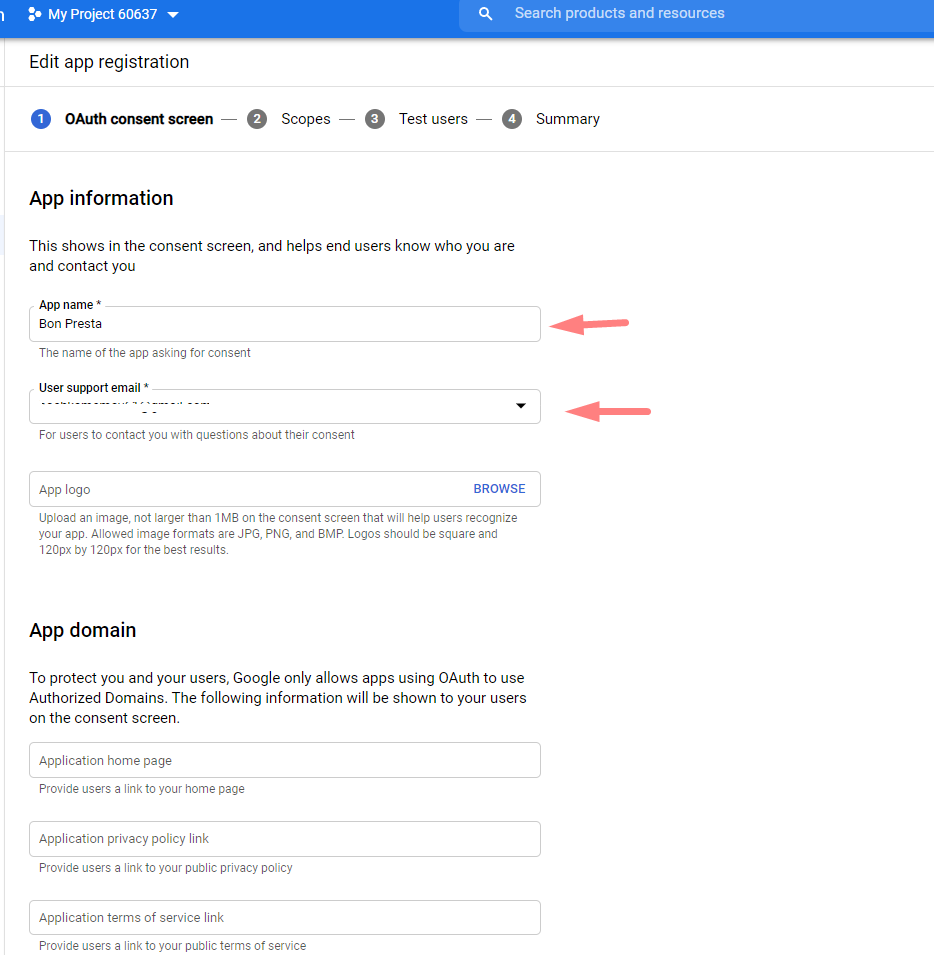
Then you need to fill out the form with the required fields.
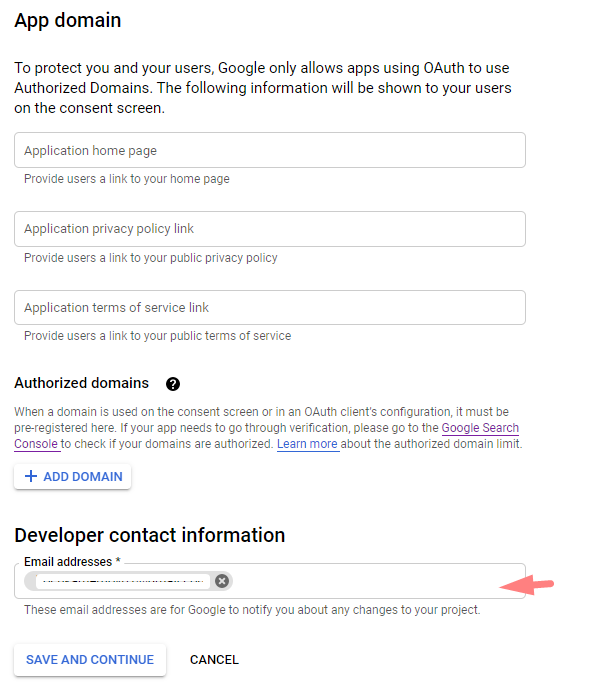
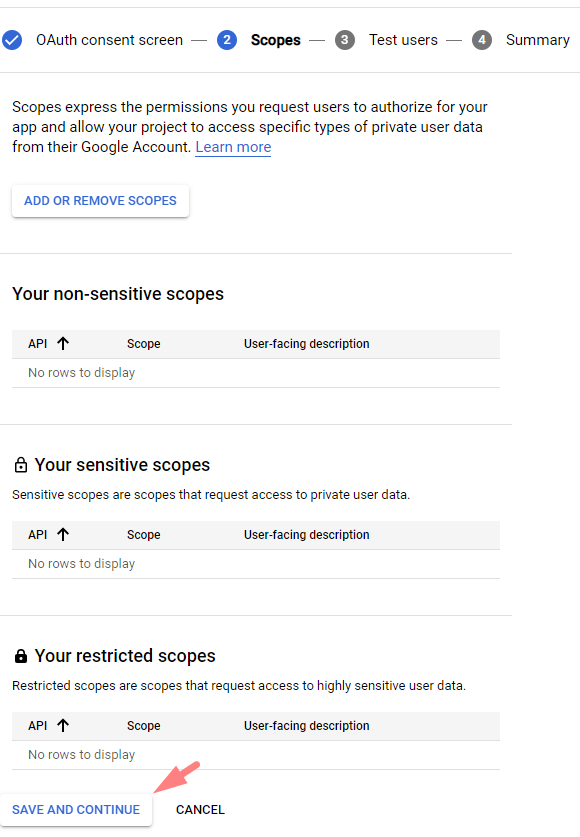
We continue filling out the forms by clicking on the "save and continue" button.
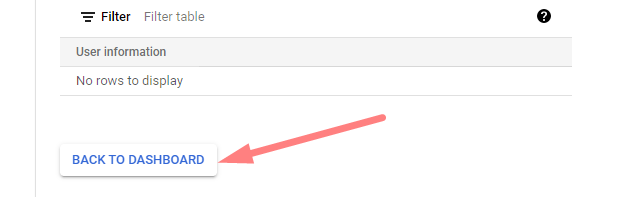
In the next, we also press the system.

In the last paragraph, click "back to dashboard"
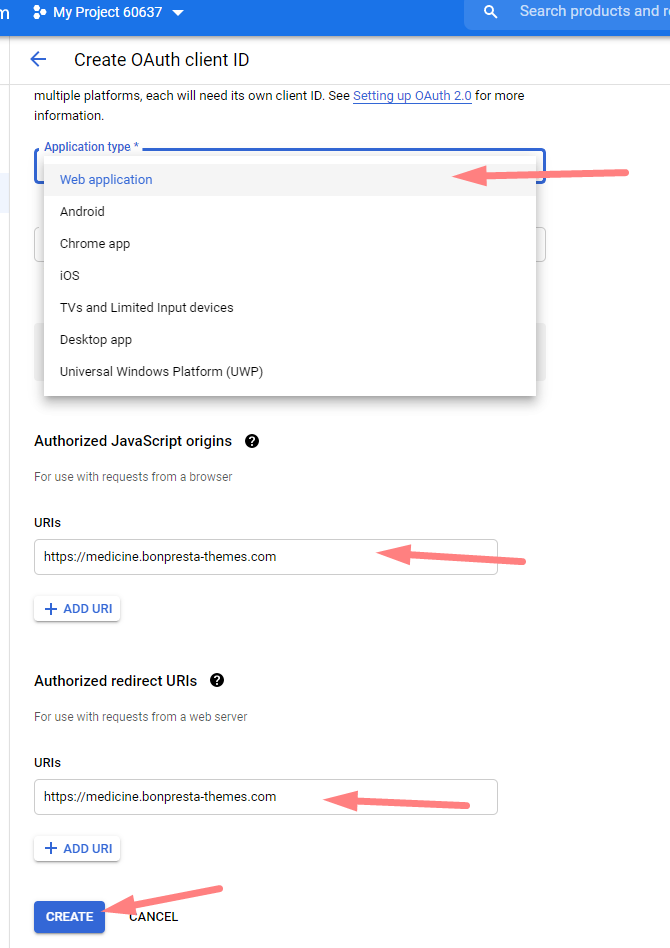
Go to the "Credentials" tab, click the "Create Credentials" button, and select the OAuth Client ID from the drop-down list.

From the Application type, select the Web application, enter Authorized JavaScript origins & Authorized redirect URIs and click the button "Create".
You’re finished! That’s all there is to generating an Client ID and Client secret code from Google. You can ignore the other settings.

Enter the received keys into the module fields and save the changes. Then you need to clear the cache from your back office.

3.18 Module "Bonmenu"
Back office view

Front office view
3.18.1 Сreating a new module element
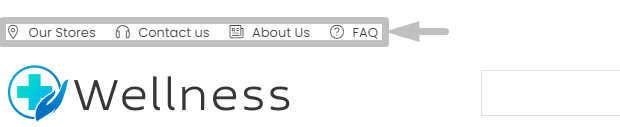
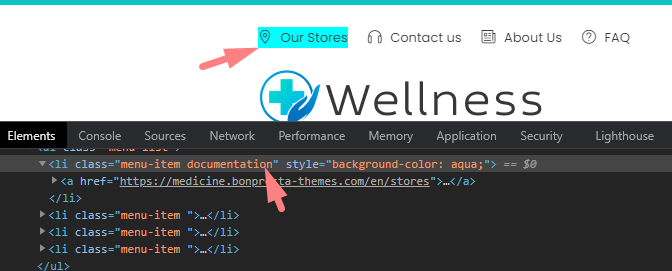
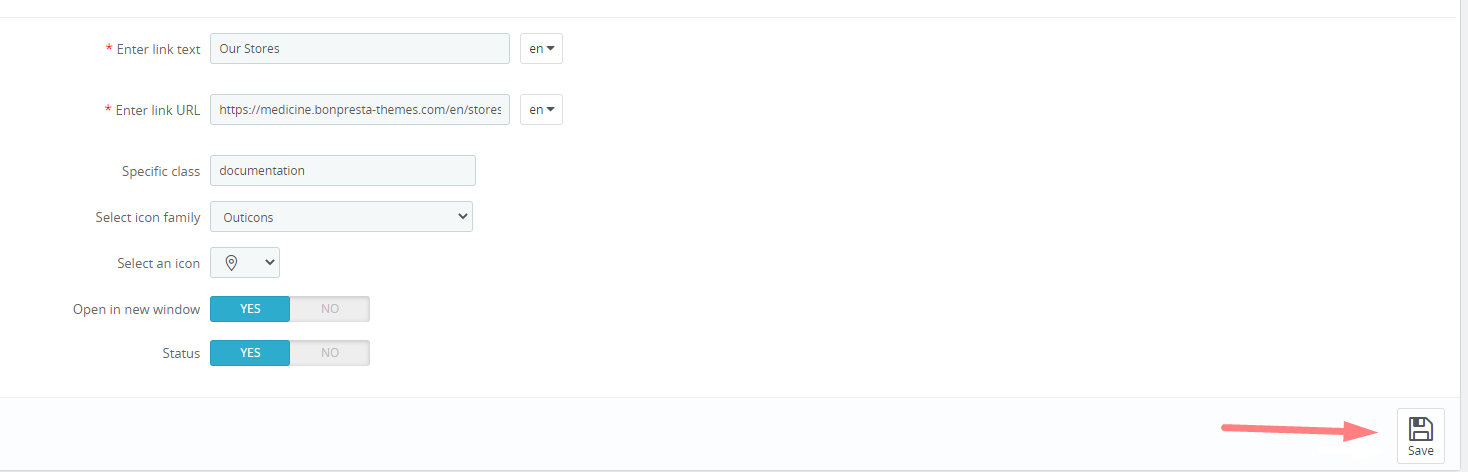
Let's analyze the principle of creating elements in the module using the demonstrated link "Our stores".
First of all, after entering the module configuration, you will see the standard settings:
First of all, to create a new item, click the button "Add new item".
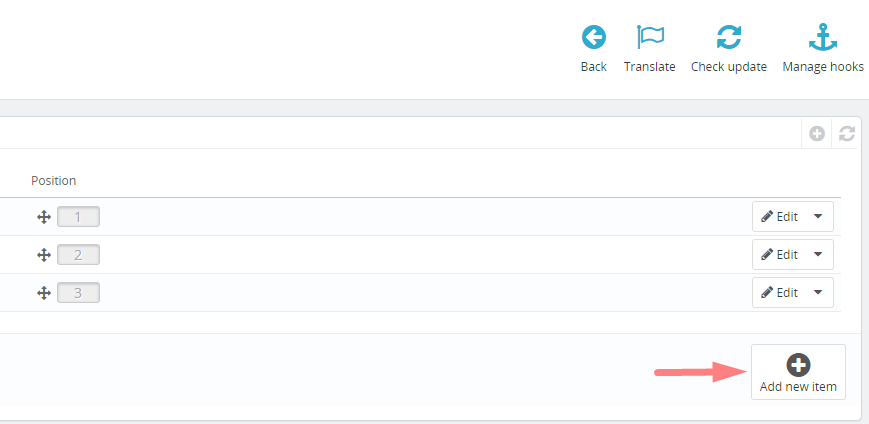
Start menu for creating a new item.
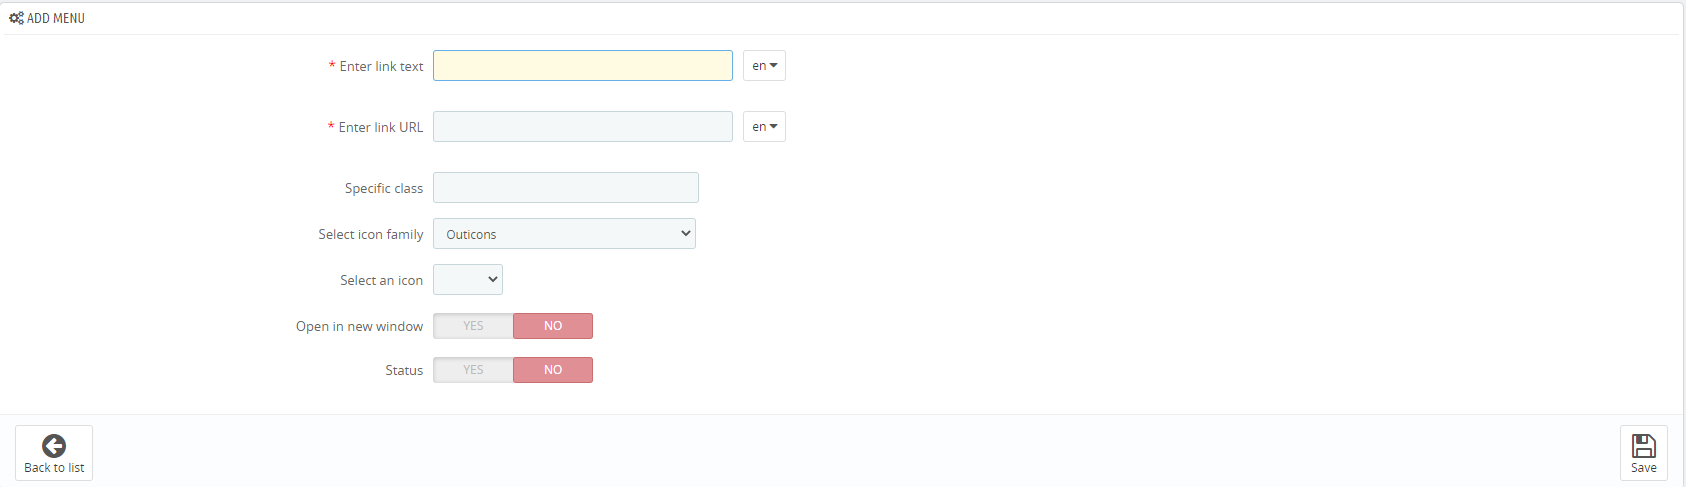
The "Enter link text" field sets the content of the header that is displayed in the front office(This field is required ).

The "Enter link URL" field is responsible for which page the user will be redirected to after clicking on the title(This field is required ).

The "Specific class" field is responsible for adding a separate class to the title, which will help you add customization if necessary, such as the color of the title text.
Back office view

Result in the front office
The "Select icon family" field is responsible for the font family of the icons that we will choose in the next paragraph

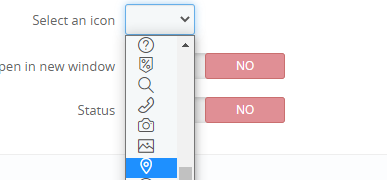
The "Select an icon" field is responsible for the icon that will be displayed next to the header in the front office. The list consists of icons from the font family that we chose in the previous paragraph
The "Open in new window" item is responsible for whether to open the link in a new window after clicking on the title.

The "Status" item is responsible for displaying the header in the front office.
The end result of the settings. After filling in the fields, click on the "Save" button
3.18.1 Сreating a new module element
3.19 Module "Bonask"
Back office view

Front office view
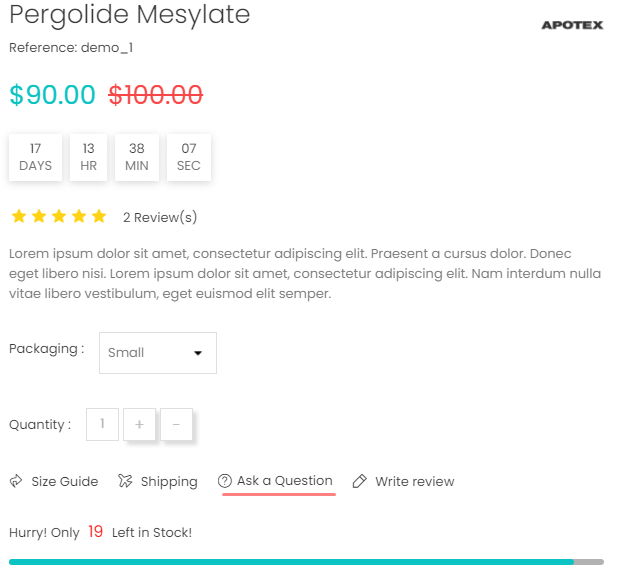
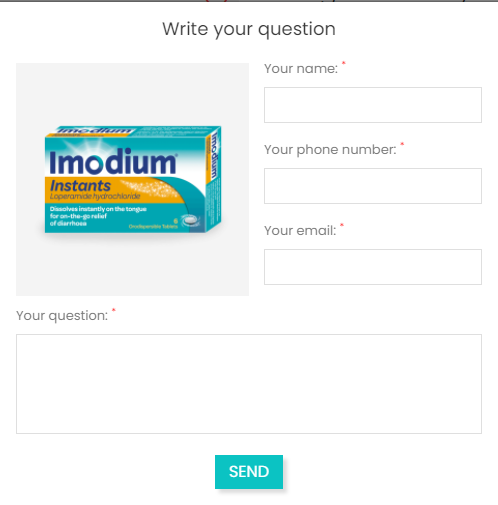
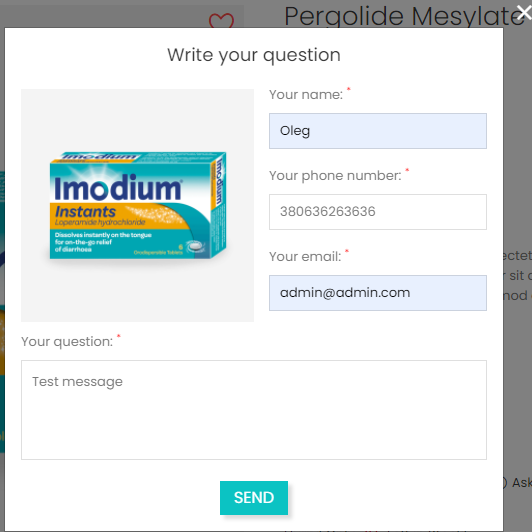
The "Bonask" module allows the user to send you a message by mail, for example, a question about a product.
3.19.1 Module settings
First you need to go to the module configuration. After going to the module configuration, you will see the module settings fields.

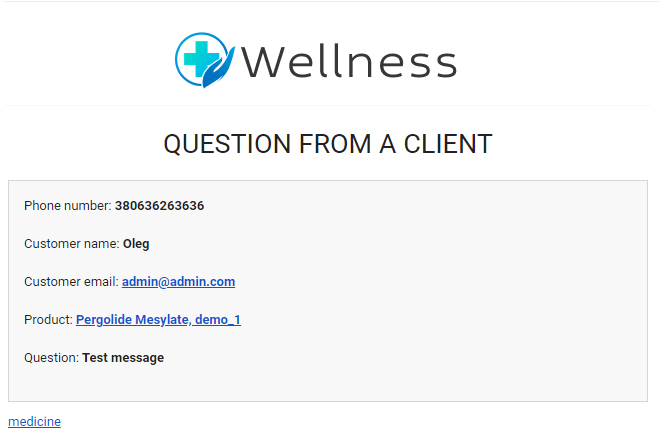
In order for the module to start working correctly, you just need to specify the correct mail. After that, if the user writes a message in the form of a module and sends it, you will receive a notification by mail with the user's request.

3.19.2 Work demonstration
User filling out a form.
Message to administrator mail.
3.19.3 A note on module hooks
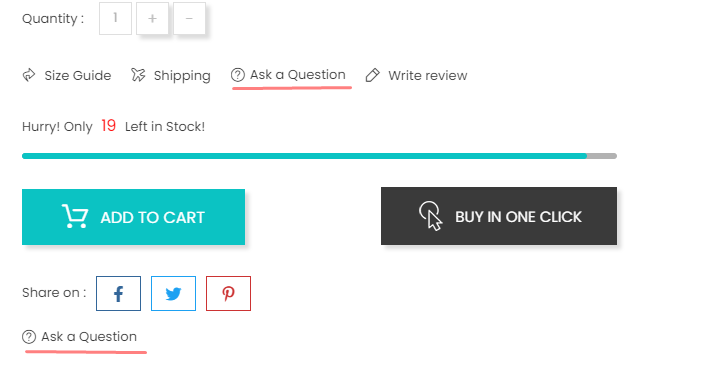
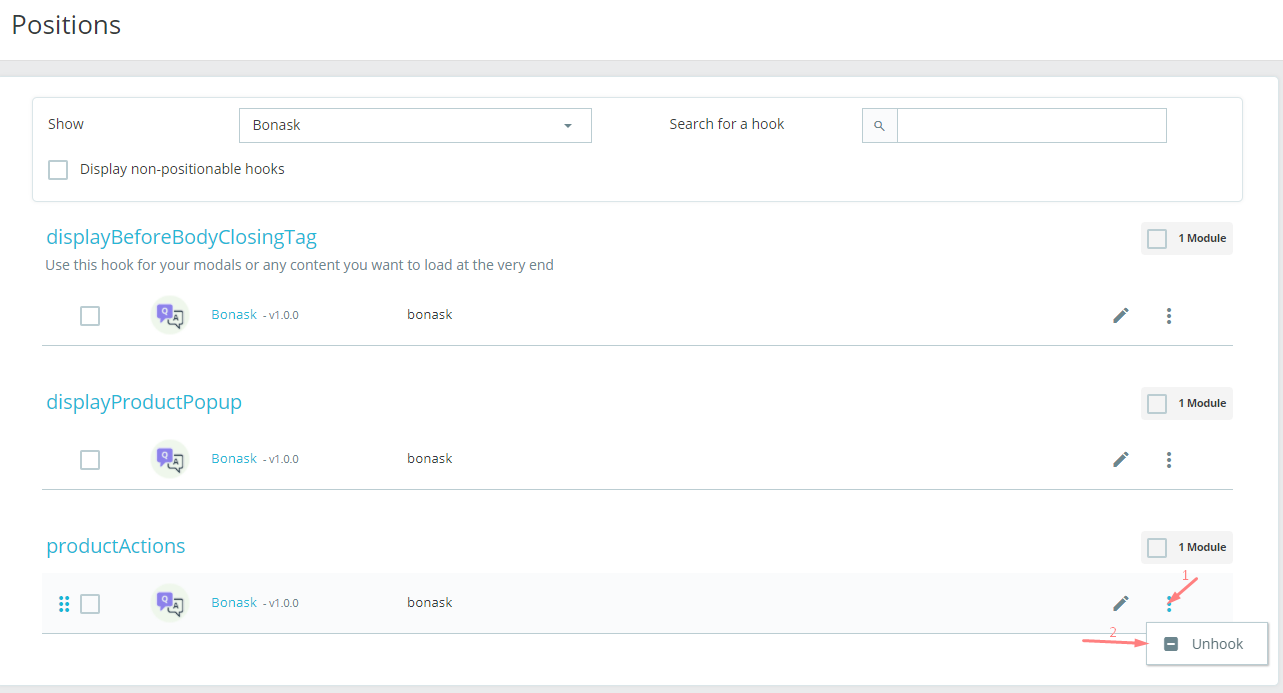
If after installing the module, the display on the front office occurs twice, as in the screenshot
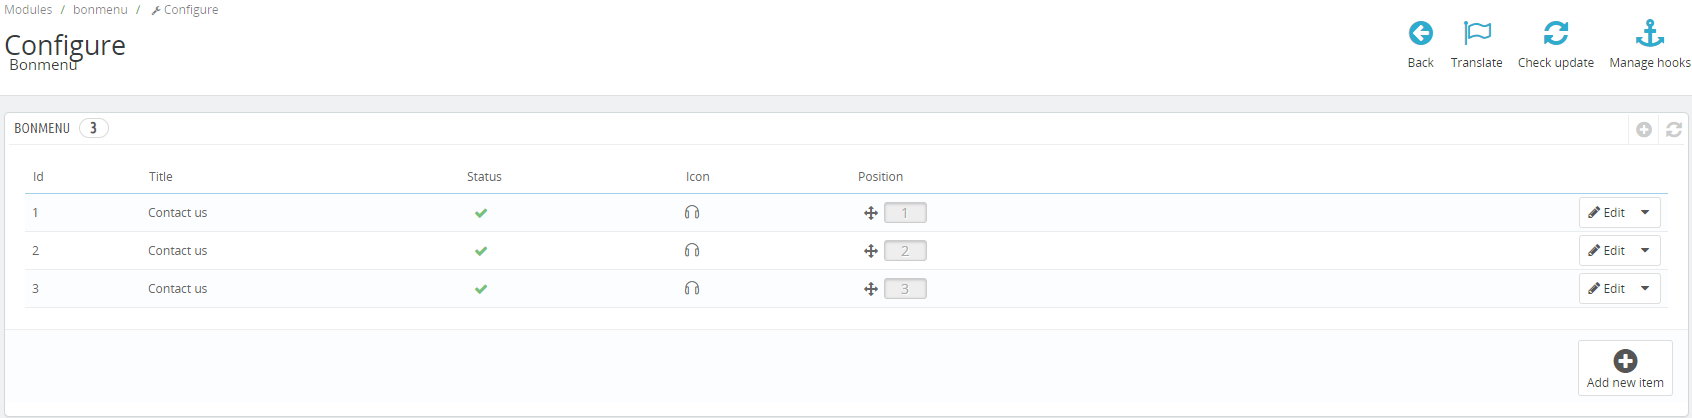
You need to go to "Manage hooks".
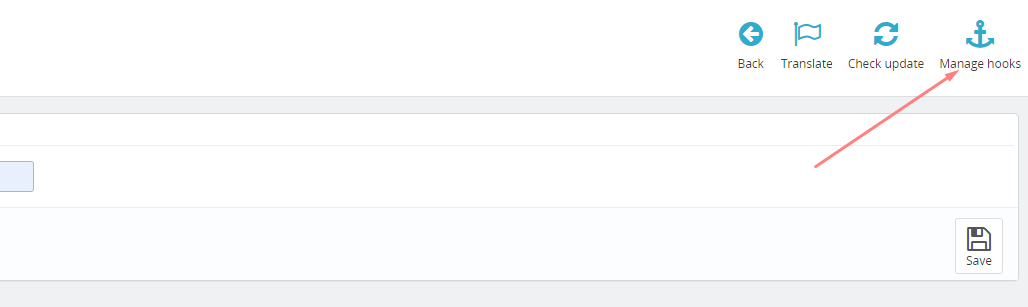
And remove one of the last two hooks. The "displayProductPopup" hook is responsible for displaying before the "Add to cart" button, and the "productActions" hook after.
3.20 Module "Call Back"
Back office view

Front office view

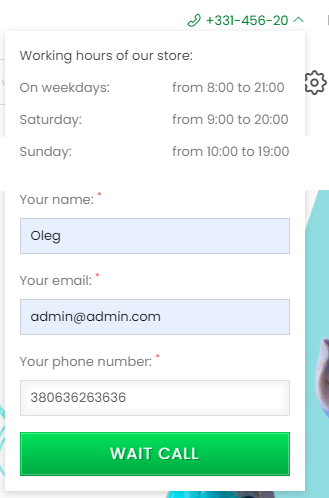
The module allows the client to order a call back, as well as find out the contact information of the store.
3.20.1 Module settings
First you need to go to the module configuration. After going to the module configuration, you will see the module settings fields.
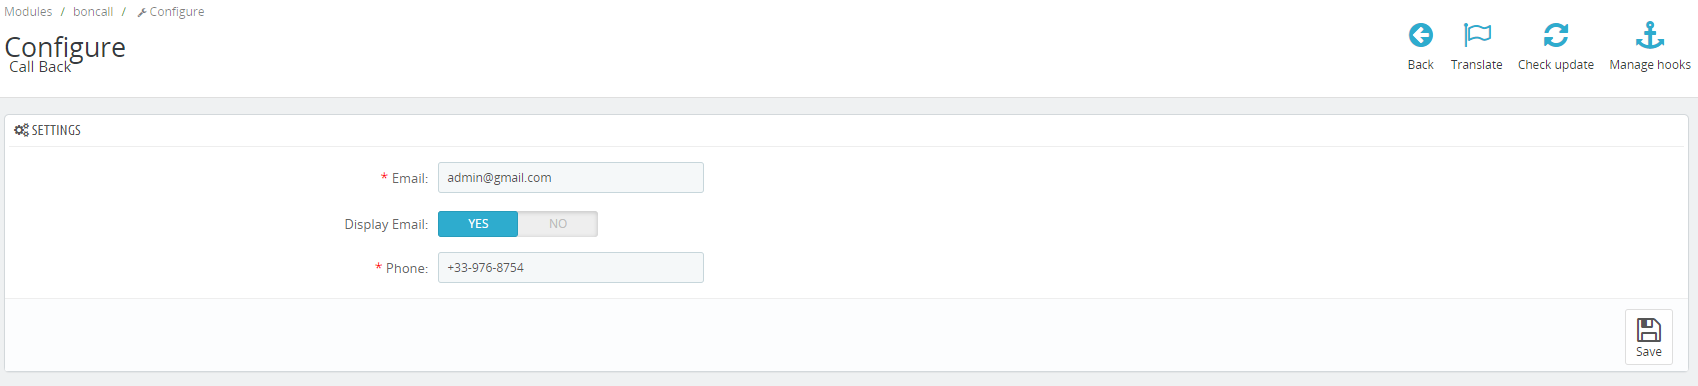
The first field specifies the email to be displayed on the front office, and it will also receive a notification about a callback request.

In the second field you can specify whether to display email on the front office or not.

In the last field, you must specify the contact phone number.

3.19.2 Work demonstration
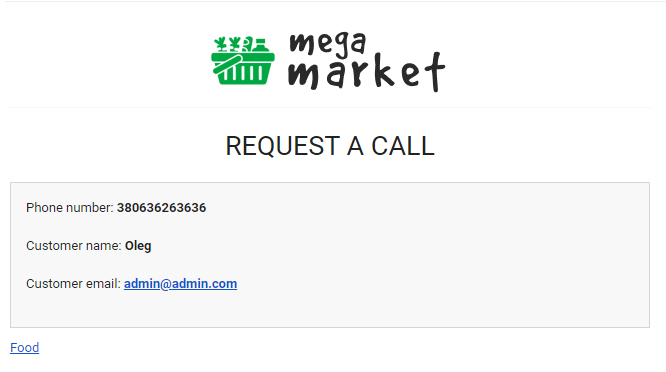
After clicking on the phone in the front office, fields for filling appear. After filling in all the fields, a callback request is sent to the specified mail.
Message by mail
3.21 Module "Latest purchase"
Back office view

Front office view

The module allows you to display the latest product purchases to the front office, in order to attract attention and increase sales.
3.20.1 Module settings
After going to the module configuration, you will see the module settings fields.
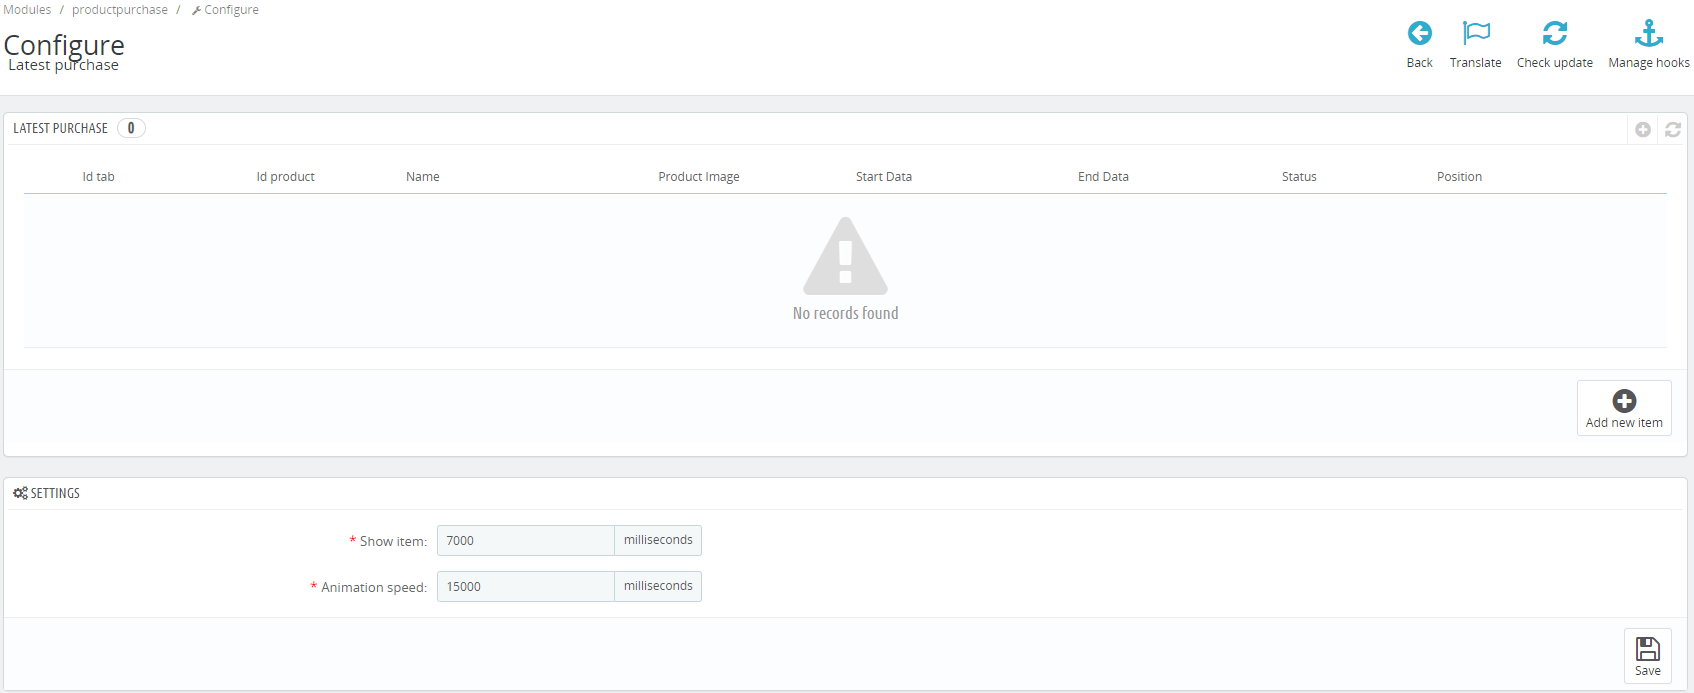
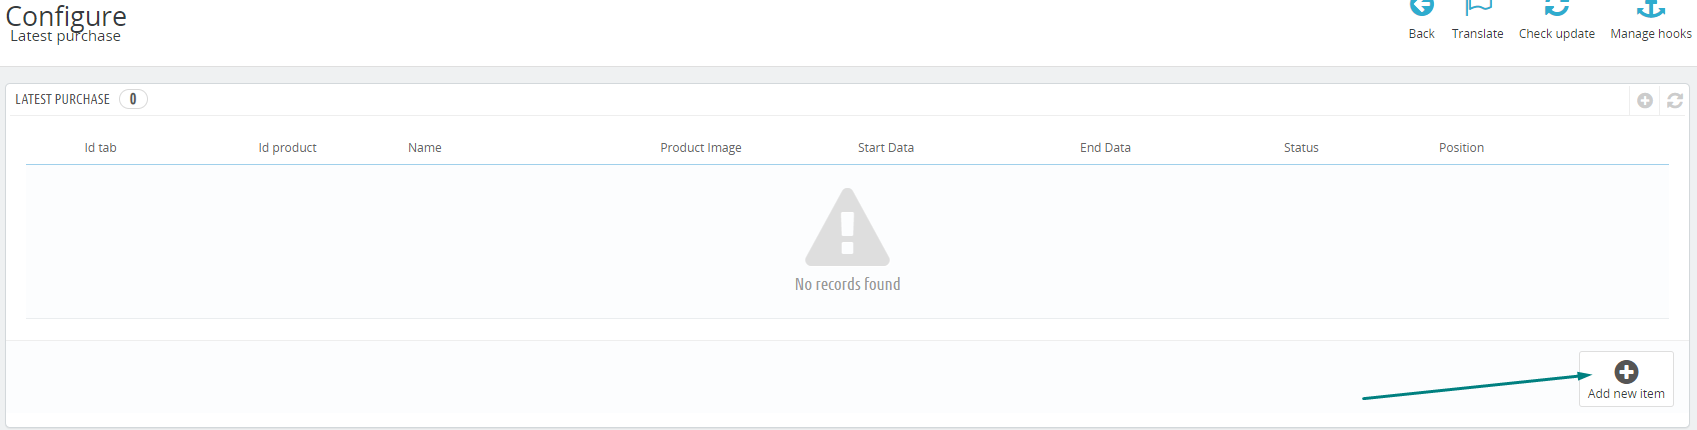
To create a new item for display, you must click the "Add new item".
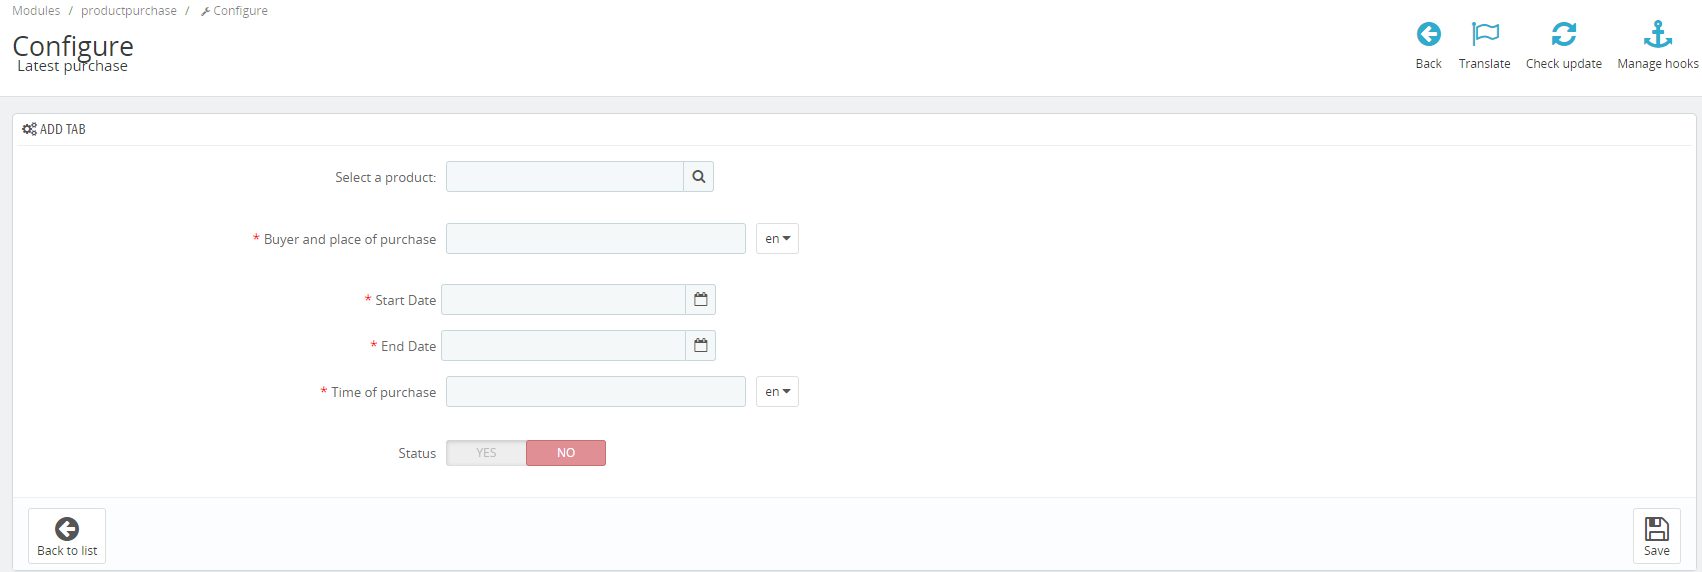
After clicking on the button, all available fields appear for filling.
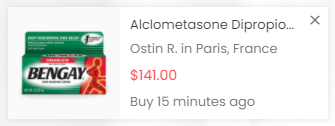
Consider an example of an already created element that was attached in the screenshot above.
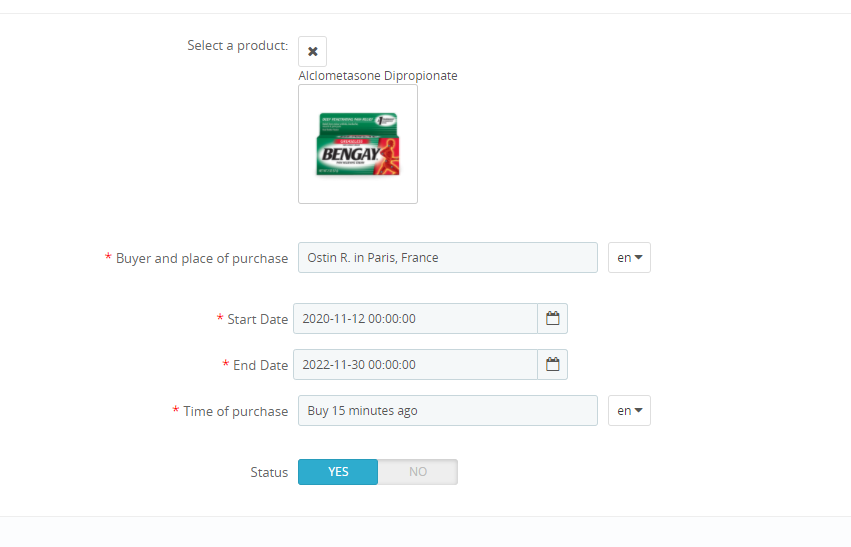
In the first field, you need to select the desired product by entering the name of the product in the empty field. After that, the found product will be highlighted on which you need to click.

In the second field, you enter the customer who bought the product and, if desired, the location of the customer (Note: if you have several languages on the site, you must fill in the field for each).

In the "Start Date" field, you need to enter the start date for displaying the created element by clicking on the date field.
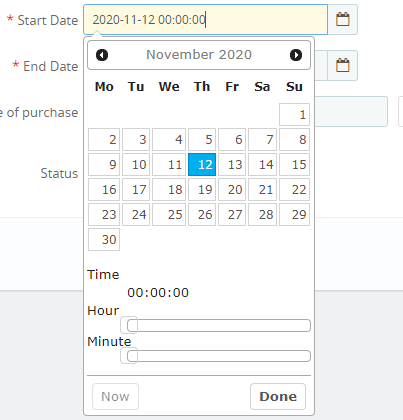
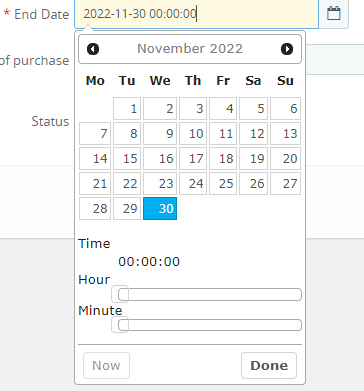
In the "End Date" field, you must enter the end date for displaying the item, also clicking on the date field.
In the "Time of purchase" field, you must indicate how many, for example, minutes ago the purchase was made.

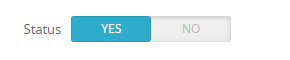
And the last field "Status" indicates whether the item is on or off for display.
Finally, you need to click the "Save" button and our element is ready.
You can also adjust the frequency of appearance of elements on the screen by setting your values in the following fields, which are in the module settings.
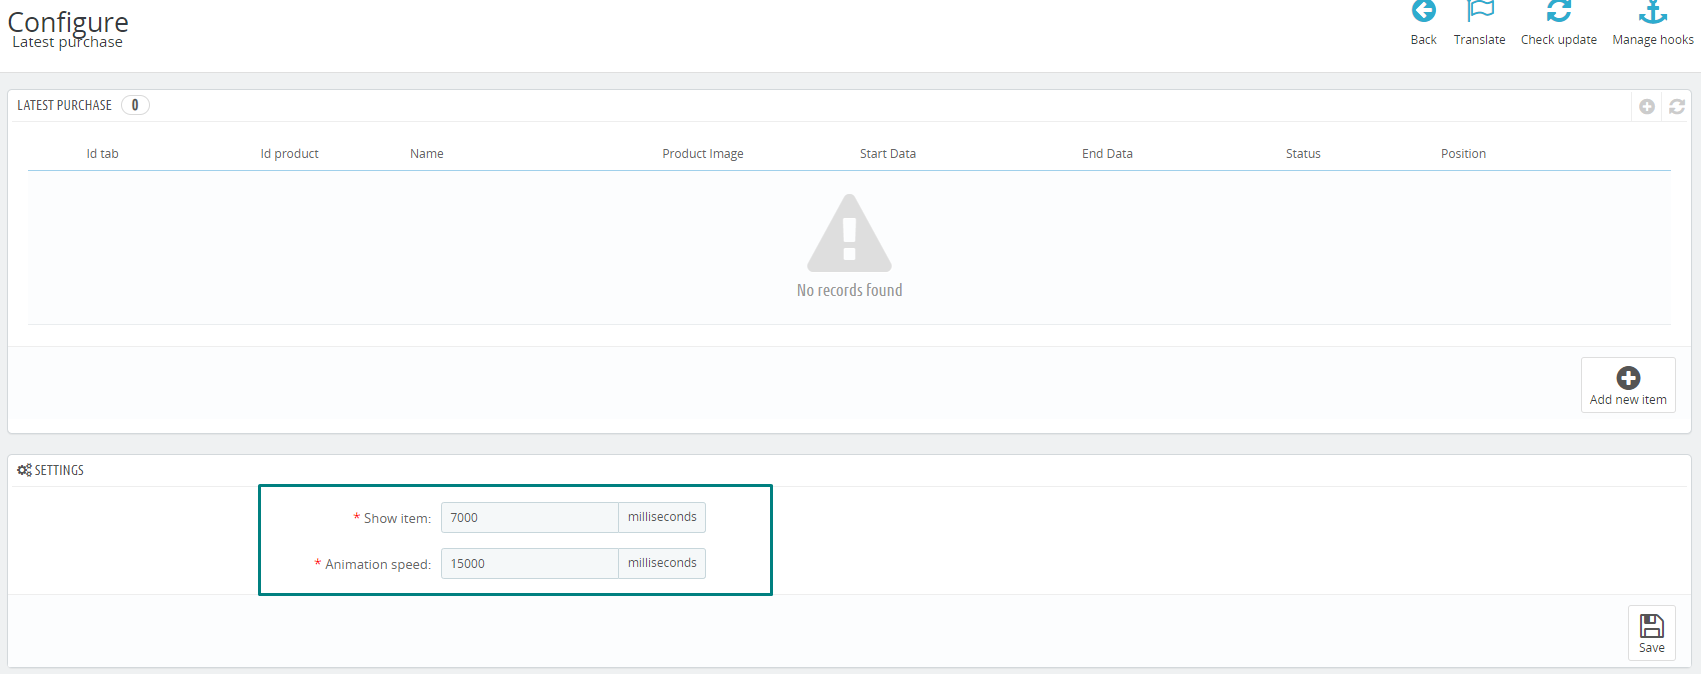
The "Show item" field is responsible for the time when the next item appears on the screen.

The "Animation speed" field is responsible for how long one element will be displayed.

3.22 Module "Wishlist"
Back office view

Front office view
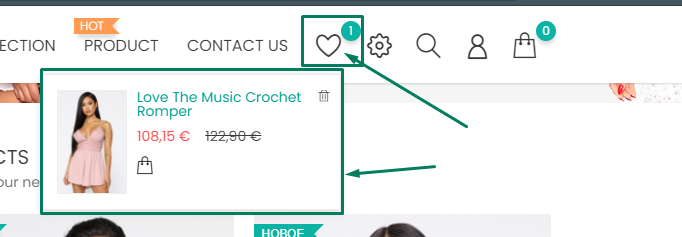

The module allows the client to mark the product he liked for further consideration and the impossibility of losing it among another list of products.

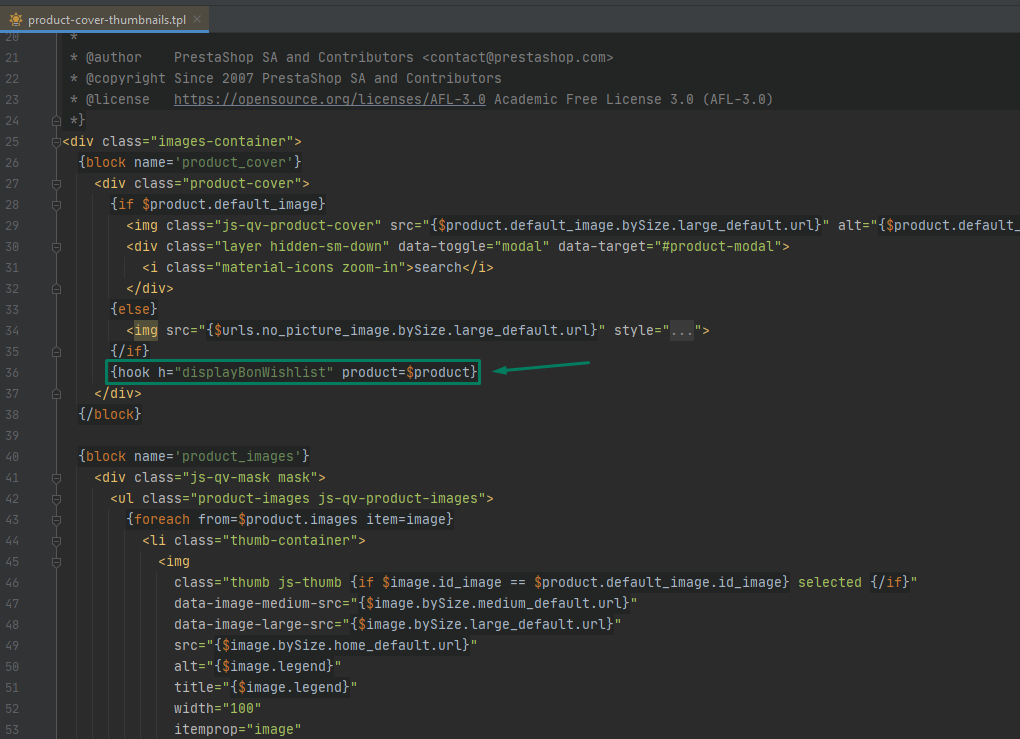
For the module to work correctly, you need to configure the module hooks. Let's get started
If the module does not work after installation, you first need to check for module hooks in the theme's tpl files.
The individual module hook is called "displayBonWishlist". The first file that should contain the hook is located in the "themes \ Theme Name \ templates \ catalog \ _partials" folder called "product-cover-thumbnails.tpl".
The following file is called "product.tpl" and is located in the folder under the path "themes \ Theme Name \ templates \ catalog \ _partials \ miniatures \"
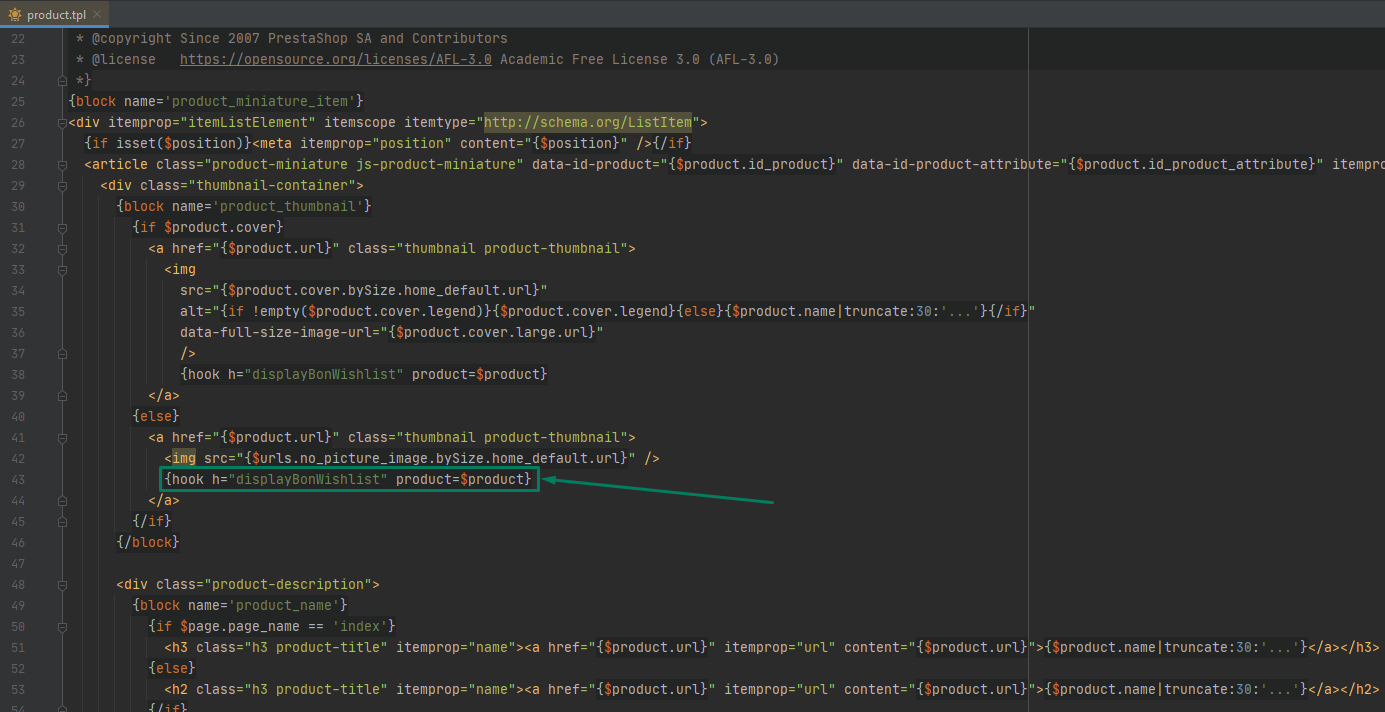
If the hook is missing in the specified place, you need to add the following code to this place yourself:
{hook h="displayBonWishlist" product=$product}
After you check and, if necessary, add the module hooks, the module should start working correctly.
Note: Each theme has its own tpl file location. If there is a discrepancy with the above file paths, contact the theme developers for the location of the required files.
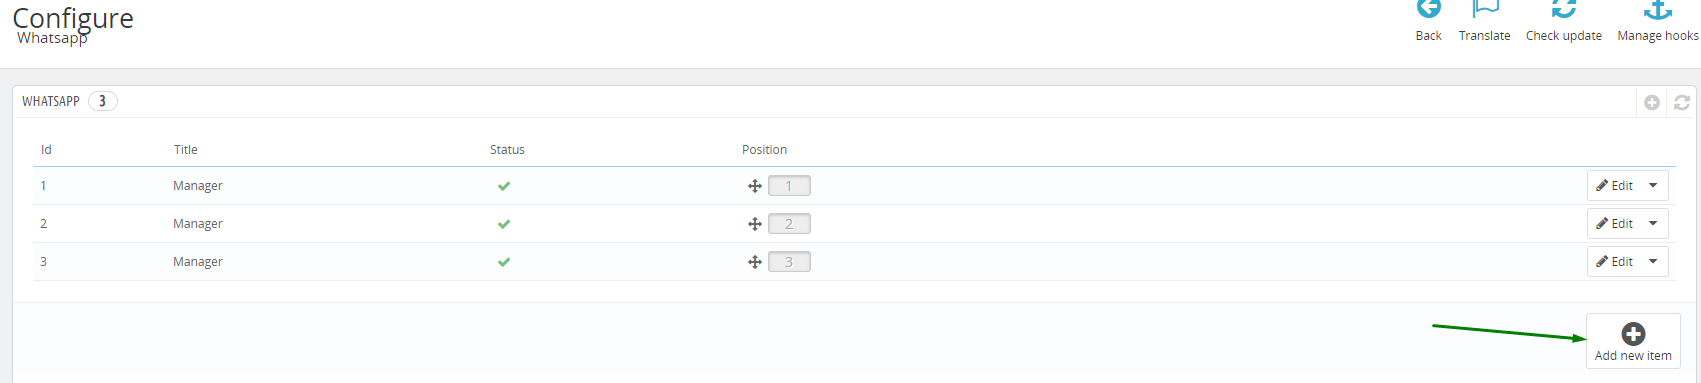
3.23 Module "Whatsapp"
Back office view

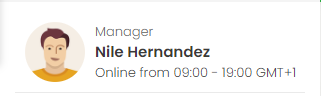
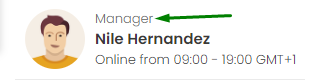
Front office view
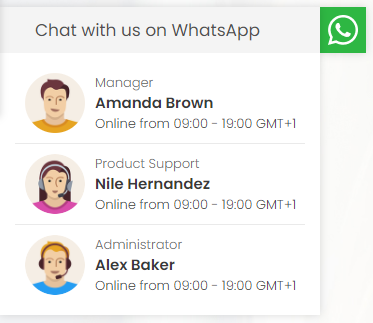
The module allows you to add an unlimited number of Whatsapp support numbers for your website.
3.23.1 Module settings
The module configurations are as follows:
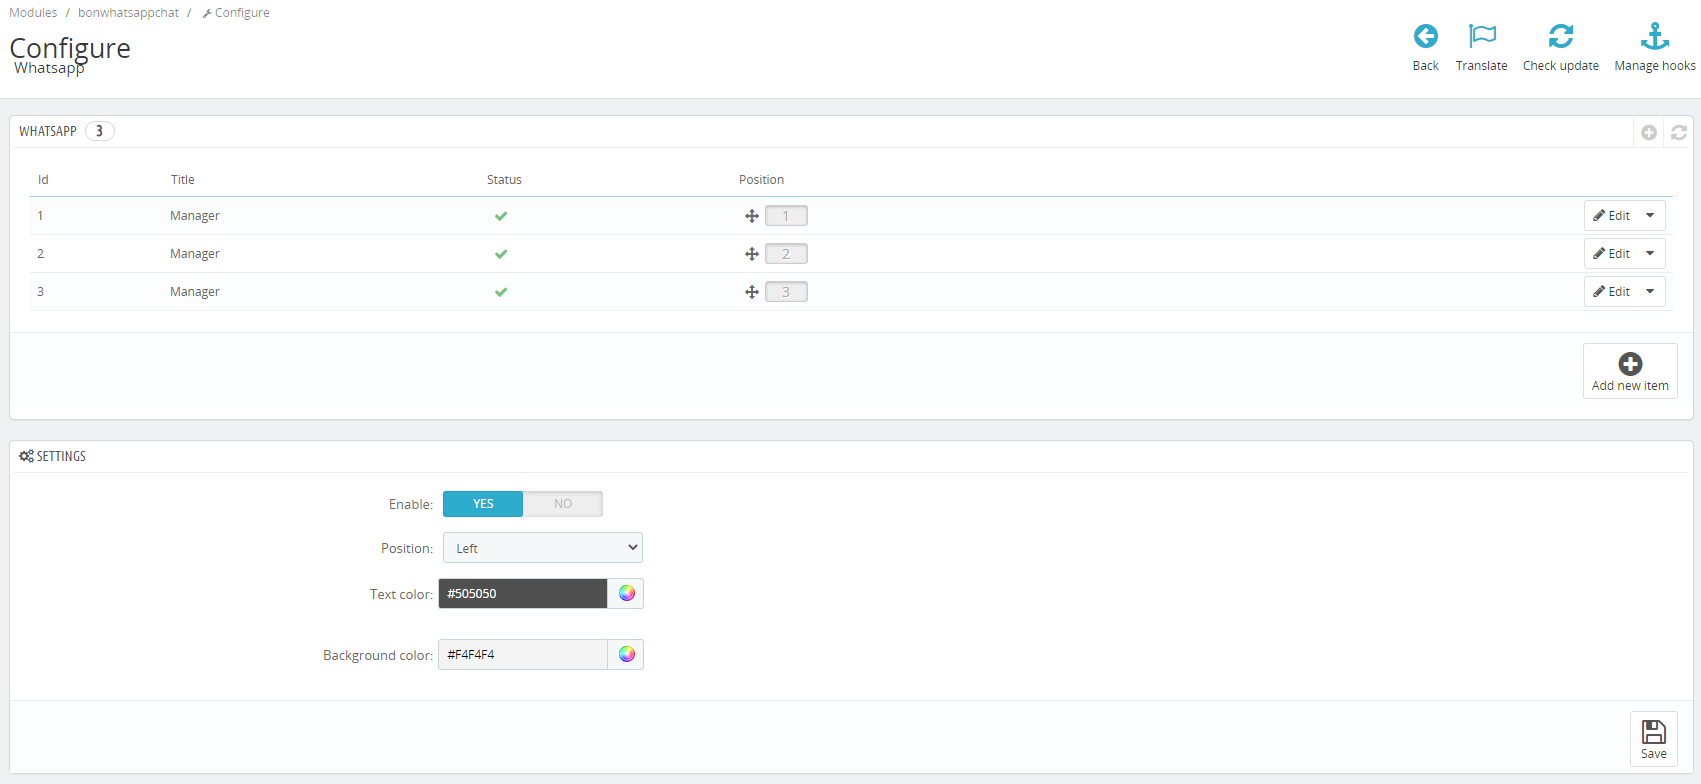
The window called "Settings" contains the following settings: "Enable", "Position", "Text color", "Background color". More about each of them
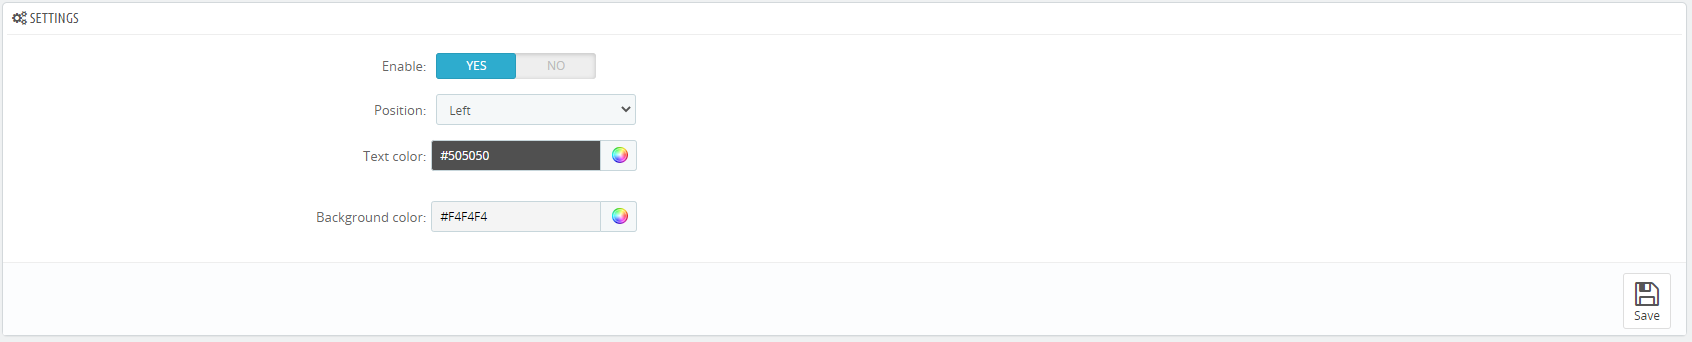
The "Enable" function is responsible for the module operation. If the value is "YES" the module is displayed on the fron office, "NO" is hidden.

The "Position" function is responsible for positioning the module on the front office. If the value is "Left", the icon and the window of the module are displayed on the left side, with "Right" - on the right.
The "Text color" function is responsible for the color of the text in the title.


The "Background color" function is responsible for the background color in the module header.


More about the elements of the module. To create a new item, click on the "Add new item" button.
We will consider the creation of a new element of the module using the example of an existing one.
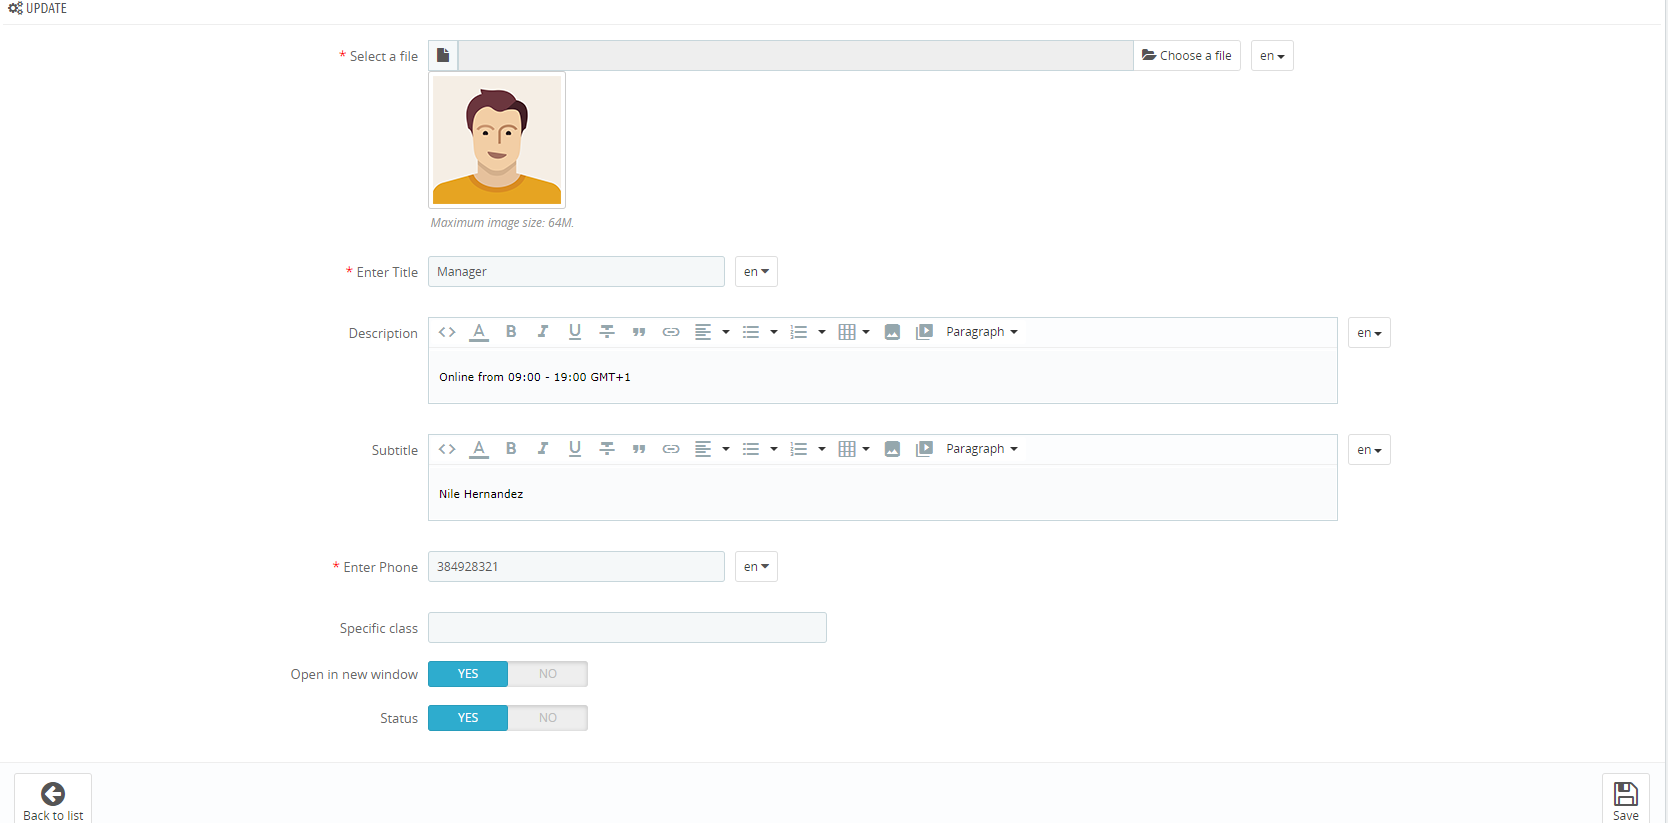
The "Select a file" field is responsible for the displayed image.

The "Enter Title" field is responsible for the title of the element.

The "Description" field is responsible for the bottom margin of the element.

The "Subtitle" field is responsible for the second field of the element.

The field "Enter phone" is responsible for the phone WhatsApp in the chat to which the user will be redirected after clicking on the item.

After clicking on the element, a transition will be made to the WhatsApp desktop application, after authorization (if the client has not done this before), the client will be redirected to the chat with the specified number, if the user is from a computer.
If the user is using a mobile device and has the WhatsApp application installed, they will be redirected directly to the application, otherwise they will be directed to the WhatsApp website in the mobile browser.
The phone number must be exactly the one that is registered in the WhatsApp application.
The "Specific class" field is responsible for adding an individual class to an element for further custom styling of the element. For example, a different fill color.


The "Open in new window" field is responsible for what happens after clicking on the element. Option "YES" is responsible for redirecting the user to a new tab, option "NO" will open in the current tab.

The "Status" field is responsible for displaying the element on the front office. Option "YES" displays the item, "NO" does not.

This completes the setting of the element.
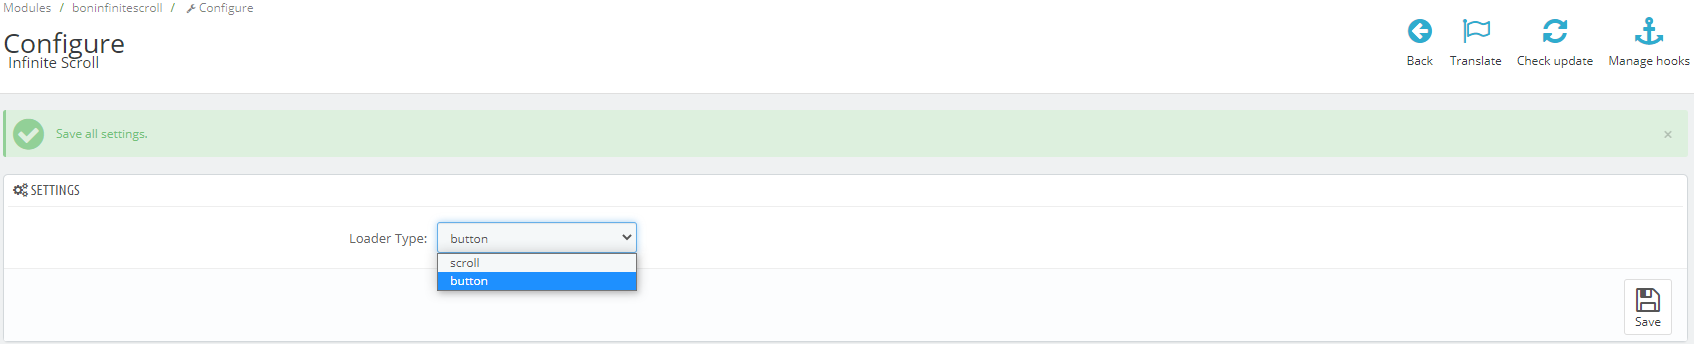
3.24 Module "Infinite Scroll"
Back office view

Front office view

The module allows you to update the list of products on the category page without rebooting an unlimited number of times, right up until the end of the products.
3.24.1 Module settings
There is only one "Loader Type" option in the module configuration in the back office. The first value - "button" is responsible for displaying the button for loading new products on the category page, and the "scroll" value - allows you to automatically load a new list of products without unnecessary user actions when the user scrolls to the end of the page.
To complete the configuration of the module, you need to add a hook to the file named "products.tpl" located in the path "themes \ Theme Name \ templates \ catalog \ _partials". Code:
{hook h = "displayButtonScroll"}
Result:
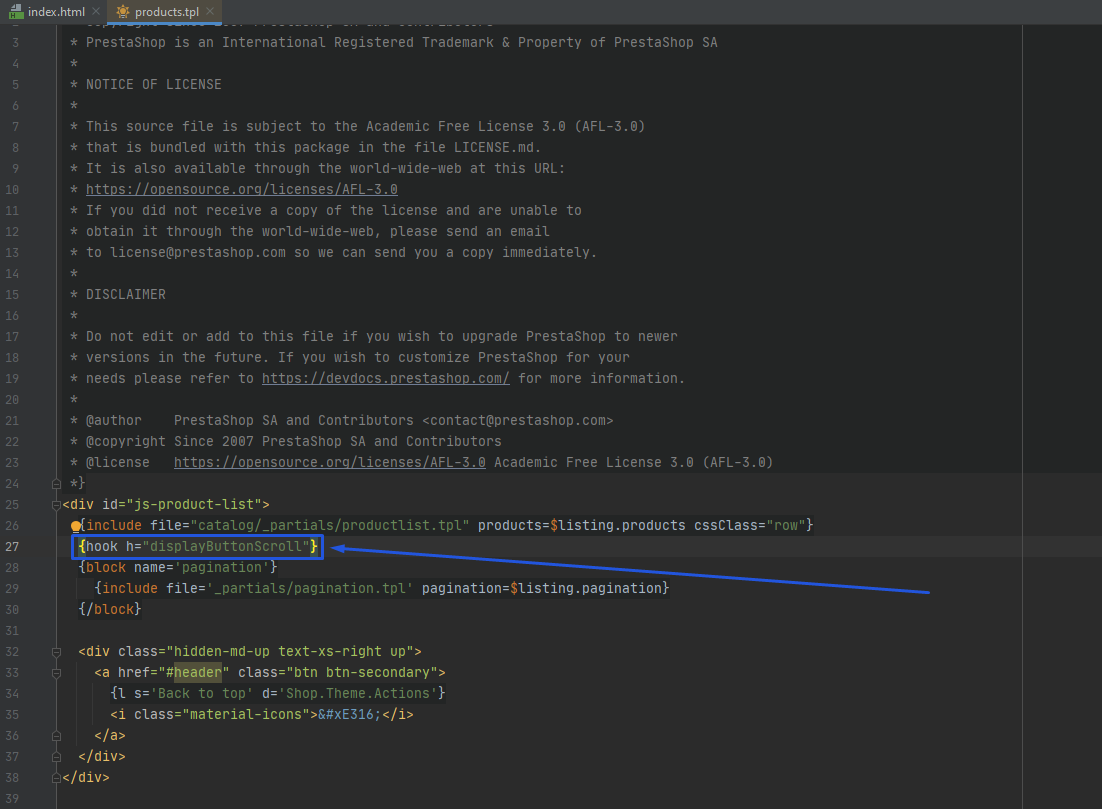
Note: The structure of the location of the tpl files in each theme is different, and may differ from the above. In this case, you need to contact the theme developers with a question about the path to the above file.
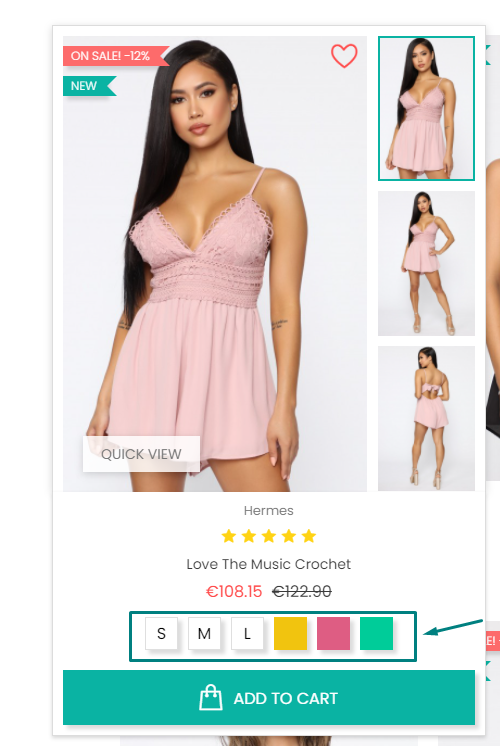
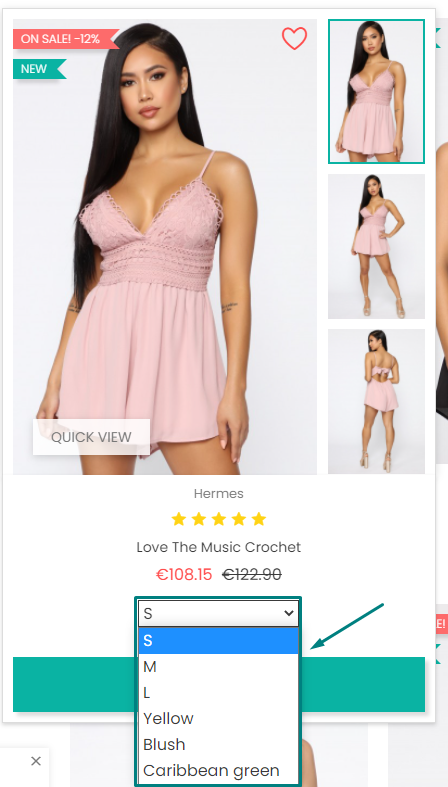
3.25 Module "Product Attributes and Combinations"
Back office view

Front office view
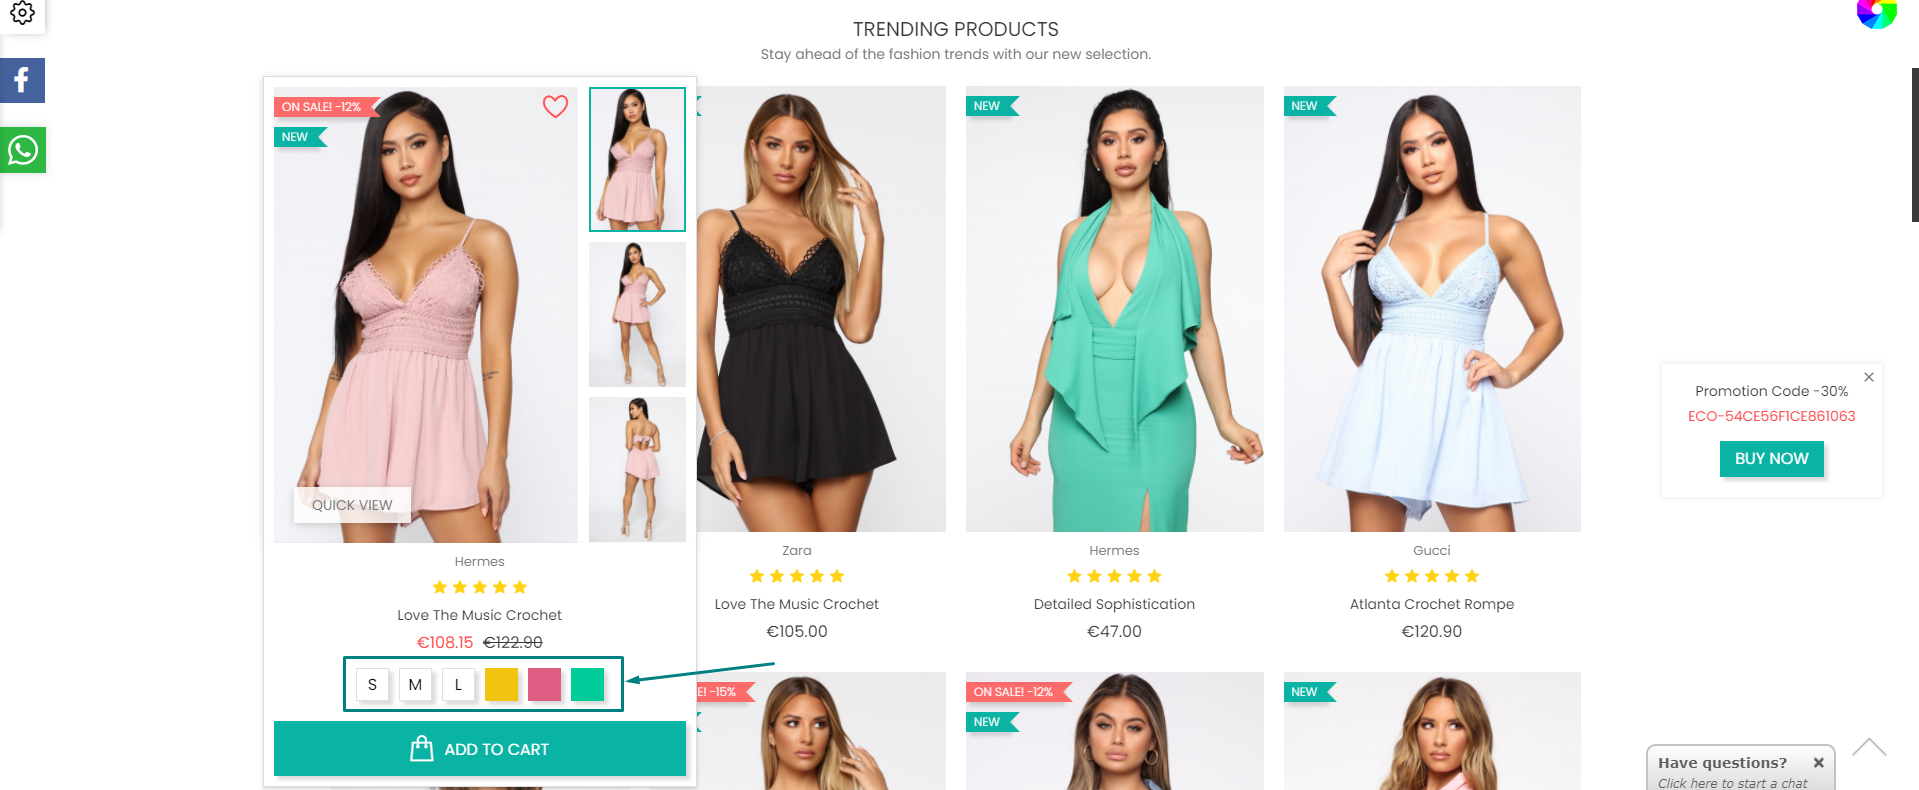
The module allows you to display product attributes in the product card.
3.25.1 Module settings
Module configurations.

There are two parameters in the module configuration: "Enable" and "Attribute type". The "Enable" parameter is responsible for the operation of the module: "Yes" - the module is enabled, "No" - disabled.

The "Attribute Type" parameter is responsible for how the module is displayed in the front office. Attributes view for the "Radio buttons" parameter:

Attributes view for the "Drop-down list" parameter:

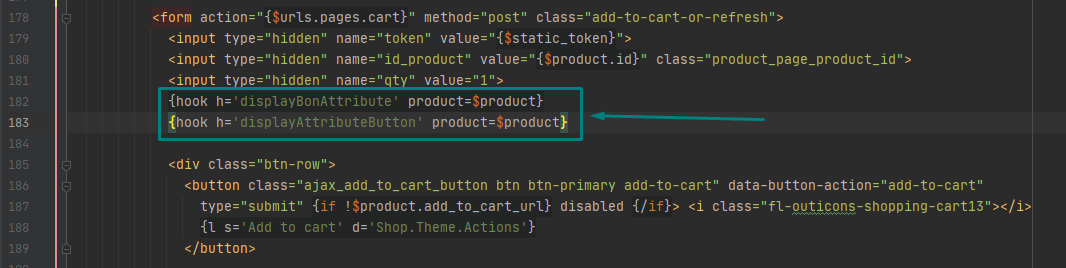
Note: If you installed the module separately, you need to make changes to the tpl file for the module to work correctly.
The file path is "..\themes\Theme Name\templates\catalog\_partials\miniatures\", the name of the file to be changed is "product.tpl". The code to add:
{hook h='displayBonAttribute' product=$product}
{hook h='displayAttributeButton' product=$product}
Result:
3.26 Module "Google Map"
Back office view

Front office view
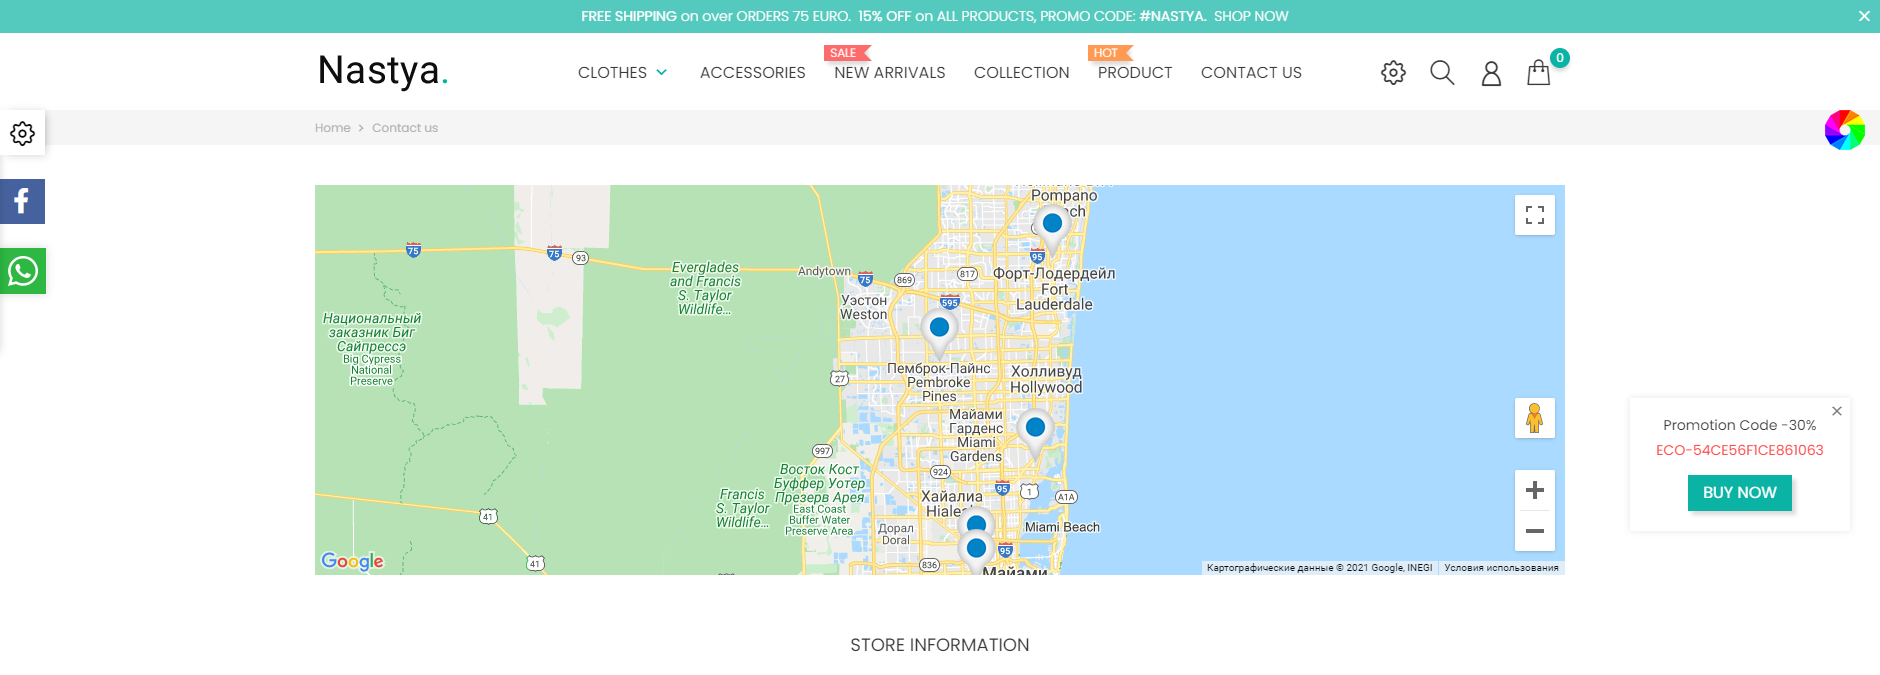
The module allows you to add the address of your stores and display them on the map.
3.26.1 Getting google key
There are many fields for editing in the module configurations and we will get acquainted with them, but a little later. The first step for the module to work correctly is to enter the "Google Key". Further instructions for obtaining a key.
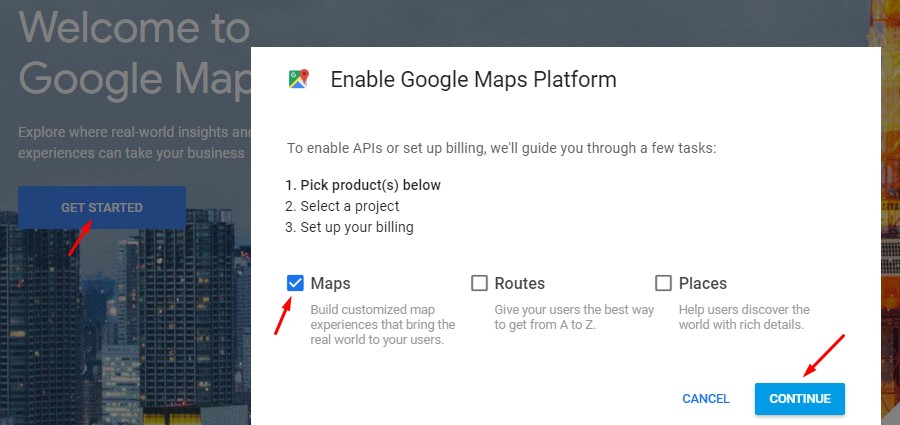
To get Google Maps API Key you need to have a Google account. It's free to create an account, build here. Most likely, we already have a Google account, so let's move on to the next step.
Go to the platform using the link: https://cloud.google.com/maps-platform/ and click on the "Get Started" button. In the dialog box that appears, select "Maps" and click the "Continue" button.
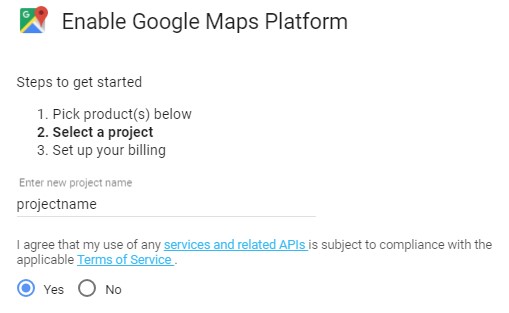
If this is your first time creating an API key, you must create a project first. Enter the name of the project, agree to the terms, click the "Next" button in the lower right corner.
Next, we connect the payment system to use the API by creating a payment account.

Select a country, agree to the terms and conditions and click "Accept and Continue"
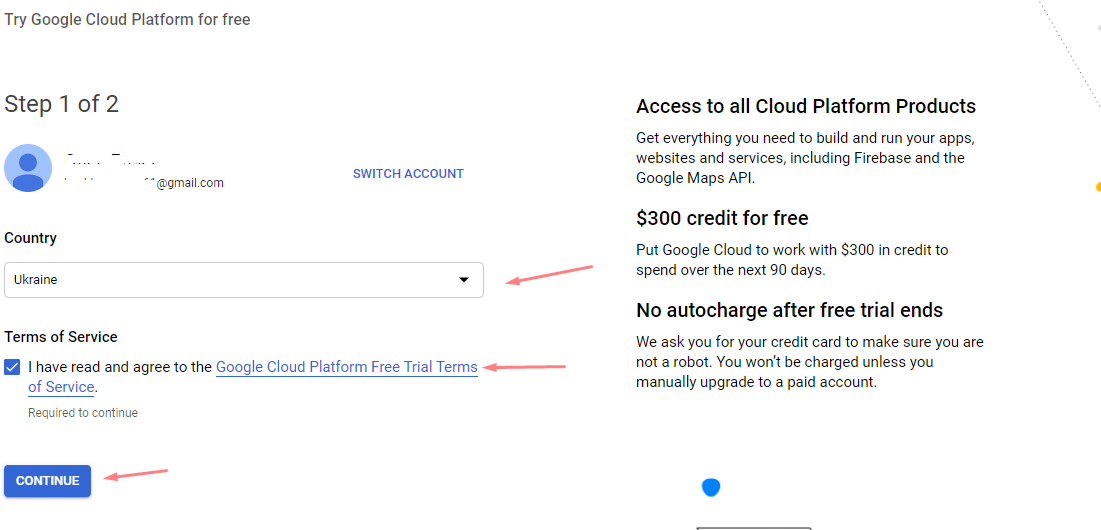
Next ("Step 2 of 2") enter your data in the fields. Below is the data for an example.
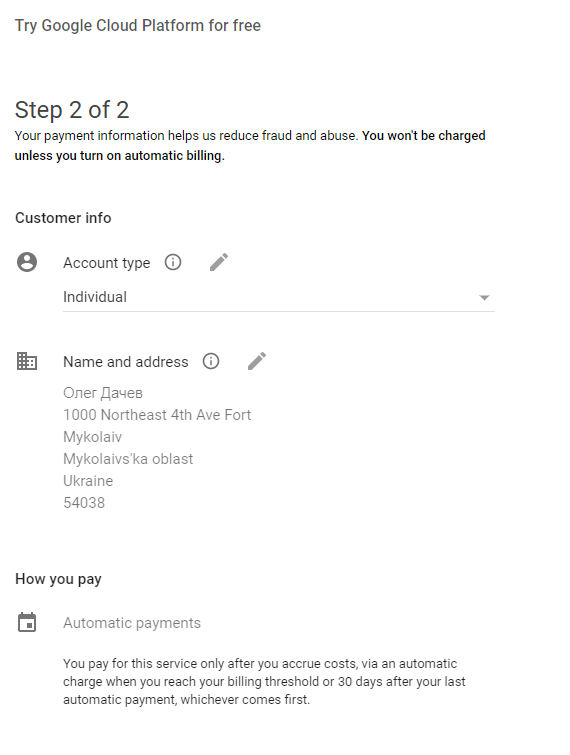
Enter credit card details: number, expiration date, cvv, contact person, phone.
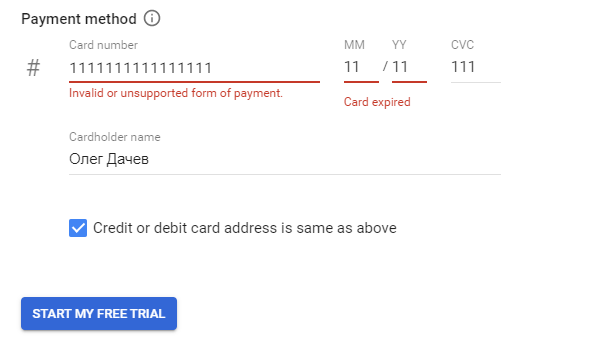
Next, click "Start a free trial period" Google will check the card: it will withdraw $ 1 from it and return it back after a while. When a billing account is connected, free card usage limits are credited to it monthly.
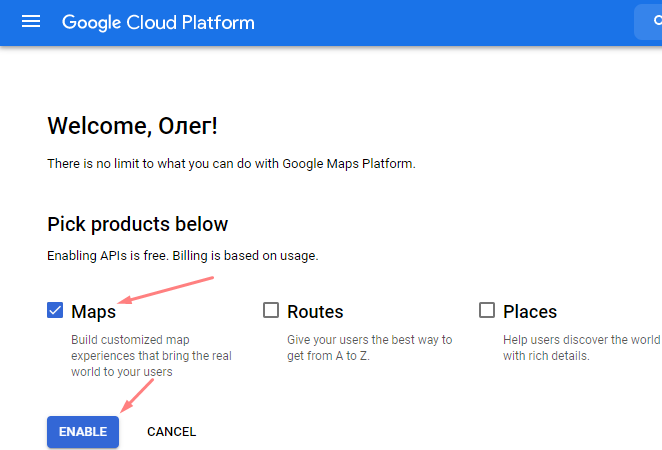
Then select "Maps" and click "Enable".
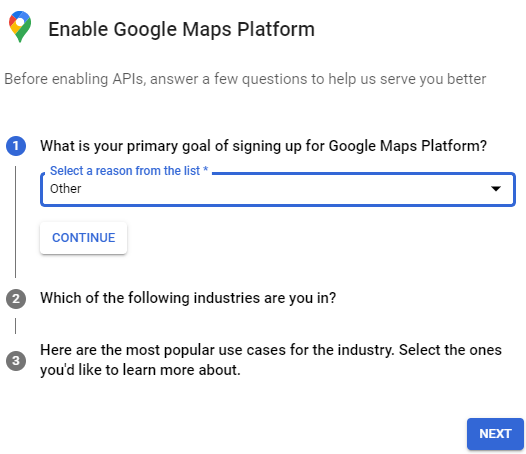
Next, we answer key questions from google and clicks "next".
Next, you will receive an API key, which you need to copy and save for future use.
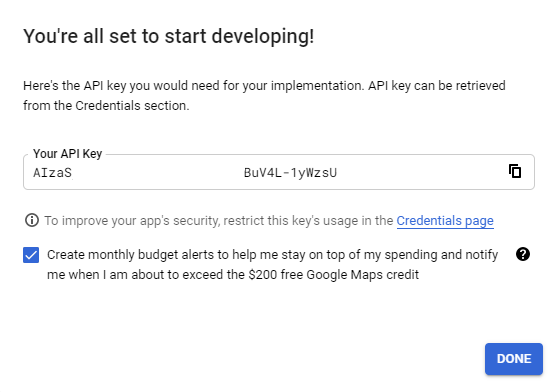
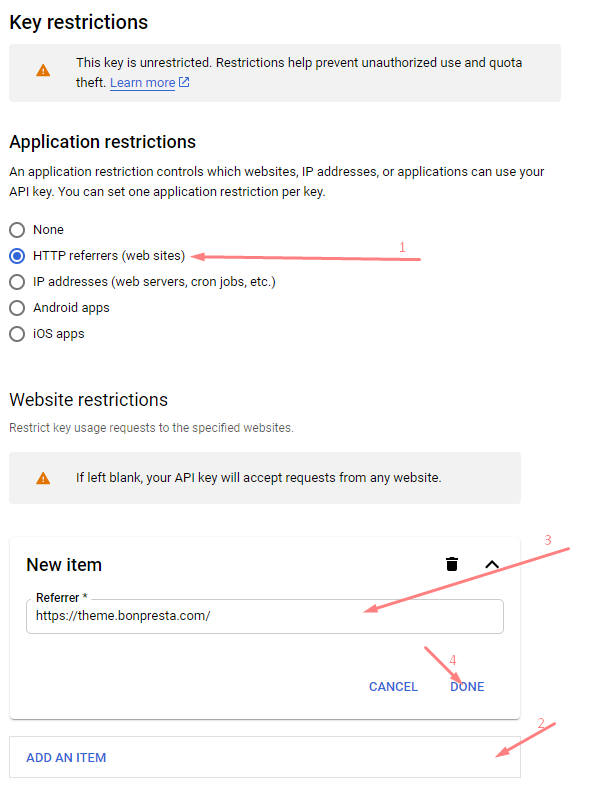
Now you need to enable restrictions for your API key so that your key gets into the hands of third parties and is invalid. Go to the Credentials section and click "Edit API key".

In the tab acceptable type of applications, select HTTP referral sources, and insert your site in the required format, be sure to consider whether your site is accessible via HTTP or HTTPS and WWW subdomain, if necessary, add all variants of domains and subdomains. For example, add a site in the form: https://theme.bonpresta.com/
Note: If the field is left blank, the API key will be available for use with any site.
On the next tab, allowable APIs and select Maps JavaScript API.
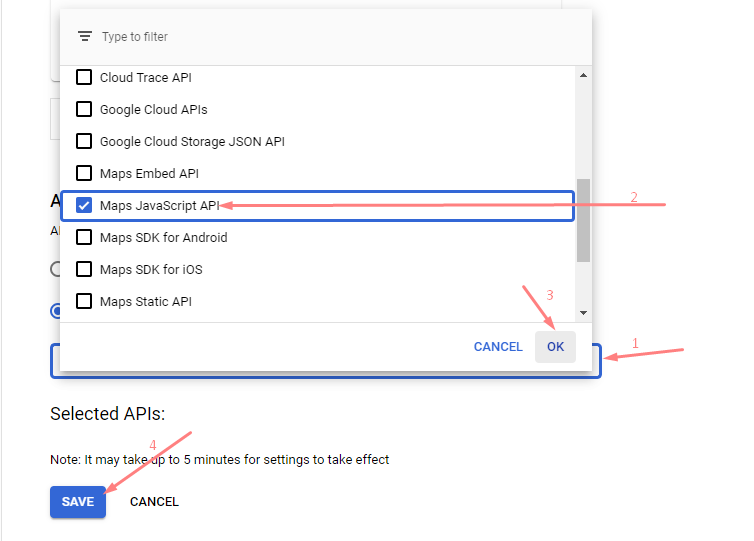
Done, we went through all the steps to get the google key. Now it must be copied and pasted into the field called "Google Key" which is located in the module's configurations.

3.26.2 Module settings
4. Where and how to change "HOT" and "SALE"
To change the position of HOT and SALE which are located in the main menu

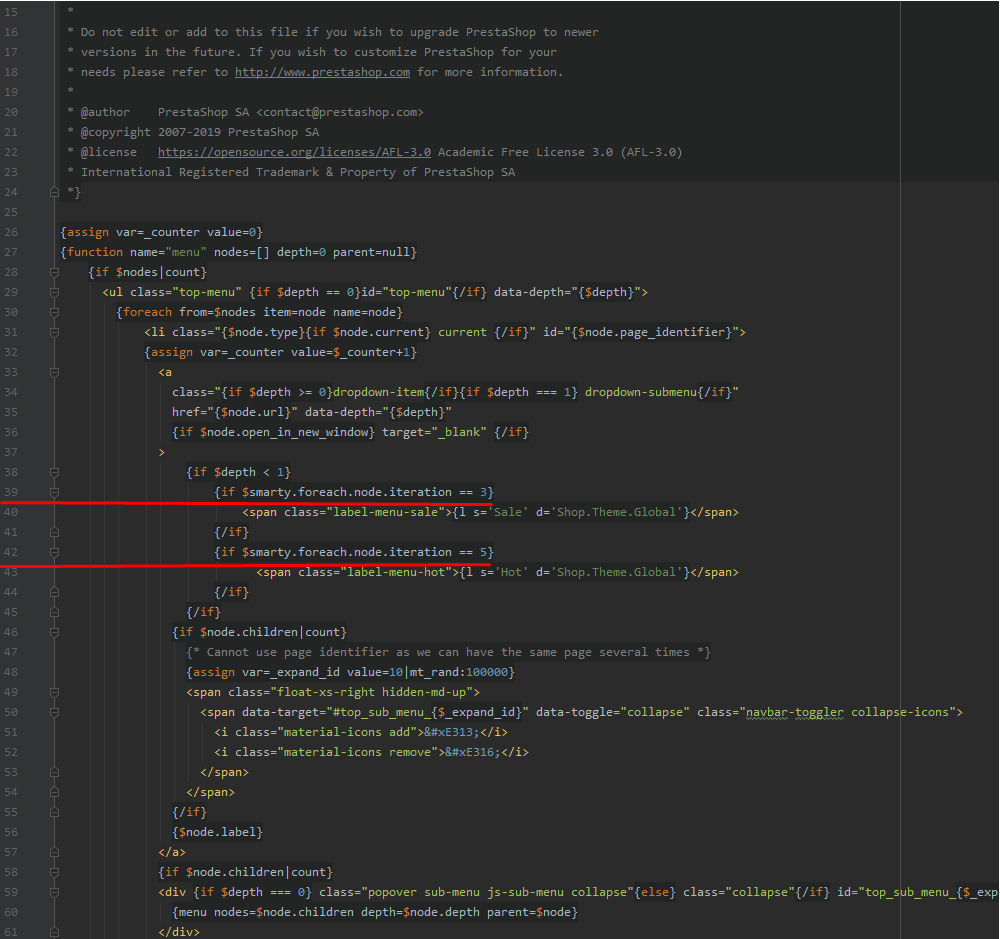
you need to go to your site using FTP to the folder that’s on the following path theme / your theme / modules / ps_mainmenu / open the file ps_mainmenu.tpl

On line 39 and 42, change the value of 4 and 6 to move the labels.

5. Commented out functionality
5.1 Product description
In order for you to enable product features, go to your website via FTP in the themes folder \ your theme \ templates \ catalog \ open the file product.tpl and uncomment the code from 165 to 174 lines and from 205 to 207


5.2 Product list
In order for you to enable product list, go to your website via FTP in the themes folder \ your theme \ templates \ catalog \ open the file product.tpl and uncomment the code from 25 to 41 lines

Once again, thank you so much for purchasing this theme. As I said at the beginning, I"d be glad to help you if you have any questions relating to this theme. No guarantees, but I'll do my best to assist.
6. Seo Settings
6.1 Product description
Microdata helps search engines find content on the site faster and understand it correctly. The introduction of micro-markup is to use tags and attributes, the purpose of which is to structure information.
6.2 Let's look at how to embed the code in the classic theme
First, let's go to the site Structured data validation
We need to check three pages of the site this is the main page category page and product page
Start from the home page
you need to copy the link and paste it into the URL field
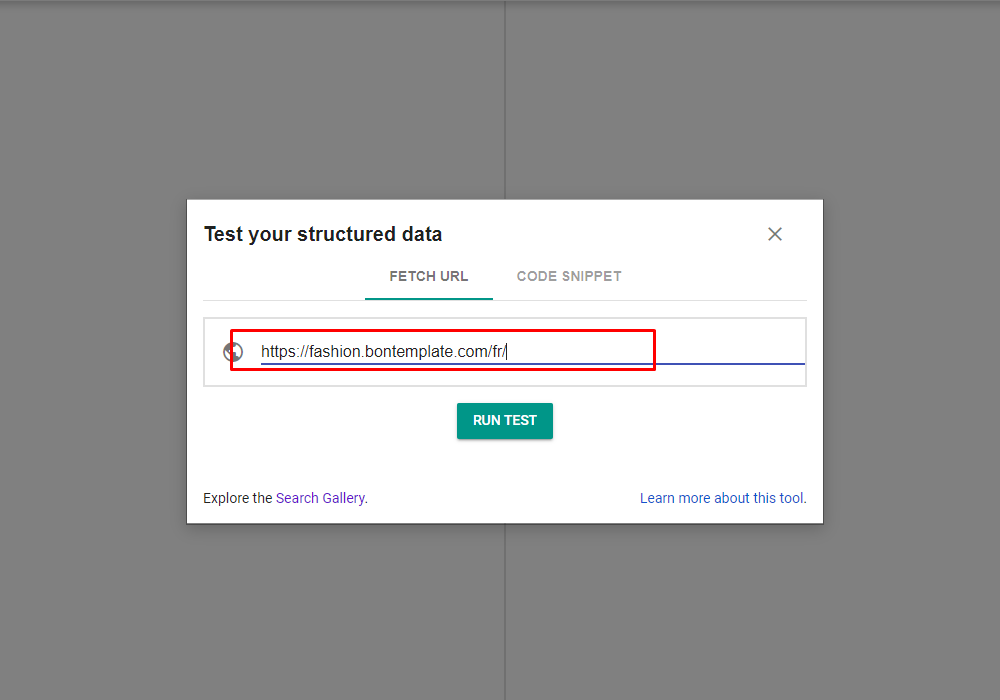
and press to button RUN TEST
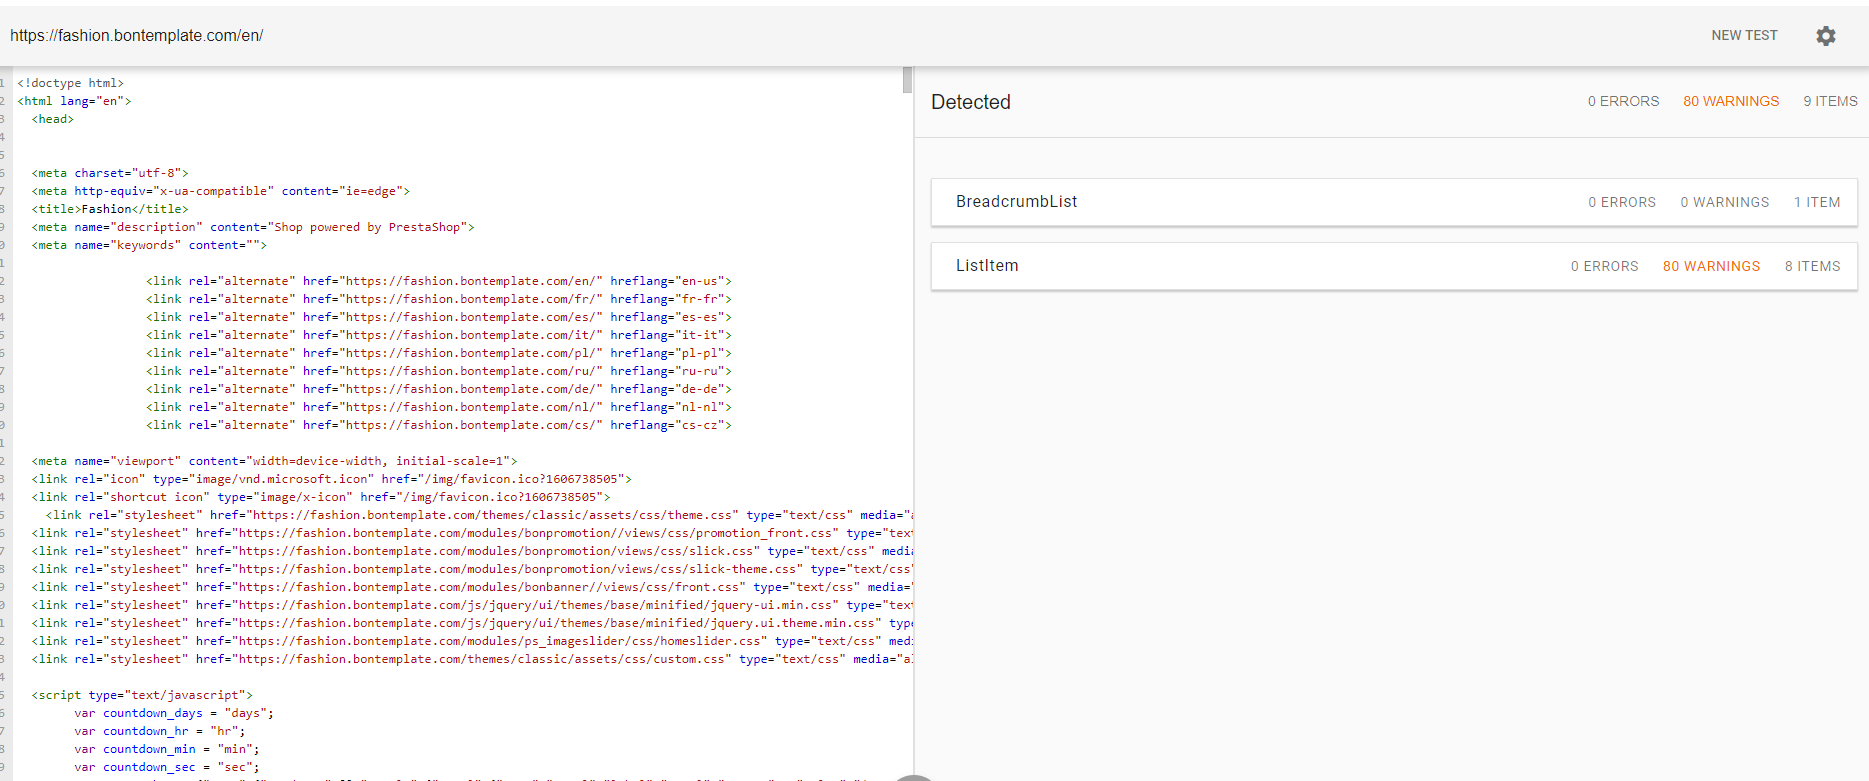
After clicking after a while you will see two columns
in the left column you will have the code of the entire site and on the right, found ERRORS, WARNINGS and ITEMS
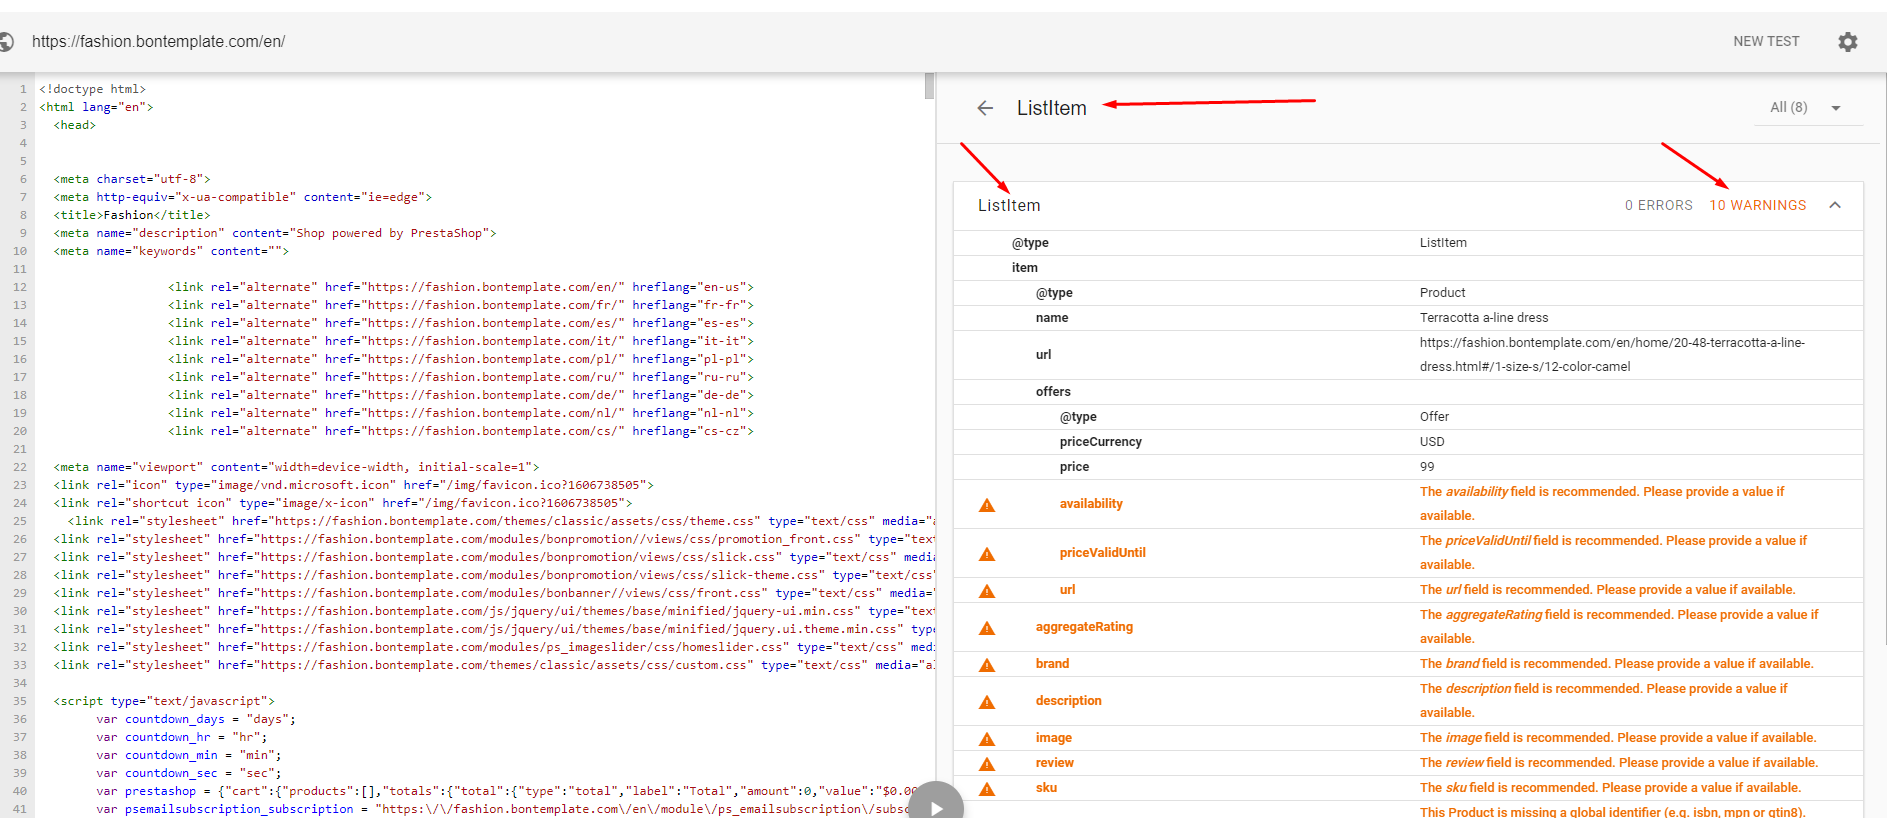
Then you need to click on the product with an error
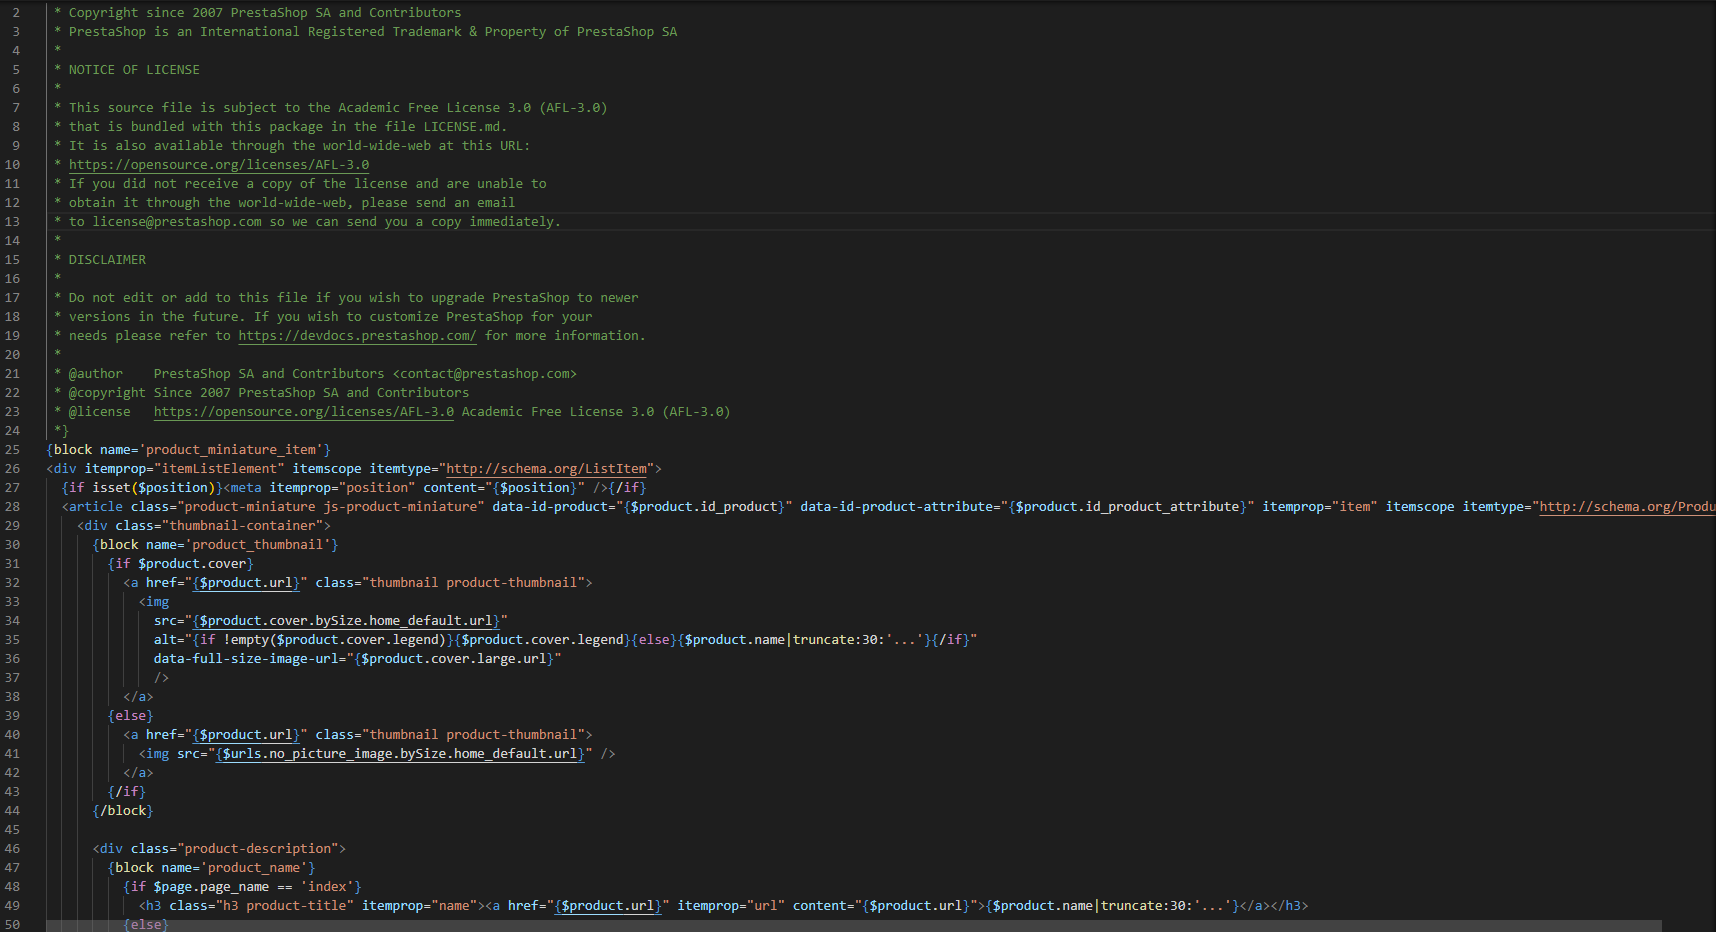
now you need to go through your FTP to the site in the folder themes\classic\templates\catalog\_partials\miniatures\ and open file product.tpl
you will see the code of the product block
and as in the Structured Data Testing Tool we see the first error related to availability ( whether in stock or not )

in the product.tpl file between lines 72 and 73, insert the following code
<link itemprop="availability" href="{$ product.seo_availability}" />
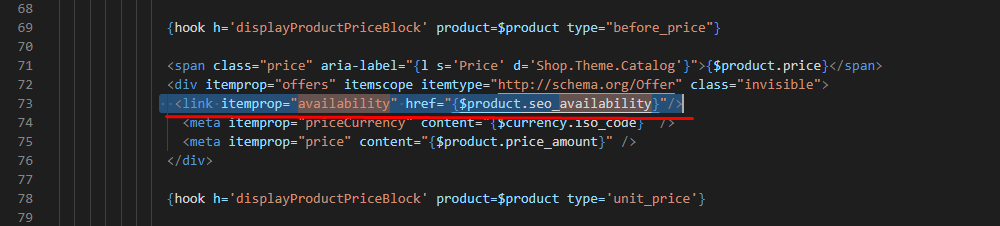
and reload your site page
As you can see this error disappeared, it means that google bot saw the availability meta tag and displayed it
We will continue to correct errors.

now we need to fix priceValidUntil
If you have a promotional item with a discount that ends on a specific day? - Then you would like to fill in this variable
If you have an item with a standard price and you do not know when the price will change - Then you don't need to fill this variable
After you have inserted the code for availability, you need to enter
<meta itemprop="priceValidUntil" content="2029-12-31">
after it

also reload the site page and see if the error is gone
how do we see that the error is gone

then we see the URL error (Item url.)
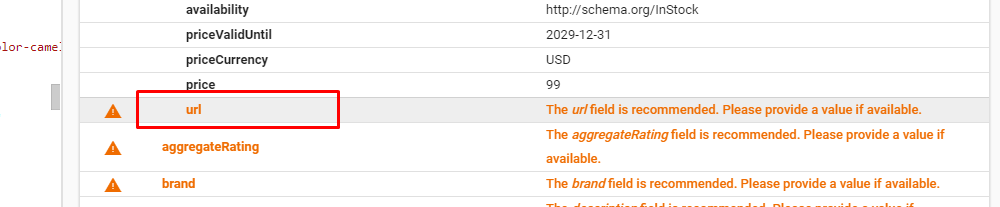
After priceValidUntil, add the code <link itemprop="url" href="{$ product.link}" />
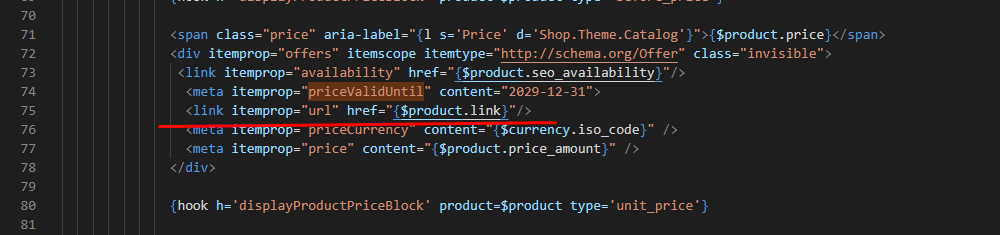
and again reload the site page
how do we see that the error is gone

aggregateRating we will skip for now
We don't have much left
Now you need to fix the error associated with description
-------------------------------------------------------------------------in the same product.tpl file lines 79 add code
<meta itemprop="description" content="{$product.name}"/>
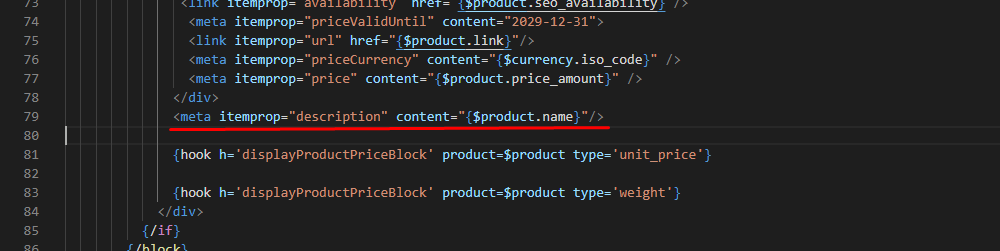
and reload the site page
how do we see that the description error is gone

For how many brands are not used on the main page of the site, we will not indicate it, but if you need it, specify it after the description
<meta itemprop="brand" content="{$product->manufacturer_name|escape:'htmlall':'UTF-8'}"/>
or use a module for this
Next, we will fix the error related to image

To do this, in the same product.tpl file on line 33 in the img tag we need to add itemprop = "image" between lines 36 and 38


To fix the sku and mpn error you need to add in the same product.tpl file
Insert code between lines 28 and 29
<meta itemprop="sku" content="{$product.id_product}" />
<meta itemprop="mpn" content="{$product.reference}" />

But for the reference, you need to specify the value in the back office in the product settings so that the value is used and the error is eliminated


as you can see in the image below, I indicated on the first product mpn (Reference) and there were only 2 errors left, but on 3 products there are one more errors, this is Reference

Bonpresta Team